yom kippur

Chocolate Challah Bread Pudding

I usually don't have leftover challah, even when I make my giant size recipe

But for Yom Kippur I make TWO giant size challahs, one for the pre-fast dinner and one for break-the-fast.

So, for the kids, there's usually a hunk or two left for French toast.

But this year I had bits and pieces left over: crusts from the pieces that went into the French toast (for the kids who don't like crust). And a few pieces of "insides" left from the grownups who picked off some of the crust.

I hate throwing food away, especially something as delicious as challah.

Waste not, want not.

I put all the leftover pieces into a bowl and made it into chocolate bread pudding.

You can't go wrong mixing challah, milk, sugar and chocolate.


Chocolate Challah Pudding

  • 6 ounces semisweet chocolate
  • 12 ounces leftover challah,including crusts, (about 7-8 loosely packed
  •                                                                         cups of small pieces)
  • 3 cups whole or 2% milk
  • 3 large eggs
  • 1-1/4 cups sugar
  • 1-1/2 teaspoons pure vanilla extract

Butter a large, deep baking dish or (8-cup) souffle dish. Preheat the oven to 350 degrees. Melt the chocolate and set it aside to cool. Break the bread into pieces into a bowl. Pour the milk over the bread and let it soak for 6-8 minutes, stirring occasionally so all pieces of bread absorb some milk. In the bowl of an electric mixer set on medium speed, beat the eggs with the sugar for 4-5 minutes or until the mixture is thick and pale. Stir in the vanilla extract. Stir in the melted chocolate. Mix in the bread-milk mixture. Pour the bread mixture into the prepared baking dish. Place the dish inside a larger pan. Add enough water to the outer pan to come up one-inch of the sides of the baking dish. Bake for 50-55 minutes. Remove from the oven and let cool slightly.

Makes 8 servings


Zimtsterne Cookies

When you see the first twinkle of stars in the night sky, the Yom Kippur fast is over.You take your fist sips of that long awaited coffee, and with it …. Zimtsterne.German star cookies. To remind you that we celebrate a new year, new beginnings, bei…

When you see the first twinkle of stars in the night sky, the Yom Kippur fast is over.

You take your fist sips of that long awaited coffee, and with it …. Zimtsterne.

German star cookies. To remind you that we celebrate a new year, new beginnings, being with loved ones. Sweet. Lovely. Gluten-free too.

Zimtsterne

  • 3 large egg whites

  • 1-1/4 cups sugar

  • 1/2 teaspoon salt

  • one pound finely chopped almonds or hazelnuts, approximately

  • 2 teaspoons ground cinnamon

  • 2 teaspoons grated fresh lemon peel

  • confectioners sugar**

Line a cookie sheet with parchment paper. Preheat the oven to 275 degrees.

Beat the egg whites until they stand in soft peaks. Continue to beat the whites, gradually increasing the speed and gradually adding all the sugar and salt, for 6-8 minutes or until they whites stand in glossy, stiff peaks. Remove about 3/4 to one cup of this mixture to a small bowl and set it aside.**

In another bowl, combine the nuts, cinnamon and lemon peel. Fold the nut mixture into the egg white mixture in the bowl until it is uniform in color. Spoon the mixture onto parchment paper and flatten the “dough” sightly. Let stand for about 15 minutes. Place another piece of parchment paper on top. Roll the dough about 1/2-inch thick. Remove the top piece of parchment paper. One at a time, cut out star shapes from the dough (the dough is sticky and difficult to work with). Place each star on the parchment paper on the cookie sheet.

When all the stars are cut, use the reserved sugar mixture and spread on top of each star.  Let rest for 60 minutes.

Bake for about 25-30 minutes.

Makes about 42

**you can skip this meringue coat and bake the cookies uncoated (in this case, do not set aside the 3/4 cup meringue. You might need about 1/2 cup more ground nuts to make the dough less sticky). When they are baked and cooled, mix about 1/2 cup confectioners sugar with enough water to make a paste and use a small spoon to cover the cookies with the sugar paste. Let dry and serve.

Hummus with Dried Chick Peas and Tahini

My dad, who was in the fabric business, always had to be thinking six months ahead. In June, for example, he asked himself what sort of material women would want to buy to sew a dress or skirt the following December. It’s the same in my busines…

My dad, who was in the fabric business, always had to be thinking six months ahead. In June, for example, he asked himself what sort of material women would want to buy to sew a dress or skirt the following December. 

It’s the same in my business, food writing. I’m already testing recipes for Thanksgiving and Hanukkah, even though the sun is brilliant, the leaves are still green and it’s 90 degrees outside.

All this means that I decided on my Break-the-fast menu several weeks ago, even though Yom Yippur doesn’t end until sunset October 4, 2014.

I always serve a new hummus version for this occasion. Hummus is usually the first bite that people eat when they come to my house. And because I work ahead, I’ve already completed all my hummus experiments for the year.

The recipe below, made with dried chick peas, is the winner for this year’s get-together. Dried chick peas give hummus a rounder, richer, nuttier flavor than the kind made with canned beans. The hummus tends to be drier too, so I keep some of the cooking liquid available to stir in at the last minute, just in case.

Don’t be surprised by the addition of a tiny amount of baking soda. It helps soften the chick peas and make the hummus smooth and creamy.      

And by the way, you don’t have to wait until October to make this. Hummus is a treat any old time as a snack, sandwich spread, party dip.

You know.                                                                                                                                  


Hummus with Dried Chick Peas and Tahini

1 cup dried chick peas

1/2 teaspoon baking soda

1/3 cup tahini

6 tablespoons fresh lemon juice

2 tablespoons olive oil

3 cloves garlic

1/2 teaspoon ground cumin

1/2 teaspoon cayenne pepper or to taste

1/2 teaspoon salt

1/2 cup cooking liquid from chick peas, approximately

zatar

cut up pita wedges

Place the chick peas in a bowl, cover them with water and let soak overnight or about 10 hours. Or, place the chick peas in a pot, cover with water, bring to a boil, lower the heat and simmer the peas for 4 minutes. Remove the pan from the heat, cover the pot and let the chick peas soak for 1 hour. Drain the chick peas. Place them in a pot, cover with water (by about one inch), stir in the baking soda, bring the water to a boil, lower the heat and simmer for about one hour or until the chick peas are tender. Drain the chick peas but reserve some of the water. Place the chick peas, tahini, lemon juice, olive oil, garlic, cumin, cayenne and salt in a food processor. Add about 1/4 cup reserved bean liquid and process until well blended. Add more bean liquid depending on desired consistency. Place the hummus in a serving dish and sprinkle with zatar. Serve with cut up pita wedges.

Makes about 1-1/2 cups


Kaniwa Salad with Roasted Tomatoes

If you’ll be fasting for Yom Kippur (or any other holiday or before a medical procedure or diet or for any other reason), it’s good to fill up first on foods like complex carbs and beans, which help you maintain your energy levels and make you feel …

If you’ll be fasting for Yom Kippur (or any other holiday or before a medical procedure or diet or for any other reason), it’s good to fill up first on foods like complex carbs and beans, which help you maintain your energy levels and make you feel fuller, longer (because they take longer to digest).

Also, don’t eat salty foods (they make you too thirsty).

This salad is worth a try. It’s made with kaniwa, which is similar to quinoa only the seeds are even tinier, about the size of poppy seeds. Kaniwa is easier to use than quinoa because the seeds don’t need rinsing (quinoa is coated with natural, but bitter-tasting saponins that must be rinsed off before you cook the seeds). 

But kaniwa, like quinoa, is extremely versatile. You can bulk up this salad with all sorts of ingredients: avocado, celery, scallion, corn, peas, chopped bell pepper. And so on.

Kaniwa Salad with Roasted Tomatoes


1 cup kaniwa

1-1/2 cups halved cherry or grape tomatoes

1/4 cup olive oil

1 cup cut up green string beans

1 15-ounce can white beans, rinsed and drained

1 stalk celery, chopped, optional

1/3 cup pitted cured black or green olives, halved

1 medium avocado, chopped, optional

2 chopped scallions, optional

3-4 tablespoons lemon or lime juice

salt and freshly ground black pepper to taste


Preheat the oven to 400 degrees. Place the kaniwa in a saucepan, cover with 1-3/4 cups water and bring to a boil over high heat. Lower the heat, cover the pan and cook for about 15 minutes until all the water has been absorbed. Place the kaniwa in a bowl and let cool. While the kaniwa is cooling, place the tomatoes in a baking dish and pour about a half tablespoon of olive oil over them. Roll the tomatoes around the dish to coat them, then roast the tomatoes for about 10 minutes or until wilter. Set aside. Cook the green beans in lightly salted water for 6-8 minutes or until crunchy-tender. Drain and add to the kaniwa. Add the roasted tomatoes and any accumulated juices. Add the beans, olives and celery, avocado and scallions, if used, and toss ingredients to distribute them evenly. Pour in the remaining olive oil and toss. Add 3 tablespoons of the lemon or lime juice, sprinkle with salt and pepper to taste. Add more juice if needed. Let rest for 10-15 minutes before serving. Serve at room temperature.


Makes 4-6 servings


Turte

If you follow this blog you know I am not a traditional cook. Most of the time I like to experiment and make new recipes and new versions of old recipes.
But every once in a while when I am feeling nostalgic or I’m too busy or tired.
Or it&#82…

If you follow this blog you know I am not a traditional cook. Most of the time I like to experiment and make new recipes and new versions of old recipes.

But every once in a while when I am feeling nostalgic or I’m too busy or tired.

Or it’s food for a holiday. On holidays I might make some new dishes, but always include the traditional tried-and-true also.

I guess that’s part of the nostalgia thing. But it’s more too. Cooking treasured family recipes is a way of carrying on, of bringing my heritage and memories into the present and, hopefully, into the future.

So, for our annual Yom Kippur Break-the-Fast I am making Turte, a Romanian specialty from my grandma. This dessert is similar to Baklava but made with almonds instead of walnuts and sugar syrup instead of honey.

I never actually did any research about this dessert until recently, when I discovered that it is a specialty particular to the eastern part of Romania called Moldavia (the part where my grandparents were born). And apparently it is a Christmas and Easter dish.

For us, a Yom Kippur Break-the-Fast dish!

There are many versions. You can make it with thin pancakes or thin, homemade pitas. My grandmother made her own strudel dough.

I use packaged phyllo pastry. Much easier.

This is such a rich and wonderful treat, sweet and sticky and crumbly and tender all at once. My family recipe included cinnamon. I added some grated orange peel, which was a refreshing addition.

Turte


1/2 pound phyllo dough

1/2 pound melted butter

cookie or cake crumbs or ground nuts

1-1/2 cups finely chopped almonds

2 tablespoons sugar

2-3 teaspoons freshly grated orange peel

1 teaspoon cinnamon

1/4 teaspoon freshly grated nutmeg


syrup:


3/4 cup sugar

3/4 cup water

1 teaspoon orange flower water or 2 tablespoons orange-flavored brandy or 1/2 teaspoon orange extract


Preheat the oven to 350 degrees. Layer half the phyllo dough in an 8” or 9” square baking pan, brushing melted butter and scattering crumbs between layers. In a bowl, combine the chopped almonds, 2 tablespoons sugar, orange peel, cinnamon and nutmeg. Place the nut mixture over the layers of dough. Cover the nut mixture with the remaining phyllo leaves, separating them as above. Brush the top layer with melted butter. Score the dough with the tip of a sharp knife, into squares or rectangles. Bake for 20 minutes. Raise the heat to 400 degrees and bake for another 15-20 minutes, or until the top is golden brown. Remove from the oven and set aside.

Make the syrup by combining the 3/4 cup sugar and the water in a saucepan. Bring the mixture to a boil, stirring only until sugar dissolves.  Cook at a boil for a few minutes until the liquid has thickened to the consistency of cream. Do not let it become too thick or caramel colored. Remove the pan from the heat and stir in the orange flavoring. Pour the syrup over the warm cake. Let the cake cool and cut it into pieces where you have scored the top.  Makes 8-12 servings


Cream Cheese-Sour Cream Rugelach

Shhhh, don’t tell anyone that I already made these and they are hidden in baggies in my freezer downstairs.Because if my family knows that there are some of these already baked they will take one — just a nibble, just ONE, and then another and …

Shhhh, don’t tell anyone that I already made these and they are hidden in baggies in my freezer downstairs.

Because if my family knows that there are some of these already baked they will take one — just a nibble, just ONE, and then another and then another — straight out of the freezer. Or thawed. Or rewarmed. Any way at all.

Is there anyone who doesn’t love Rugelach?

Well, not in my family.

Which is why they are hidden, because nobody eats just one. It is impossible. And I need them for my annual Yom Kippur Break-the-Fast.   


Cream Cheese-Sour Cream Rugelach

1/2 pound butter

1/2 pound cream cheese

4 cups flour, sifted

3/4 teaspoon salt

1 cup dairy sour cream

filling


Beat the butter and cream cheese together in a mixer at medium speed until smooth and uniform. Add the flour and salt, blend them in slightly, but not completely. Add the sour cream and mix until a soft, smooth uniform dough has formed. Cut the dough into 6 equal pieces. Wrap each piece and refrigerate for 6 hours or until thoroughly firm and cold. Preheat the oven to 375 degrees. Roll each piece of dough on a lightly floured surface about 1/4-inch thick. Spread equal amounts of filling on top. Cut each circle into 8-10 wedges. Roll the wedges from the wide end to the pointy end. Curve slightly to form a crescent. Tuck in the pointy end so it is on the bottom. Place the crescents on an ungreased cookie sheet. Refrigerate them for 30 minutes before baking. Bake for about 30 minutes or until lightly browned. Makes 48-60

NOTE: you may roll each circle jelly-roll style and cut the rolls into Rugelach cylinders.

Chocolate-Raspberry Filling:

6 tablespoons melted butter

1 cup raspberry jam

8 ounces finely chopped chocolate

1/2 chopped finely chopped nuts, optional


Brush each dough circle with some of the melted butter; spread the raspberry jam on top, scatter the chocolate over the jam, scatter the nuts over the chocolate.


Cinnamon-Raisin-Nut Filling:

6 tablespoons melted butter

3/4 cup sugar

1-1/2 teaspoons cinnamon

3/4 cup raisins

1/2 cup finely chopped nuts

Brush each circle with some of the melted butter. Mix the sugar and cinnamon together and sprinkle each circle with equal amounts of the cinnamon sugar. Scatter with raisins and nuts. 


News Times

I read your article today in the news times…wonderful! I wanted to add that I make rugalach all the time and for myself I put splenda instead of sugar on the rolled out dough! For the base I use  a fruit spread or jam sweetened with fruit juice or jam with no sugar, then nuts and raisins. People can not tell the difference, and for our diabetic friends , they LOVE it!

take care,’

Barbara

Hi Barbara

Thanks for this message. I’ve never baked rugelach with Splenda but it’s good to know how delicious it is. So important for people who can’t eat sugar. 

Ronnie

Mandelbrot

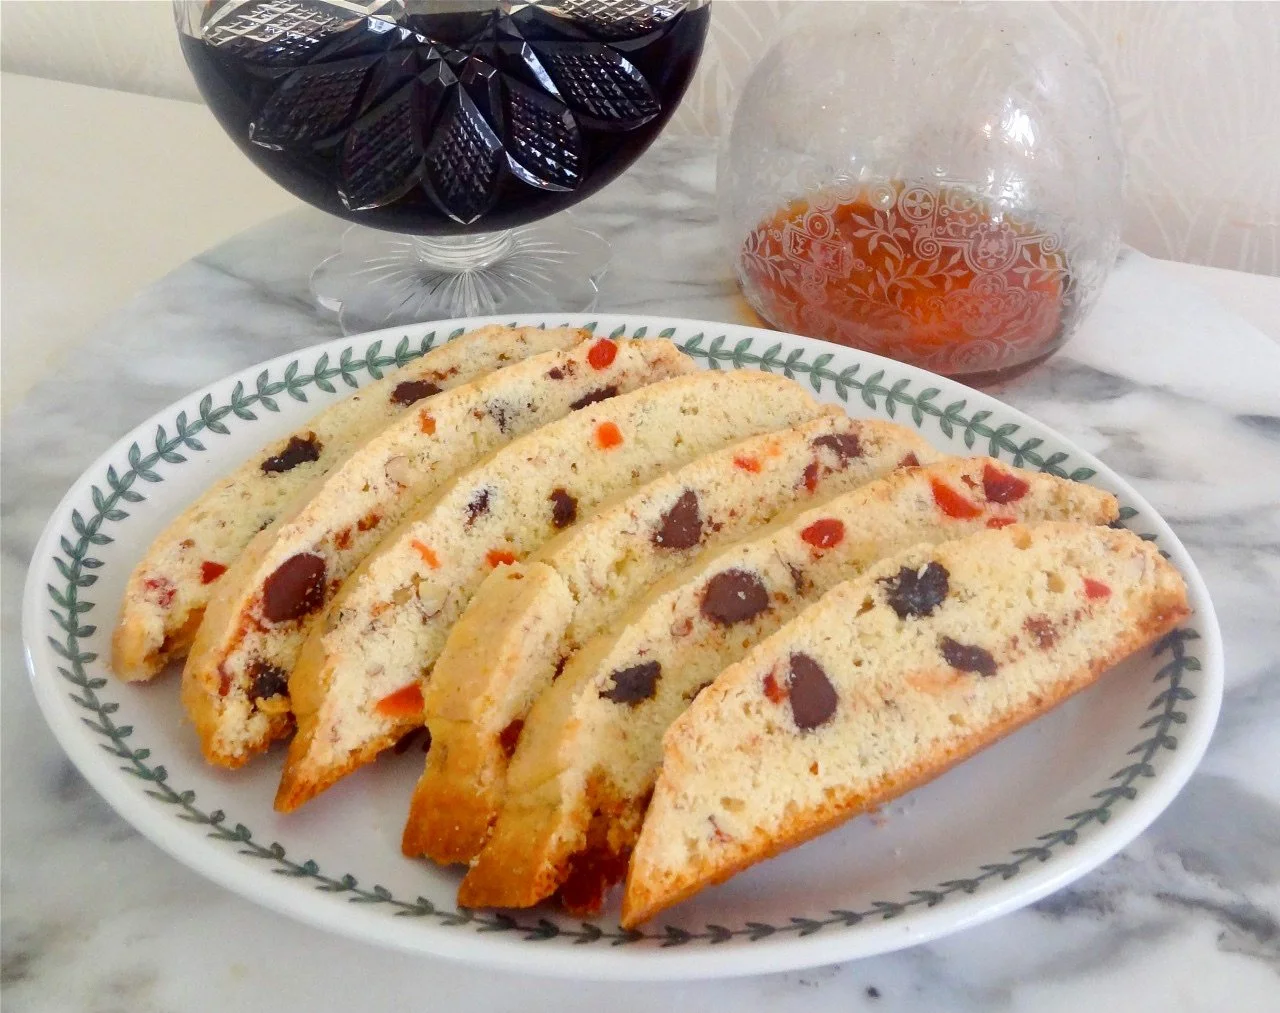
See these slices of Mandelbrot? I offered one to a friend of mine who is Italian-American and he said “I love biscotti. Thanks!”

And of course he was right. Mandelbrot is the Jewish version of biscotti: cookies (or biscuits) that have been baked twice. First you bake the sweet dough in the form of a low cake and when it is finished baking and cools, you slice the loaf and toast the slices until they’re dry and crispy.

In my family we prefer the slices soft, so I serve Mandelbrot after only one baking, which means they actually aren’t exactly bi-scotti. But they are really good. At your house you can do it either way of course.

Mandelbrot (like biscotti) can be plain or be swirled with chocolate or contain chopped nuts and/or fruit. This is our favorite family version. 

It freezes well in case you want to make some in advance.

Mandelbrot

  • 1/2 cup butter or margarine

  • 1 cup sugar

  • 3 large eggs

  • 2-1/2 to 3 cups all-purpose flour

  • 2-1/2 teaspoons baking powder

  • 1 tablespoon brandy or apple juice

  • 1 teaspoon almond extract

  • 1/4 teaspoon salt

  • 1/2 cup chopped nuts

  • 1/3 cup cut up candied cherries

  • 1/3 cup chocolate chips

  • 1/3 cup raisins

Preheat the oven to 350 degrees. Lightly grease a cookie sheet. Cream the butter and sugar together in the bowl of a mixer set at medium speed for about 2 minutes or until creamy and well blended. Add the eggs one at a time, beating after each addition. Add 2-1/2 cups of the flour, baking powder, brandy, almond extract and salt and beat at medium speed until the ingredients are thoroughly blended. Blend in the remaining flour if the pastry is very sticky. Fold in the nuts, cherries, chocolate chips and raisins. On a lightly floured surface, divide the dough into thirds and shape each piece into an oval loaf about 1-1/2 to 2 inches thick. Place the loaves on the cookie sheet. Bake for 25-30 minutes or until the loaves are golden brown. Remove from the oven and let cool. Serve sliced, as is, or toast the slices for extra crispness.

Makes 3 loaves. 

NOTE: sometimes I cut the dough in half, rather than thirds, to make larger loaves/slices. These need a few more minutes of baking time.

Lemony Roasted Asparagus

When in need of a quick, festive side dish, think asparagus. They’re elegant looking and there’s very little you have to do to them. Only the real fat ones need peeling. Wash them off, cut off the fibrous, purplish-white ends and cook th…

When in need of a quick, festive side dish, think asparagus. They’re elegant looking and there’s very little you have to do to them. Only the real fat ones need peeling. Wash them off, cut off the fibrous, purplish-white ends and cook them. Either steam, poach or roast them. It takes just minutes, depending on thickness.

Here’s one of my favorites, to be served tonight with my pre-fast dinner.

Lemony Roasted Asparagus

1 pound mediun thick asparagus

1 tablespoon olive oil

1 clove garlic, finely chopped

1 teaspoon grated fresh lemon peel

salt and freshly ground black pepper

2 tablespoons lemon juice

Preheat the oven to 450 degrees. Trim the ends from the asparagus, wash and dry them and place on a cookie sheet. Drizzle with the olive oil and scatter the garlic and lemon peel on top. Sprinkle with salt and pepper, then roll the asparagus to coat them on all sides with the other ingredients. Roast for 10-15 minutes, depending on thickness, or until tender. Sprinkle with the lemon juice. Serve hot or at room temperature. Makes 4-6 servings

The Kugel to End all Kugels

This is the kugel to end all kugels.I mean it. I am a kugel-eating expert, if only because when I grew up my grandmother and mom made salty kugel stuffed with mushrooms and onions and it was only when I was grown, married and with kids that I had my…

This is the kugel to end all kugels.

I mean it. I am a kugel-eating expert, if only because when I grew up my grandmother and mom made salty kugel stuffed with mushrooms and onions and it was only when I was grown, married and with kids that I had my first taste of this. That taste was a transforming moment.

My friend Susan brought this dish to my annual Break-the-fast (she got the recipe from her friend Linda and I don’t know where Linda got it).

For years after that I have tasted more kugels than you could possibly imagine (including those hard, dried up things they sell in some supermarkets) always trying to surpass that moment of culinary discovery. 

I was even a judge once in a kugel contest.

I have made some wonderful kugels since then. But this is still my favorite. I always ask Susan to make an extra one so there will be leftovers. I pack pieces of it in my freezer so I can have a little treat whenever.

Don’t even think about the calories. Just enjoy.


Susan/Linda’s Sweet Noodle Kugel

      1 12-ounce package egg noodles

      1 8-ounce package cream cheese at room temperature

      1/4 pound unsalted butter at room temperature

      1 cup sugar

      2 cups dairy sour cream

      6 large eggs

      1 teaspoon cinnamon

      1 cup raisins, optional

      2 cups crushed frosted flakes or corn flakes

      4 tablespoons melted butter

Preheat the oven to 350 degrees. Cook the noodles in slightly salted water until al dente (not soft). Drain and set aside. In an electric mixer, beat the cream cheese and butter until thoroughly blended and softened. Beat in the sugar until well blended. Add the sour cream and blend thoroughly. Add the eggs one at a time, beating after each addition. Stir in the cinnamon and raisins, if used. Pour the mixture into the noodles and toss to coat them completely. Place in a baking dish. Combine the frosted flakes and melted butter and sprinkle on top of the noodles. Bake for about 40 minutes or until the top is crispy. 

Makes 8 servings