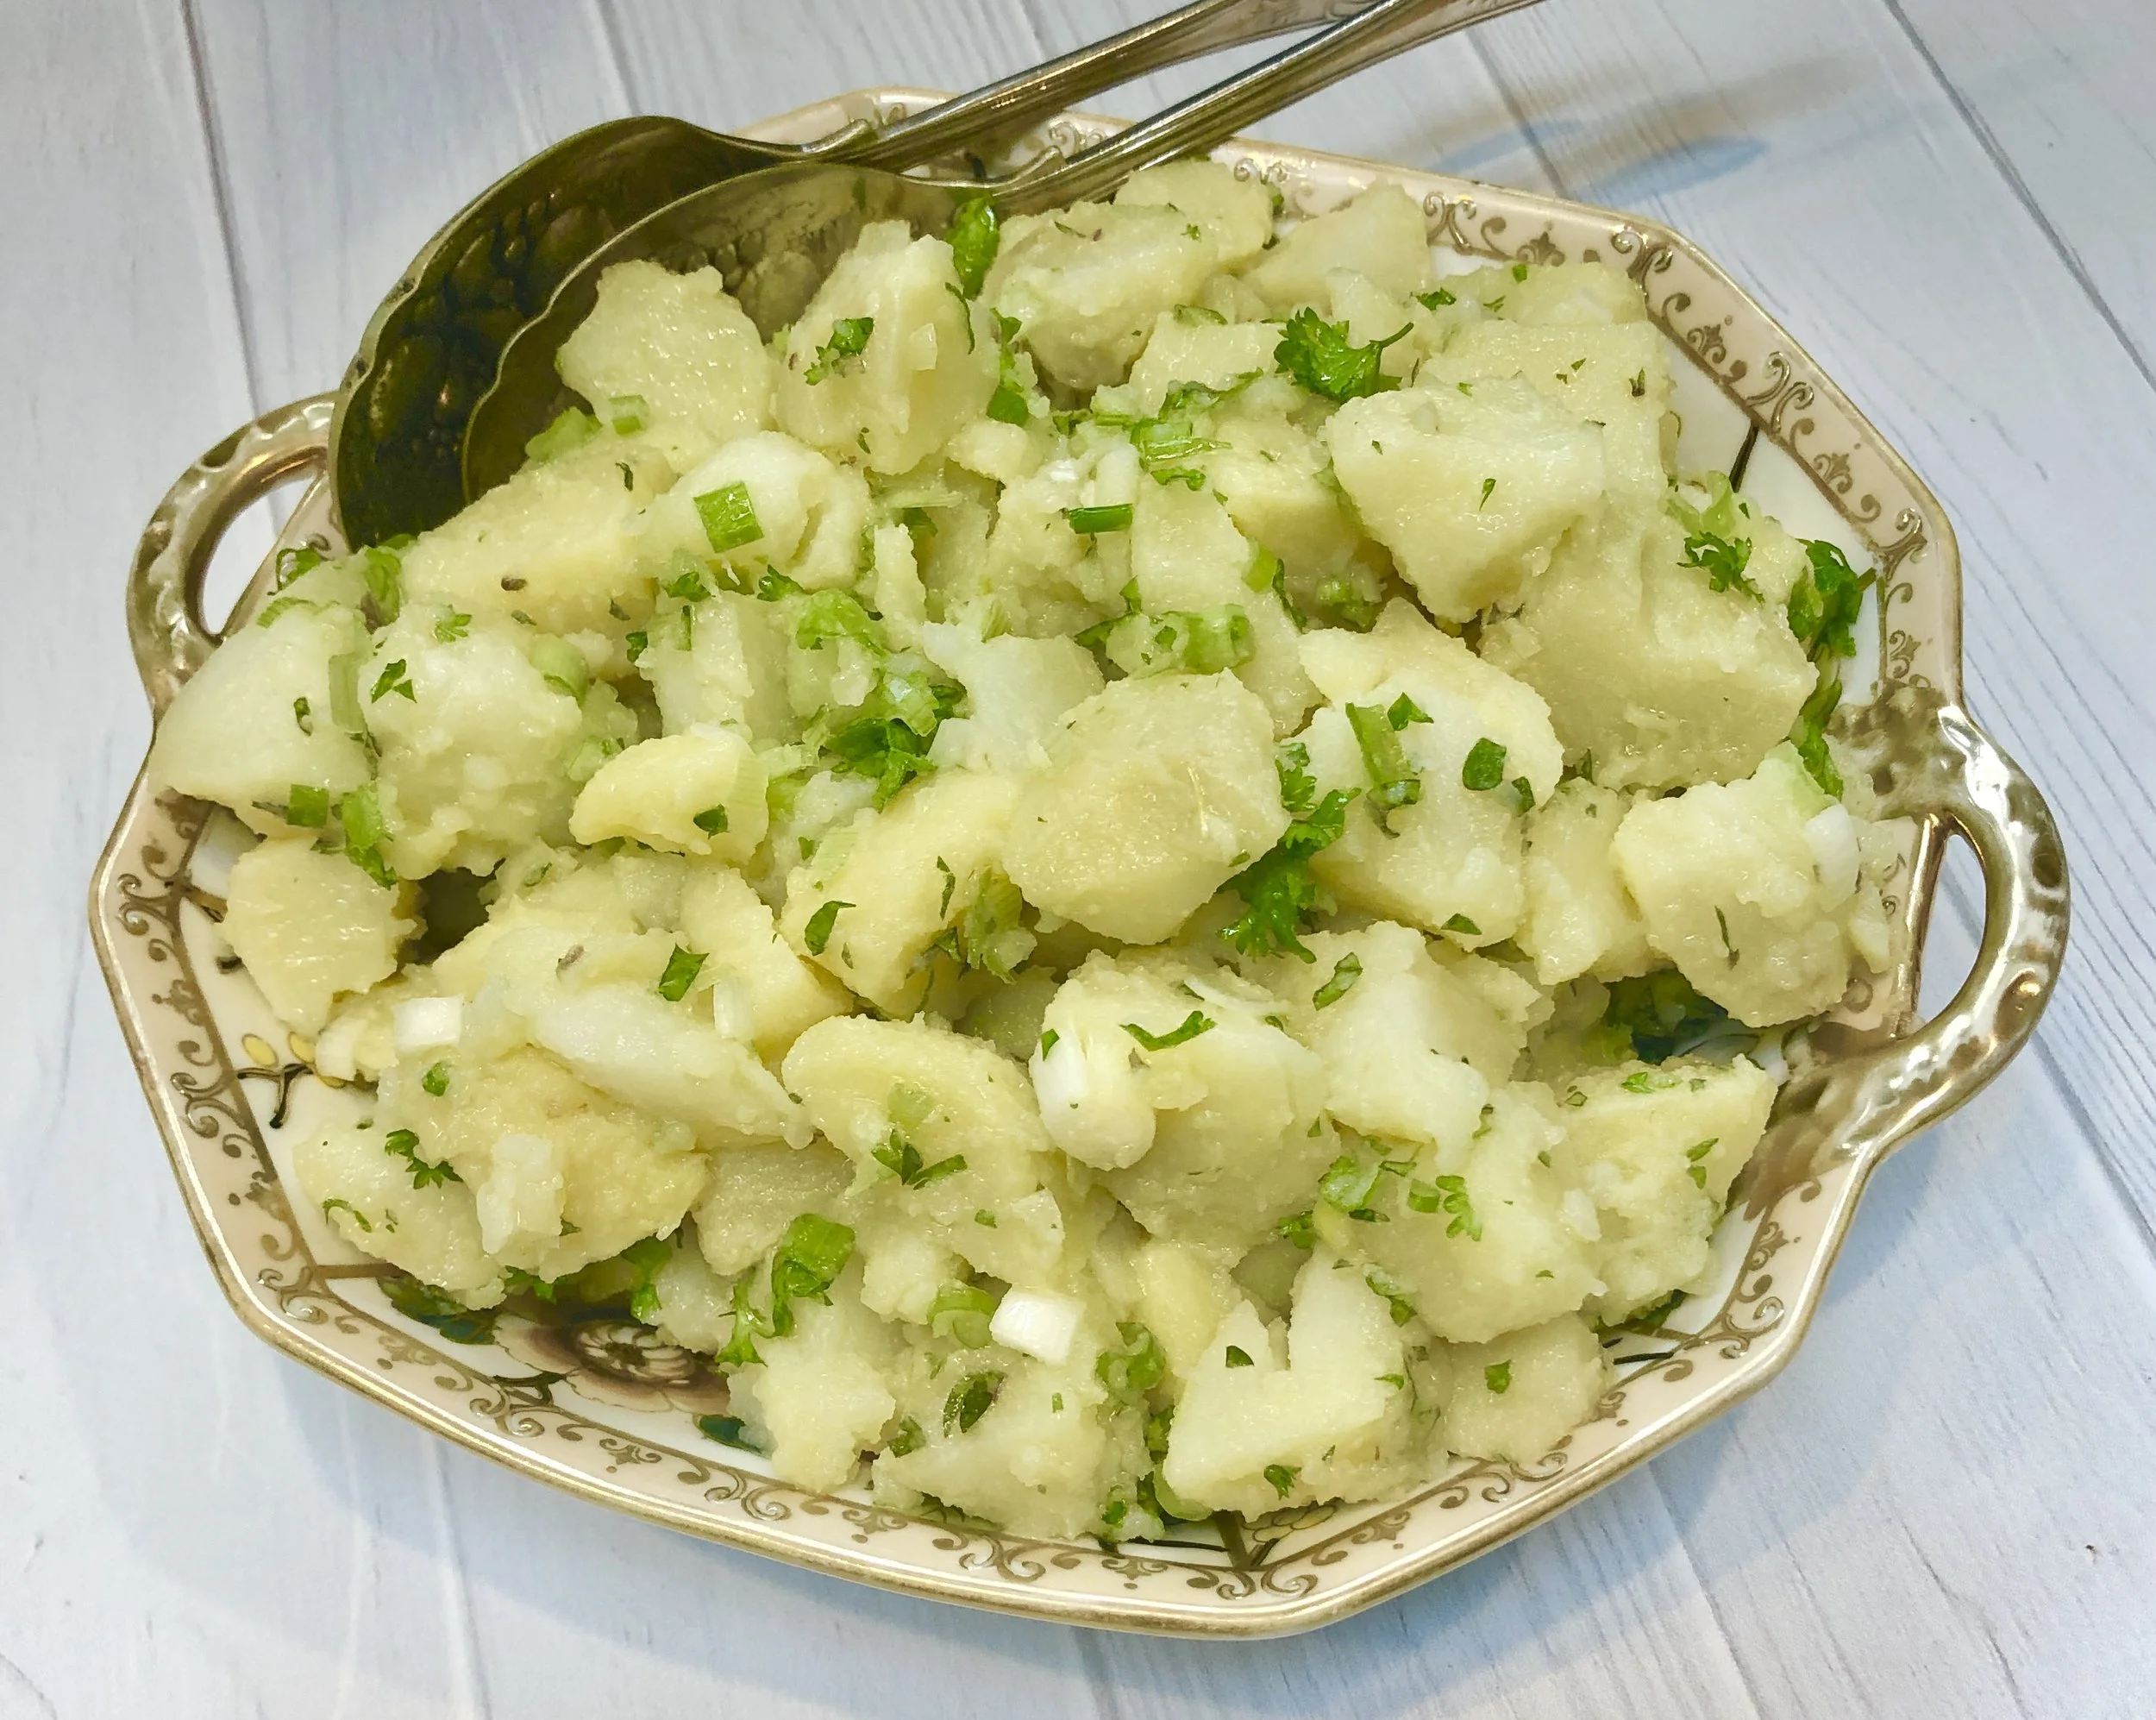
brunch

Matzo Polenta

Many years ago I decided to develop a Passover version of polenta — what my grandma called mamaliga — using matzo meal instead of corn meal.

The plain, version was beyond awful. My daughter said it tasted like a box.

But (never one to waste food) I mixed in some golden brown fried onions, celery and mushrooms, let the mixture chill inside a loaf pan, and when it was cold, I cut the loaf into slices and fried them until they were hot and crispy.

Perfection! A delicious side dish during Passover.

MATZO MEAL “POLENTA” CRISPS

  • 2 tablespoons olive oil

  • 1 medium onion, chopped

  • 1 large stalk celery, chopped

  • 2 cups chopped mushrooms

  • 2 tablespoons chopped fresh parsley

  • 1 tablespoon chopped fresh mixed herbs such as dill, basil, rosemary, thyme

  • 2 cups vegetable or chicken stock

  • 1 cup water

  • 1 cup matzo meal

  • salt and freshly ground black pepper to taste

  • 1/2 cup grated Fontina cheese, optional

  • vegetable oil and/or butter for frying

Lightly grease a 9”x5”x3” loaf pan. Heat the olive oil in a saute pan over medium heat. Add the onion and celery and cook, stirring occasionally, for 3-4 minutes or until softened. Add the mushrooms, parsley and herbs and and cook for another 3-4 minutes or until all the liquid has evaporated from the pan. Set aside to cool slightly. Bring the stock and water to a boil in a large saucepan. Whisk constantly as you gradually add the matzo meal and cook for about 2-3 minutes or until the mixture is thick. Reduce the heat to low and cook, stirring occasionally for another 3-4 minutes or until the mixture is very thick. Stir in the vegetable mixture and season to taste with salt and pepper. Mix in the cheese of used. Spoon the mixture into the prepared loaf pan. Refrigerate until cold, at least one hour. Unmold the loaf onto a cutting board and cut into 3/4-inch slices. Heat the vegetable oil and/or butter in a saute pan over medium heat. Cook the slices a few at a time, for 2-4 minutes per side, or until crispy. Makes 6-8 servings

Stuffed Peppers

Stuffed Peppers

Historians tell us that Queen Esther, hero of Purim, was a vegetarian. Rice-and-veggie stuffed peppers is a delicious way to honor that remarkable woman, who was successful in preventing the annihilation of the Jews in ancient Persia.

My grandmother made a similar dish. I don’t have her recipe but have been experimenting with the ingredients for years and this is the closest I’ve come to the dish I remember her serving when I was a child.

Stuffed Peppers

  • 8 bell peppers

  • 1 cup rice

  • 2 tablespoons currants or raisins

  • 5 tablespoons olive oil

  • 2 medium onions, chopped

  • 2 tablespoons pine nuts, optional

  • salt and freshly ground black pepper to taste

  • 1 large tomato, chopped

  • 2 teaspoons sugar

  • 1 teaspoon ground allspice

  • 1-3/4 cups vegetable stock

  • 2 tablespoons chopped fresh parsley

  • 2 tablespoons chopped fresh dill

  • 1 tablespoon chopped fresh mint

  • 2 tablespoons lemon juice


Place the peppers in a deep bowl and pour boiling water over them. Weight them down to keep them under the water. Let rest for 5 minutes. Drain and repeat the process with cold water. Cut a lid from the top of the peppers, but reserve the lids. Scoop out and discard the seeds and membranes. Set the peppers aside. Place the rice and currants in a bowl and pour boiling water over them. Let rest for 30 minutes. Drain. Heat the olive oil in a sauté pan over medium heat. Add the onions and pine nuts, if used, and cook, stirring occasionally, for 4-5 minutes or until the onion has softened and is slightly golden. Add the rice and currants and some salt and pepper to taste. Cook for another 1-2 minutes, stirring occasionally. Add the tomato, sugar and allspice and cook for another minute, stirring occasionally. Add the stock, bring to a boil, cover the pan and lower the heat. Cook for 18-20 minutes or until the rice is soft and all the liquid has been absorbed. Remove the pan from the heat. Stir in the parsley, dill, mint and lemon juice. Let cool. Use to fill the peppers. Place lids on top. (You may prepare to this point and cook later). Preheat the oven to 350 degrees. Place the peppers in a baking dish. Add 2 cups of water to the dish. Bake the peppers for 40 minutes. Let cool slightly before serving (warm or at room temperature).

Makes 8 servings

Mom's Corn Fritters

Mom’s Corn Fritters

Today is Shrove Tuesday, a Christian holiday, the day before Lent, when it has been traditional to eat pancakes. So it’s also known as Pancake Tuesday. I like that! Anyone can relate to pancakes! And enjoy a day feasting on some! Especially if the pancakes are my Mom’s Corn Fritters. Crispy on the outside, soft and puffy within and loaded with corn. For breakfast, lunch or dinner. With a little (lot?) real maple syrup.

CORN FRITTERS

2 tablespoons butter
1 large egg
1 cup milk
2 cups cooked corn kernels
1-1/4 cups all-purpose flour
1 tablespoon baking powder
1 teaspoon sugar
1-1/4 teaspoons salt (or to taste
butter for frying
maple syrup, optional


Melt the butter and set it aside to cool. In a bowl, beat the egg and milk together. Stir in the cooled melted butter and the corn kernels. In a second bowl, mix the flour, baking powder, sugar and salt; add this to the corn mixture and stir ingredients gently to blend them together. Heat a small amount of butter in a saute pan over medium heat (about 2 teaspoons). When the butter has melted and looks foamy, spoon the corn batter by the 1/4-cupful into the pan, leaving some space between each one. Cook for about 2 minutes or until the bottom has browned. Flip the pancakes and cook for another 1-2 minutes or until the second side is brown. Use more butter in the pan as needed. Serve with maple syrup if desired.

Makes 6-8 servings

Shakshuka

Lately, Ed and I have not been in the mood for a meat meal, so I make pasta or pizza or a big salad and such. These days it’s really easy (also delicious) to put together a tasty vegetarian dinner. One of our favorites is Shakshuka - originally a North African dish but popular everywhere now. I season it differently from time to time (there’s a good recipe for Indian style Shakshuka right here on my website). But this one is my old standby. It’s seasoned with basil, which I realize is not traditional in North Africa or anywhere in the Middle East. But we like it this way. We also prefer a thick, chunky tomato base rather than a more sauce-like version that’s typical of restaurant Shakshuka that we’ve tried. Here it is; it’s a nice dinner but also a feast of a weekend breakfast.

SHAKSHUKA

  • 1/4 cup olive oil

  • 1 medium onion, chopped

  • 1 red bell pepper, deseeded and chopped

  • 2 small habanero or other chili peppers, deseeded and finely chopped

  • 1 large clove garlic, finely chopped

  • 6-8 plum tomatoes, chopped

  • 1 tablespoon chopped fresh basil

  • 1 tablespoon lemon juice

  • 8 large eggs

  • 3/4 teaspoon zatar

Heat the olive oil in a large sauté pan over medium heat. Add the onion, bell pepper, and habanero peppers. Cook for 4–5 minutes or until softened slightly. Add the garlic and cook briefly. Add the tomatoes, basil and lemon juice, stir, cover the pan, turn the heat to low and cook for 8–10 minutes, stirring occasionally, or until vegetables are very soft. Crack the eggs into a small bowl one at a time then transfer each one next to the other over the vegetables. Cover the pan and cook for 4–5 minutes or until the eggs are set but yolks are still slightly runny. Sprinkle with zatar. Serve each person 2 eggs and some of the vegetables.

Makes 4 servings

Blueberry Buttermilk/Yogurt Muffin

It’s not exactly blueberry season here. In fact it’s gloomy and a big rain and windstorm is likely. And I do have some blueberries that aren’t exactly perfect summer blueberries. So I decided to use them to make some blueberry muffins, which are exactly perfect and also cheerful looking enough to brighten my morning.

I usually have buttermilk in my house because I like to bake with it. I also have a canister of buttermilk powder just in case….. however, if you don’t have buttermilk you can use plain kefir or yogurt (stir it to loosen it a bit) or use 1 tablespoon lemon juice plus enough milk to equal one cup and let it stand for 5 minutes. 

Brighten your day with these:

BLUEBERRY MUFFINS

  • 4 tablespoons butter

  • 1-3/4 cups all-purpose flour

  • 1/4 cup sugar

  • 1-1/2 teaspoons baking powder

  • 1/2 teaspoon baking soda

  • 3/4 teaspoon salt

  • 1 tablespoon grated fresh orange zest

  • 1 cup buttermilk or 1-1/4 cups plain yogurt, stirred

  • 1 large egg

  • 3/4 teaspoon vanilla extract

  • 1 cup fresh blueberries

Preheat the oven to 400 degrees. Place 10 muffin liners inside a muffin pan or lightly grease the hollows. Melt the butter and set it aside. In a bowl mix the flour, sugar, baking powder, baking soda, salt and orange zest. In a second bowl, mix the buttermilk, egg and vanilla extract. Pour the liquid ingredients plus the melted butter into the flour mixture and stir only to blend ingredients (do not mix vigorously). Fold in the berries. Drop the batter in equal amounts into the prepared muffin tin cups (the number will depend on the size of the muffins) to about 2/3 filled. Bake for 22-26 minutes, depending on size, or until a cake tester inserted into the center comes out clean.

Makes 10

Spinach Pie

Every Hanukkah in our family, we retell the story of Judith, who played a major role in the Maccabees’ victory some 2000 years ago. According to the story, Judith visited Holofernes, a general in the enemy camp; he fell in love with her and asked her to dine with him.

During the meal Judith gave him great quantities of cheese, which made him very thirsty! To quench his thirst he drank so much wine that he fell asleep and Judith cut off his head with his own sword.

Thus was she able to get word to the Maccabees about the best time to strike.

Note: there are dozens of artworks depicting the event, including this well-known painting which hangs in the Uffizi gallery.

Since that fateful victory we have been making merry every year with an 8 day Hanukkah celebration.

Our celebrations are known to include latkes!

But did you know that the first “traditional” Hanukkah ingredient was cheese!

And that’s because of Judith.

Long ago it was Cheese Latkes that Jewish cooks prepared for Hanukkah.

But so many people couldn’t afford cheese so they substituted potato. Not bad, that.

Still. I always serve something made with cheese, every Hanukkah.

This year, how about this Cheese-loaded Spinach Pie to to remember the brave, intrepid Judith?

Cheese Loaded Spinach PIE

  •  1 tablespoon butter

  • 1/4 cup chopped red onion

  • 6 ounces fresh spinach

  • 1 partially baked 9-inch pie crust

  • 3-4 ounces grated Swiss cheese

  • 4 large eggs

  • 2 cups half and half cream

  • salt and pepper to taste

Preheat the oven to 375 degrees. Heat the butter in a sauté pan over medium heat. When the butter has melted and looks foamy, add the red onion and cook for 1-2 minutes to soften it slightly. Add the spinach and cook for another 2-3 minutes or until the spinach is completely wilted. If there is liquid in the pan, continue to cook until the spinach is dry (alternatively, place in a strainer and press out the excess liquid). Place the spinach inside the partially baked pie crust. Sprinkle the cheese on top. Beat the eggs and cream together with salt and pepper to taste. Pour over the ingredients in the pie crust. Bake for 40-45 minutes or until golden brown and set.

Makes 6-8 servings

Zucchini Latkes with Cheese

Anyone who knows me knows that the humble potato is my favorite food, so of course I am going to make potato latkes for Hanukkah!

But, ya know …. it’s a long, delicious holiday, so there’s time for zucchini latkes too. The recipe here includes cheese, because on Hanukkah I like to prepare food with cheese in honor of Judith, heroine of Hanukkah! You can read about it here.

Of course you can make these latkes without the cheese. They’re delicious either way.

Zucchini Latkes with Cheese

  • 2 medium zucchini (10-12 ounces each)

  • 1/2 teaspoon salt

  • 1/2 cup chopped red onion

  • 1/2 cup crumbled feta cheese

  • 2 large eggs

  • 1/2 cup plain bread crumbs, approximately (Matzo meal also fine)

  • vegetable oil for frying

Shred the zucchini in a food processor (or grate by hand). Place the shreds in a bowl, sprinkle with salt, toss the shreds and let rest for 10-12 minutes. Squeeze the shreds to extract as much liquid as possible. Return the shreds to the bowl. Add the onion, cheese and eggs and mix the ingredients. Add the bread crumbs and mix thoroughly. If the mixture seems too loose or soft, add another tablespoon or two (different bread crumbs absorb liquid/moisture differently). Heat about 1/8-inch vegetable oil in a large sauté pan over medium-high heat. Spoon portions of the mixture into the pan to make latkes about 2-inches in diameter. Leave some space between each one. Cook for 2-3 minutes per side or until crispy and golden brown. Remove to paper towels to drain. Repeat with the remaining zucchini mixture. Serve with dairy sour cream or plain yogurt or mashed avocado.

Makes about 12

Moroccan-Spiced Vegetable Kugel

Back in September I posted a recipe for a dish (Couscous with Seven Vegetables) that is traditional on Rosh Hashanah among the Jews of North Africa. We love the dish so much that I made it several times, changing the spices a bit each time. Then, one time, I decided to use the same vegetables and seasonings but instead of serving them over couscous, mix them into a kugel.

It worked perfectly!

Of course the texture of kugel vs braised vegetables over couscous is quite different. But the flavors are reminiscent of each other and just as delicious, either way.

This is a good side dish for Thanksgiving. First, it goes so well with turkey. It’s a good choice for any vegetarians who might be at your table. and also, you can make it in advance

Moroccan-Spiced Vegetable Kugel 

  • 2 tablespoons olive oil

  • 1 small onion, sliced

  • 1 clove garlic, finely chopped

  • 1/2 teaspoon chopped fresh ginger

  • 1 carrot, peeled and cut into 1/2-inch slices

  • 1 medium tomato, cut into chunks

  • 1 small parsnip, peeled and cut in 1/2-inch slices, optional

  • 1/2 cup cut up bite sized butternut squash

  • 1/2 teaspoon ras al hanout (or use 1/4 teaspoon harissa plus 1/8 teaspoon each of ground ginger, turmeric and cinnamon)

  • 3/4 cup vegetable stock

  • 1 cup diced zucchini

  • 1/4 red bell pepper, cut into bite sized chunks

  • 1/2 cup raisins

  • 1/2 cup canned chickpeas, rinsed and drained

  • Salt to taste

  • 12 ounces egg noodles

  • 3 eggs

Preheat the oven to 375F. Heat the olive oil in sautepan over medium heat. Add the onion and cook, stirring often, for about 4 minutes or until softened and beginning to brown. Add the garlic and ginger and cook for a minute. Add the carrot, tomato, parsnip and squash and stir the ingredients. Stir in the ras al hanout. Add the stock, bring to a boil, reduce the heat to medium low and cook for about 15 minutes. Add the zucchini, bell pepper, raisins and chickpeas. Cook for about 10 minutes more, or until vegetables are tender. Add salt to taste. Cook the noodles according to the manufacturer’s directions. Spoon the vegetables and pan fluids into the noodles and mix to distribute the ingredients evenly. Beat the eggs and mix them in. Place inside a baking dish and bake for about 35-40 minutes or until the top is crispy.

Makes 4 dinner servings, 8 side dish servings

Pizza with Garden Fresh Tomatoes

I’d never tasted pizza with fresh baby arugula before a recent trip to Rome, where my granddaughter ordered one for us for lunch. EUREKA! I have found it! I’ve now made this several times and it has become my go-to pizza. Here’s how:

Pizza with Baby Arugula: preheat the oven to 450F. If you have a pizza stone, preheat for an hour. Roll out pizza dough on parchment paper to 12” then spoon about 3/4 cup ricotta cheese evenly over the surface. Leave about 1/2-inch perimeter. Top with tomato slices, then some shredded mozzarella cheese. Sprinkle with a few drops of olive oil. Slide the pizza on top of the pizza stone or use a baking sheet. Bake for 15-20 minutes or until the crust is golden brown and the cheese is bubbly and beginning to brown. While the pizza is baking, wash and dry some baby arugula, then toss with a small amount of olive oil. When the pizza is ready, top it with the arugula, slice and serve. Makes one pizza. #pizza #pizzalover #pizzawitharugula #arugulapizza #cheesepizza

Fig, Cheese and Caramelized Onion Pizza

Can you tell I bought a truckload of fresh figs this week?

This is my third recipe so far — I can’t resist fresh figs when I first see them in the market. So, we’ve had two versions of salad (with figs of course) and one pizza — I’ve made this pizza numerous times since I first posted about it last year.

One of us, as usual, added some fresh arugula on top and one of passed on that.

Fig, Caramelized Onion and Cheese Pizza

  • 2 tablespoons olive oil

  • 1 large onion, sliced

  • 1 tablespoon Balsamic vinegar

  • cornmeal

  • about 15 ounces of pizza dough

  • 3/4 cup ricotta cheese

  • 5-6 fresh figs, cut into quarters

  • 2/3 cup mozzarella cheese

  • 2 tablespoons Parmesan cheese (or 1/3-1/2 cup crumbled blue type cheese)

  • arugula, optional

  • Balsamic vinegar, optional

Preheat the oven to 450F. Preheat a pizza stone if you have one. Heat the olive oil in a saute pan over low-medium heat. Add the onions and cook for 15-18 minutes, stirring frequently or until the onions and beginning to turn golden. Add the Balsamic vinegar, stir and cook another 10 minutes or until the onions are soft, well glazed and golden brown. Set aside. Place some cornmeal on a board or on parchment paper and stretch/roll the dough into a circle (Mine was 12-inches but you can make it 11-13-inches depending on how thick you like the crust.) Spoon the ricotta cheese evenly over the dough surface, leaving about 1/2-inch at the edge. Cover the ricotta cheese with the onions. Top with the quartered figs, placing them evenly round the surface. Scatter the mozzarella cheese over the top, then the Parmesan or blue cheese. If you have a pizza stone transfer the pizza to the stone using a pizza peel; or, transfer to a large baking sheet with the parchment paper underneath. Bake for 15-20 minutes or until the crust is crispy and browned to taste and the cheese is melted and bubbly.

Makes one large pizza