vegan

Cole Slaw with Beet Greens

I bought the freshest, most gorgeous beets recently and used the bulbs for some recipes, but — what to do with the greens?

The greens were also crisp and perfect, as if they were just harvested.

However, Ed hates beet greens. I’ve cooked them any number of ways to no avail.

Truth to tell, beet greens are not my favorite either.

But I hate wasting food.

So I shredded the greens, shredded some cabbage, mixed them all together and made them into Cole Slaw.

PERFECT!

Not only did the beet greens add some flavor, they also provided a lovely color, which I usually get from parsley — but I didn’t have parsley, so it all worked out deliciously.

Cole Slaw with Beet Greens

  • 1/2 medium green cabbage, shredded

  • 2 cups shredded red cabbage

  • 1 bunch beet greens, shredded

  • 2 medium carrots, grated

  • 3/4 cup mayonnaise

  • 5 tablespoons apple cider vinegar

  • 1 teaspoon Dijon mustard

  • 1 teaspoon sugar

Place the cabbages, beet greens and carrots in a large bowl and toss to distribute the ingredients evenly. In a bowl, whisk the mayonnaise, vinegar, mustard and sugar together and pour over the vegetables. Toss the ingredients and let rest for at least 15 minutes before serving.

Makes 8 servings


Roasted Pineapple Salad with Avocado, Arugula and Greens

We eat salads throughout the year but have them much more often when the weather gets warm. Frequently I’ll toss together some greens, dress them with vinaigrette and it’s done.

But — in the summer, when the tomatoes are good, I’ll add one (or a few baby tomatoes).

If I have a ripe avocado, that gets thrown in.

Leftover veggies, occasionally.

Croutons, sometimes.

You get the picture right?

Salads are among the most versatile and flexible of recipes.

So, this week, when I went to prepare a salad for dinner I opened the fridge to find the remnants of a cut up pineapple. And I decided to use them in the place of croutons. Same look — cut-up cubes — but I roasted and caramelized the pieces (thanks to a bit of honey or maple syrup) and this addition of lightly sweet, roasted fruit, took the salad into a completely new, different and delicious direction. Sweet (pineapple), creamy (avocado), bitter (arugula) all in balance.

When we finished I realized that I could also have added a few roasted cashews.

Next time.

Roasted Pineapple Salad with Avocado, Arugula and Greens

  • 2 cups cut up bite size pineapple chunks

  • 1 tablespoon honey or maple syrup

  • 2 cups packed cut up salad greens (about 3 ounces)

  • 1 cup packed baby arugula (about 1-1/2 ounces)

  • 1 peeled avocado, cut into bite size pieces

  • 1/4 cup chopped red onion

  • 2 tablespoons olive oil

  • 2 tablespoons white wine vinegar or apple cider vinegar

  • Aleppo pepper or freshly ground black pepper

Preheat the oven to 475 degrees F. Line a baking sheet with parchment paper. Place the pineapple on the baking sheet. Pour the honey or maple syrup over the fruit, toss and roast for about 20 minutes, turning the pieces once or twice, or until they are lightly browned. Remove from the oven and let cool. When cool, place in a bowl. Add the salad greens, arugula, avocado and red onion and toss the ingredients. Pour in the olive oil and toss the ingredients. Pour in the vinegar and toss. Season to taste with Aleppo pepper or freshly ground black pepper.

Makes 4-6 servings

Roasted Vegetables

I make roasted vegetables all the time, with different combinations of veggies and seasonings. It’s such a useful dish. A good side dish for sure, but also:

  • nice over polenta/mamaliga for a substantial vegetarian dinner

  • cooked, then covered with shredded mozzarella cheese and baked until the cheese bubbles and melts

  • placed on a pizza crust and topped with cheese (as above)

  • topped with a fried egg

  • served at room temperature as a salad (drizzled with olive oil and wine vinegar or Balsamic vinegar)

and so on ….

Roasted Vegetables

  • 12-16 baby potatoes

  • 1 large onion, peeled

  • 1 medium eggplant

  • 1 sweet red bell pepper, deseeded

  • 1 medium zucchini

  • 8 ounces mushrooms

  • 5 tablespoons olive oil

  • 3 cloves garlic, chopped

  • salt and pepper

  • 3 tablespoons mixed finely chopped fresh parsley and/or herbs such as thyme, basil, marjoram, rosemary, etc.

  • Balsamic vinegar or lemon juice, optional

Preheat the oven to 400F. Wash and drain the vegetables. Slice the potatoes 1/8-inch thick. Cut the onion, eggplant, red pepper, zucchini and mushrooms into chunks. Place all the vegetables in a single layer inside a large roasting pan. Pour olive oil over vegetables and toss to coat them. Sprinkle with garlic, salt and pepper and herbs. Toss to coat the vegetables evenly. Place the vegetables in the oven. Turn the heat down to 350F and roast the vegetables for about 50 minutes, stirring them occasionally. Serve hot or at room temperature. Serve plain or sprinkled with Balsamic vinegar or lemon juice. 

Makes 8 servings


Roasted Brussels Sprouts with Pumpkin Seed Oil

I’ve done some reading about the health benefits (or potential health benefits) of pumpkin seed oil. It can (maybe) slow down hair loss. It is good (maybe) for your skin, for eye health and heart health.

But really, I got a bottle of the stuff in a fancy condiment store, so I was more interested in how and what I could cook with it.

It has an unmistakable roasted-pumpkin seed-nutty flavor. It’s expensive too.

On the other hand, a small amoiunt can make all the difference to salad dressing, on top of roasted vegetables, into vegetable or hearty meat soup and so on.

One of the best recipes I’ve tried: roasted Brussels Sprouts with a dressing that includes a bit of pumpkin seed oil. Think this dish for Sukkot or Thanksgiving.

Roasted Brussels Sprouts with Pumpkin Seed Oil

  • 2 dozen medium-large Brussels sprouts (about one pound)

  • 3 tablespoons olive oil

  • 2 thick scallions, chopped

  • 1 large clove garlic, finely chopped

  • 1/4 teaspoon Aleppo pepper (or crushed red pepper; or use a sprinkle of ground cayenne pepper)

  • salt

  • 1-1/2 tablespoons pumpkin seed oil

Preheat the oven to 400 degreesF. Wash the Brussels sprouts, then cut them in half (if very large, cut into quarters). Place them on a baking sheet. Pour the olive oil over the sprouts and toss the vegetable to coat all surfaces. Scatter the scallion and garlic over the sprouts. Sprinkle with Aleppo pepper and salt to taste. Roast for about 20 minutes, turning the sprouts once or twice, or until the vegetable is browned and there are some crispy leaves. Remove from the oven, spoon into a serving dish and drizzle the pumpkin seed oil over the sprouts.

Makes 4 servings

Roasted Cauliflower with Tomatoes and Green Olives

A colorful side dish always makes dinner more special and festive no matter what you’re serving as an entree.

I love the colors in this dish — I’ve made it with different veggies on different occasions but this combo seemed the prettiest to me (black olives work too though). And the olives add a surprisingly tasty tang. It’s perfect for Shabbat dinner

Bonus: if you have any leftovers you can sprinkle them with vinaigrette for a lovely salad. Add cooked potato or hard cooked egg if you have some.

ROASTED CAULIFLOWER WITH Tomatoes and Green Olives

  • 4 cups bite sized cauliflower florets

  • 4 tablespoons olive oil

  • kosher salt or sea salt

  • 2 dozen halved cherry tomatoes

  • 10-12 green pitted olives

  • 2 tablespoons chopped chives or green scallion tops

Preheat the oven to 400 degrees. Line a cookie sheet with parchment paper. Place the cauliflower pieces on the parchment and sprinkle with 3 tablespoons of the olive oil. Toss the pieces to coat them evenly with the olive oil. Sprinkle with salt. Roast for about 20 minutes, tossing the pieces once during that time, or until lightly browned. Sprinkle the tomatoes and olives with the remaining olive oil and add them to the cauliflower. Toss the ingredients and roast for another another 10 minutes. Sprinkle with chives and serve.

Makes 4 servings

Honey-Balsamic Glazed Brussels Sprouts

I remember when my husband said he wouldn’t eat Brussels sprouts. Now he’s a big fan and we eat them at least once a week. My kids like them. The grandkids like them.

This simple recipe with just a touch of Balsamic vinegar and honey and a sprinkle of orange peel works wonders to balance what former Brussie-haters thought of as bitter tasting.

Honey-Balsamic Glazed Brussels Sprouts

  • 1 pound Brussels Sprouts

  • 2 tablespoons olive oil

  • salt to taste

  • 1 tablespoon Balsamic vinegar

  • 1 tablespoon honey (or maple syrup)

  • 1 teaspoon finely grated fresh orange peel

Preheat the oven to 375 degrees. Line a baking sheet with parchment paper. Trim the Brussels Sprouts, cut them in half, then wash them. Pat them dry with paper towels. Place the vegetables on the baking sheet. Pour the olive oil over the vegetables and toss to coat them. Sprinkle with salt to taste. Bake for about 12-15 minutes, tossing the ingredients once. Mix the vinegar, honey and orange peel, pour over the vegetables, toss and bake for another 10 minutes or until the Brussels Sprouts are tender.

 Makes 4 servings


Potlagela

fullsizeoutput_ad10.jpeg

I know I am not alone in in thinking I want “my old life back” —— seeing my kids and grandkids, giving them a hug. Seeing family and friends without having to sit at least six feet away, always outside. Going out for dinner. Going to the opera.

All that.

I’ve managed to find ways that help me through this stressful time. One of them is making foods that remind me of “the good old days.”

So I’ve baked some Apple Brown Bettys, because they remind me of my parents (z”l), who once lived nearby. It was my Dad’s favorite dessert, my Mom made it often and there was always some left for me when I’d visit, at least twice a week. (Apple Brown Betty is also good for socially distanced company because you can bake the ingredients in individual ramekins.)

Almond Crusted Chicken Nuggets have been on my menu recently because they remind me of my very special cousin and lifelong friend, Leslie. She and her husband Neil spend every New Year’s weekend with us and I always serve these for hors d’oeuvre. (Another winner for social distancing!)

There’s always a reason to make my grandma’s award-winning challah, so that’s nothing new in my house.

BUT, my other grandma used to make potlagela, a Romanian specialty. I hated this dish when I was a youngster but last year, when I grew my own eggplants, I decided to give her recipe a try and realized how delicious this dish is. That revelation also brought back some terrific memories.

SO, here it is. My Grandma Hoffman’s version of Potlagela. She used vegetable oil, but I prefer olive oil. Either will work. She also cooked her eggplant right on top of the cooktop burner, so if you have a gas burner, you can do it that way too. OR, you can cook it on an outdoor grill, which I’ve done many times.

This dip is so perfect for summer. Especially perfect for eating outdoors socially distanced because you can serve it in separate bowls for other people.

Serve with pita or bagel chips.

Potlagela

  • 1 large eggplant

  • 1-2 scallions or one shallot or small onion

  • 1 clove garlic, finely chopped

  • 1 tomato, chopped, optional

  • 2 tablespoons olive oil

  • 2 tablespoons lemon juice

  • salt and freshly ground black pepper to taste

  • parsley

Preheat the oven to 425 degrees. Wash the surface of the eggplant, then wipe it dry. Coat the surface with a thin film of olive oil. Prick the skin in a few places with the tines of a fork. Place the eggplant on a baking sheet and roast for about 25 minutes, turning the eggplant once or twice during the cooking. Remove the eggplant from the oven. When the eggplant is cool enough to handle, remove the skin and stem and place the flesh in a bowl. Mash the eggplant with the back of a fork. Add the scallion, garlic, optional tomato and olive oil and mix the ingredients to distribute them evenly. Add the lemon juice and mix again. Season to taste with salt and pepper; sprinkle with some parsley.

Makes 4 servings

Matbucha

fullsizeoutput_a219.jpeg

Spring has sprung and for me, that means more salad.

So I got to thinking about that word salad, which I realize means so many things that I was never able to fit all of my salad recipes into a file folder simply marked “salad.” I had to sub-categorize them into files such as “grain salads,” “tomato salads,” “fruit salads” and so on.

Over the years I’ve made salads of all sorts. Some based mostly on greens and some that had no greens at all.

I’ve made beet salads, dinner salads, fish salads and quinoa salads.

I could go on. But really, there is no one way to describe “salad,” even though a dictionary might say something like “a mixture of raw and cooked vegetables served with dressing.”

No.

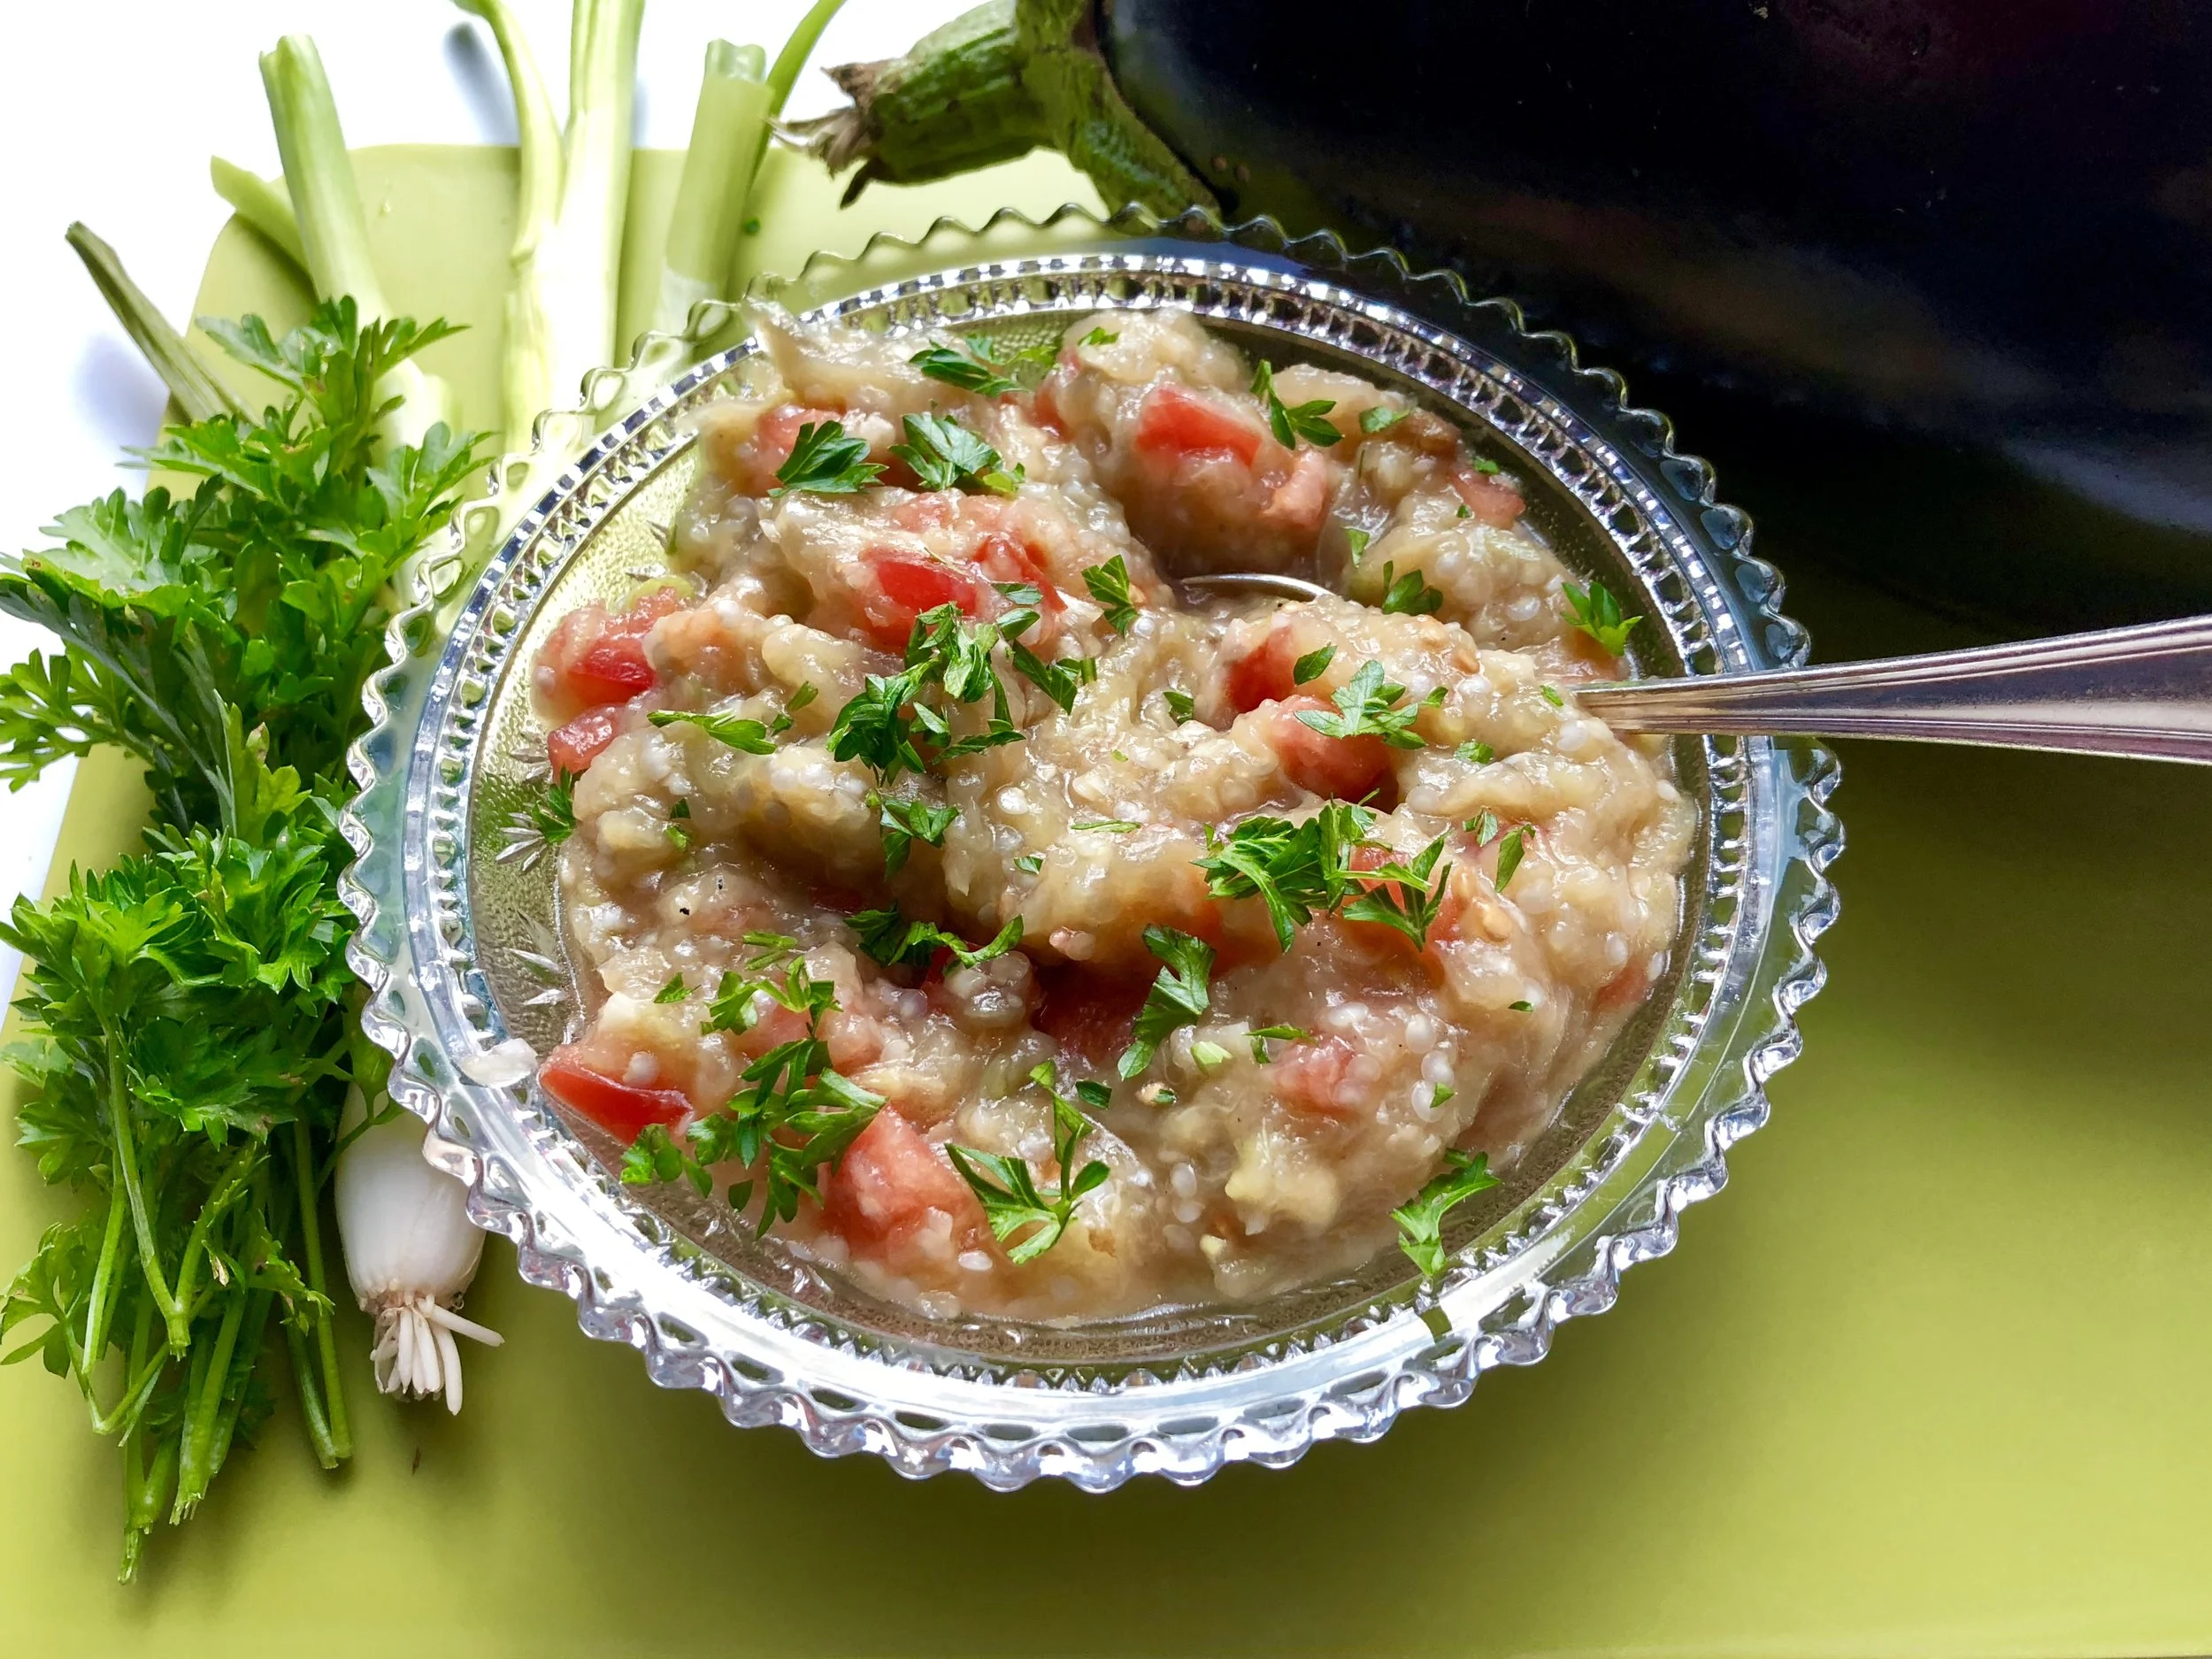
Because recently I prepared some Matbucha, which is an entirely different salad category.

Matbucha is a “salade cuit” — that is, “cooked salad.” In fact the word Matbucha, is an Arabic word that means “cooked salad".”

Cooked salad may seem odd to Western thinking except for the fact that most of us actually eat lots of cooked salads, such as potato salad and egg salad too. We just don’t think of them as “cooked salads,” but that’s what they are.

Matbucha is a Moroccan dish, especially popular in the Moroccan Jewish community, which was once large and thriving in North Africa. When good numbers of Moroccan Jews migrated to Israel, they brought their love of this dish with them and it is now wildly popular in Israel too.

For good reason: Matbucha is vibrantly tasty, easy to cook and is ideal for Shabbat because, even though it’s cooked, you can serve it at room temperature. Use it as a salad course or as a side dish with dinner. I’ve always served it with hors d’oeuvre, as a topping for crackers or pita wedges (it works well with other Middle Eastern nibbles and dips such as hummus, raheb, baba ghanoush and so on).

You can make Matbucha 3-4 days ahead. That’s handy isn’t it?

Matbucha

  • 2 large red bell peppers

  • 3 tablespoons olive oil

  • 1 serrano pepper, deseeded and chopped

  • 2 large cloves garlic, finely chopped

  • 6 medium tomatoes peeled and finely chopped

  • 1-1/2 teaspoons paprika

  • 1 teaspoon sugar

  • 1/2 teaspoon salt or to taste

Preheat the broiler. Place the peppers under the broiler, about 4-6" away from the heat, and broil for 2-3 minutes, until the skin has blistered. Turn the peppers and repeat this process until the entire surface is blistered and lightly charred. Remove the peppers and place them in a paper bag. Let rest at least 10 minutes. Remove the peppers from the bag, peel off the skin and discard the stem and the seeds. Cut the peppers into pieces. Heat the olive oil in a large saucepan over medium heat. Add the peppers, serrano pepper and garlic and cook for 2-3 minutes. Add the tomatoes, paprika, sugar and salt. Bring to a simmer over medium-high heat. Cook for 30-35 minutes, until most of the liquid has evaporated and the mixture is thick.

 Makes 1-1/2 to 2 cups


Barley with Carrots, Raisins and Almonds

fullsizeoutput_92d5.jpeg

For me, the appeal of winter foods is their ability make me feel warm and well-nourished. I don’t expect them to be gorgeous. When I look at dishes such as beef stew or a beloved chicken-and-soup, I don’t see art, I see safety and memory and the expectation of comfort.

This is why, when winter comes, I look for side dishes or desserts or an appetizer that can provide some color or add some beauty to the entree or the meal.

This barley casserole fits the bill. It’s a substantial side dish that works with meat, fish and poultry, with stews and hearty winter casseroles and for vegetarian meals too. It’s colorful and makes for an attractive addition to a winter dinner.

Barley with Carrots, Raisins and Almonds

  • 2 tablespoons olive oil

  • 2-3 carrots, sliced 1/2-inch thick

  • 3-4 scallions, chopped

  • 1 cup pearled barley

  • 2-1/2 cups vegetable stock

  • salt and freshly ground black pepper to taste

  • 1-1/2 teaspoons chopped fresh thyme

  • 1/2 cup golden raisins

  • 1/2 cup chopped toasted almonds

  • 2 tablespoons chopped fresh parsley

Heat the olive oil in a sauté pan over medium heat. Add the carrots and scallions and cook for about 2 minutes. Add the barley and cook for another 2 minutes, stirring often. Pour in the stock and add the salt, pepper and thyme. Stir, bring to a boil, lower the heat, cover the pan and simmer for about 50 minutes or until all the liquid has been absorbed. Stir in the raisins and almonds and toss gently to distribute the ingredients evenly. Cover the pan and let rest for 5 minutes. Spoon into a serving bowl and sprinkle with parsley.

Makes 6-8 servings


Chocolate-Banana-Applesauce Cake

fullsizeoutput_97d5.jpeg

When I was a kid my mother sometimes made macaroni-and-cheese using somewhat older, hard-around-the-edges American cheese that didn’t look fit to eat. I thought it was appalling.

But she told me that these cheese wasn’t spoiled, just hard because maybe it wasn’t wrapped quite so well, and that in any event she would never make any dish for us using an ingredient that could be harmful.

Of course.

And also, why waste perfectly good cheese that’s going to melt anyway. So if it isn’t perfect to eat cold, as is, it is perfectly fine for macaroni and cheese.

And it was. She made delicious macaroni and cheese.

My children are appalled if I use an ingredient that’s past its sell-by/expiration date. I feel the same way my mother did. I would never use an ingredient that is spoiled or harmful. But some of those expiration dates are meant more as a “use them soon because the flavor or texture won’t be perfect” than “do not eat this EVER!”

So recently, I noticed that in addition to some fresh bananas turned black-spotty, my snack packages of applesauce were a month beyond their expiration date. Rather than give the applesauce to my grandkids and have my daughters feel appalled, I used it in chocolate cake, in the place of eggs.

Not only was I able to use up a perfectly good ingredient, the cake was delicious and also a good vegan choice.

So there.

Chocolate-Banana-Applesauce Cake

  • 3 ounces semisweet chocolate

  • 1-1/3 cups all-purpose flour

  • 1/3 cup unsweetened cocoa powder

  • 1 teaspoon baking soda

  • 1 teaspoon salt

  • 2 medium ripe bananas

  • 1 cup sugar

  • 1/2 cup applesauce

  • 1/3 cup apple juice (or orange juice)

  • 1 teaspoon vanilla extract

Preheat the oven to 350 degrees. Lightly grease an 8”x8” cake pan. Melt the chocolate and set it aside to cool. In a bowl, whisk together the flour, cocoa powder, baking soda and salt. Set the flour mixture aside. Mash the bananas and place them in the bowl of an electric mixer (or use a hand mixer and bowl). Add the sugar and mix at medium speed for a minute, or until well blended. Add the applesauce, juice, vanilla extract and melted chocolate and beat for 1-2 minutes, or until thoroughly blended. Add the flour mixture and beat for 1-2 minutes, or until throughly blended. Spoon the batter into the prepared cake pan. Bake for 25-30 minutes or until a cake tester inserted into the center comes out clean.

Makes 9 servings