gluten free

Aunt Fanny's Passover cookies

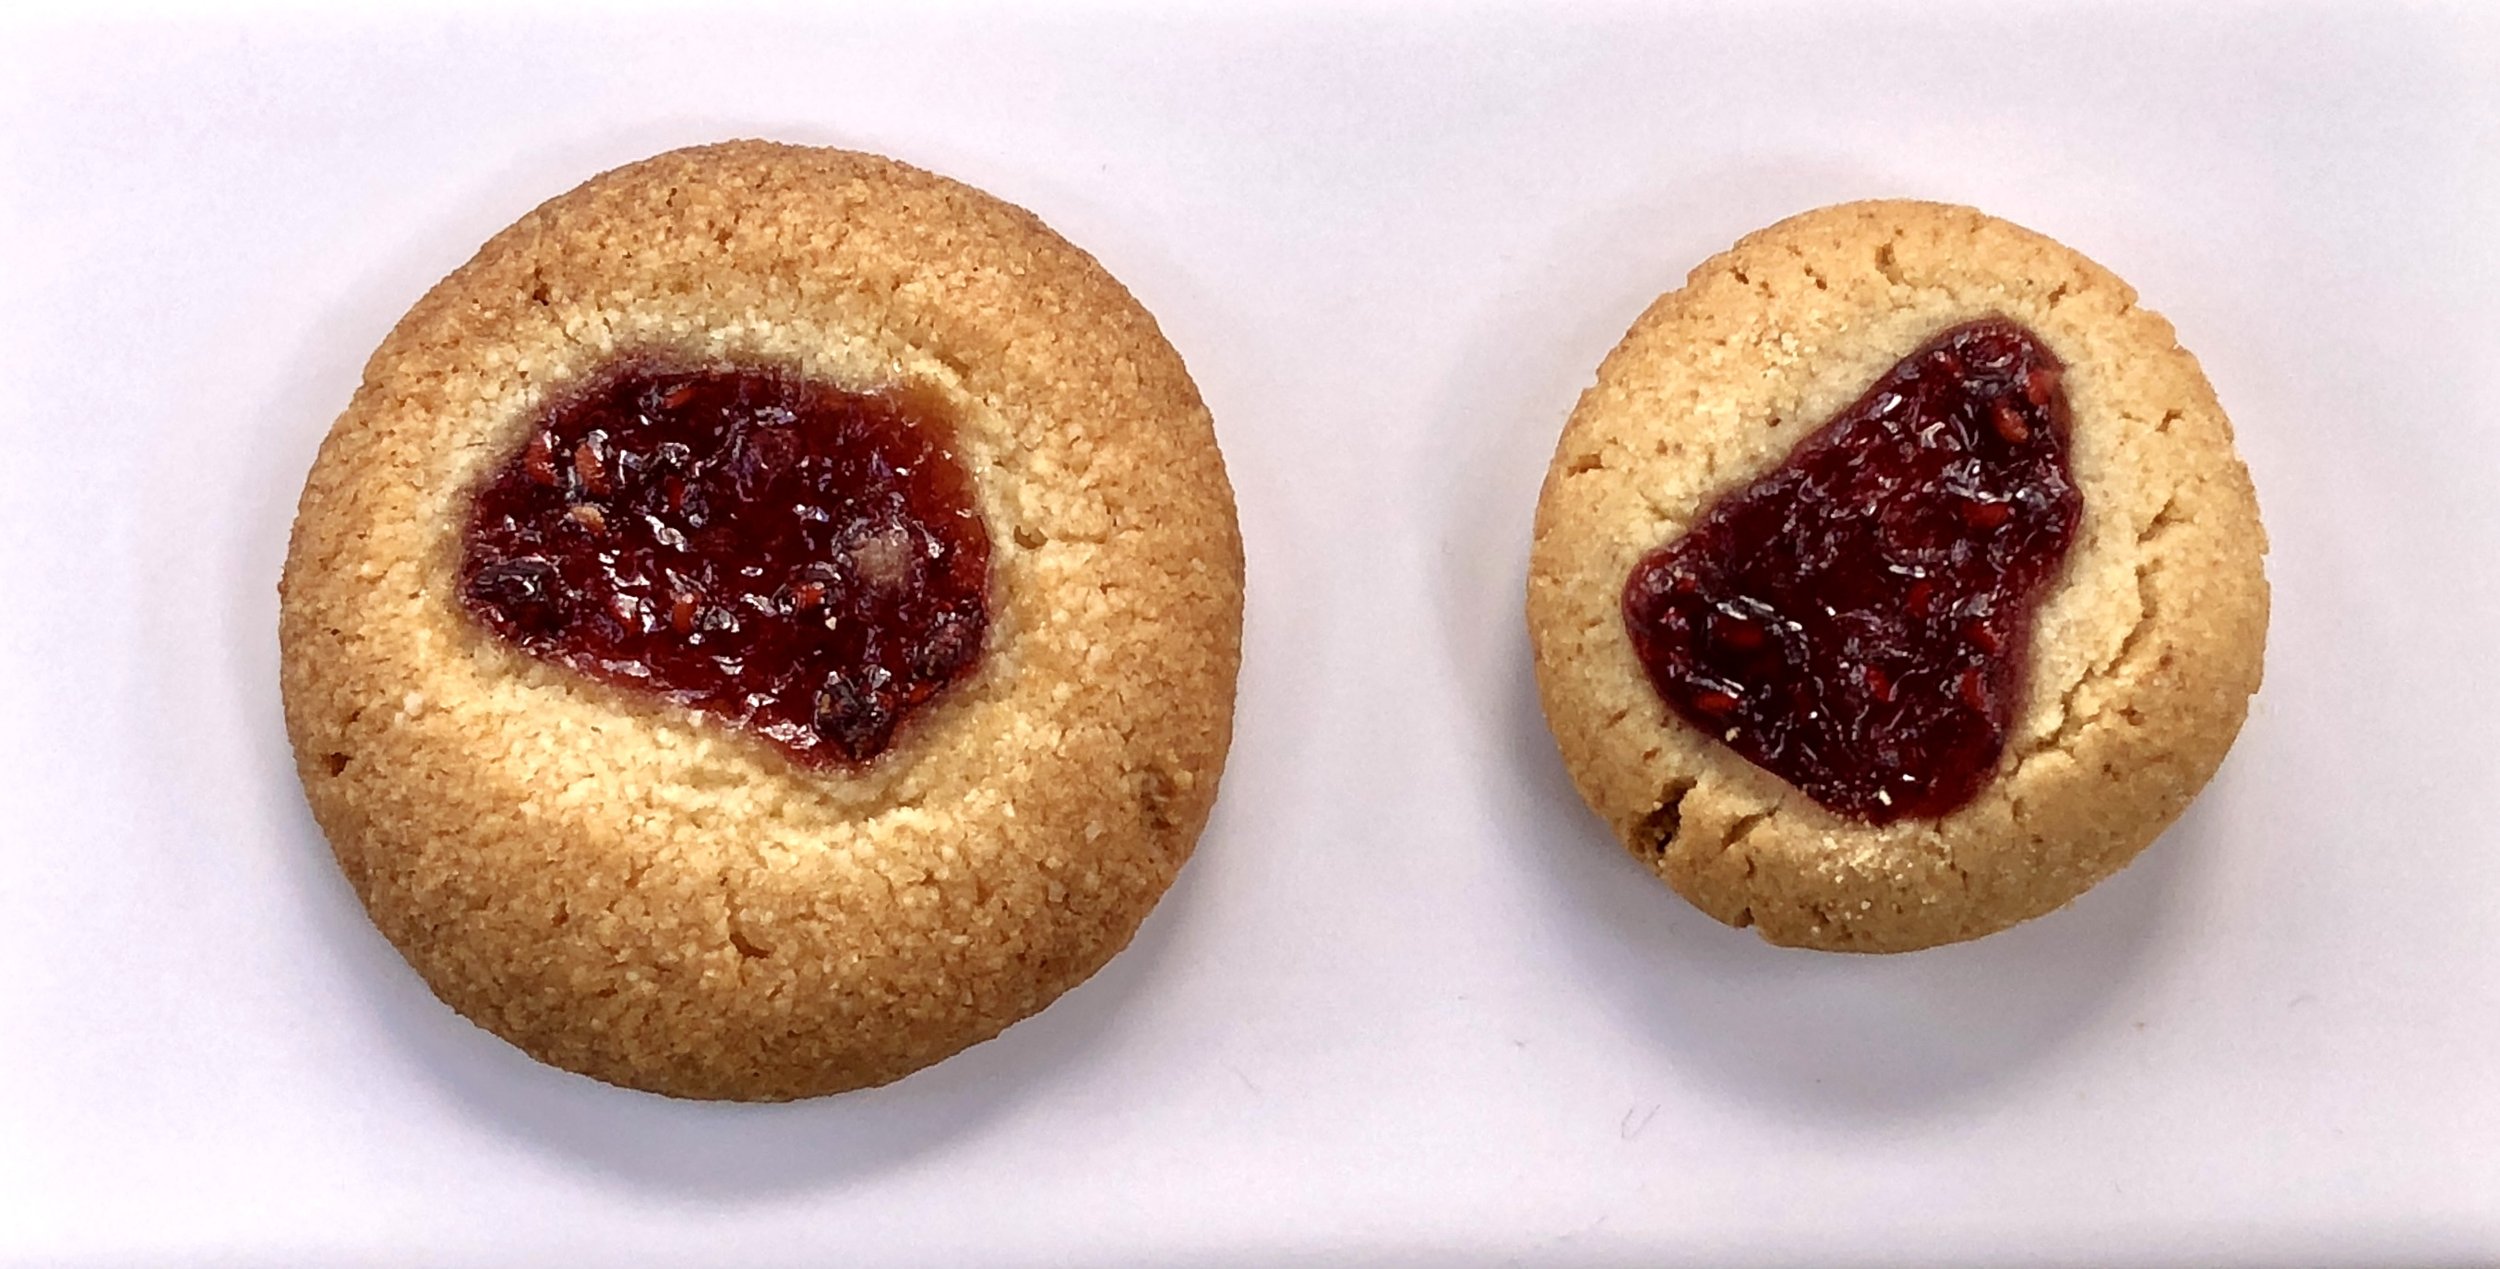
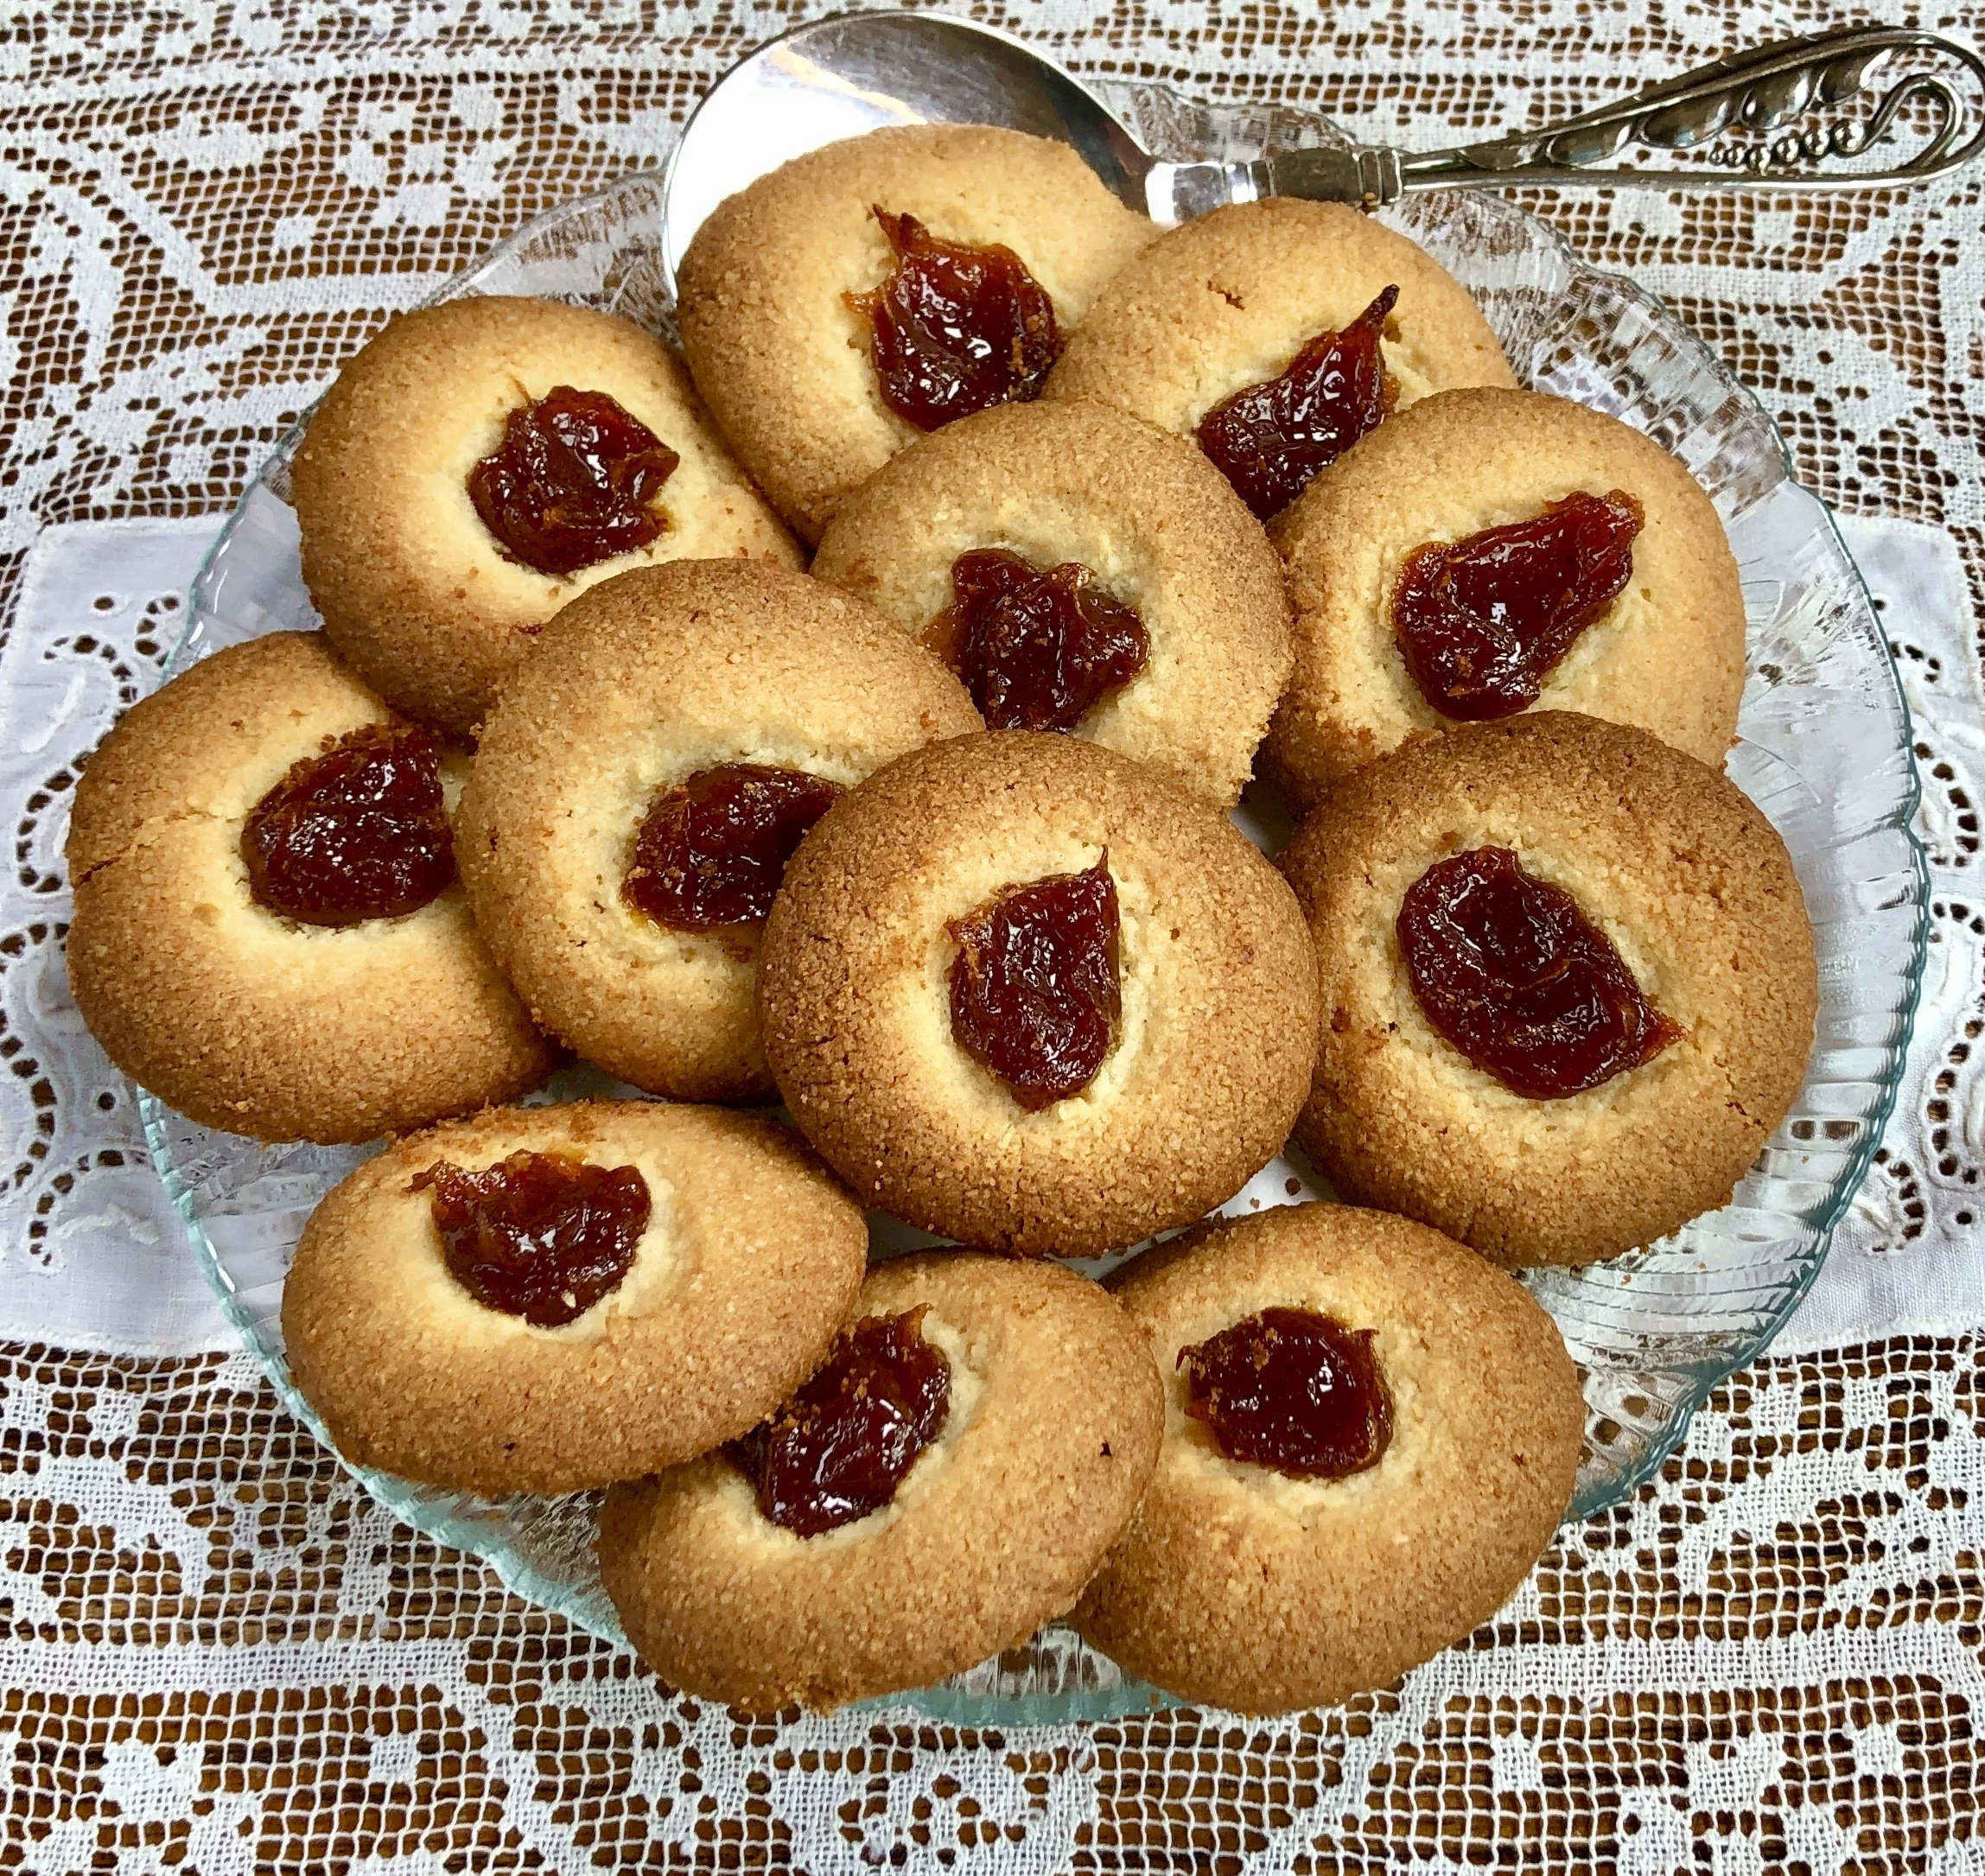
My great-aunt Fanny’s thumbprint cookies have been a family favorite for over a century. They’re the best butter cookies on earth and we lovingly call them Fannies (rather than just butter or thumbprint cookies) in her honor.

I’ve written about these cookies several times and the recipe for her original is on my website.

But we love these cookies so much I have experimented over the years to find a version suitable for Passover.

Success!

There are a couple of recipes for different versions on my website (using matzo cake meal). Everyone likes all the recipes, however, this one has been declared the favorite. They’re not nut-free, obviously, but they are gluten free.

Aunt Fanny and her cookie recipe: this is what is meant by immortality.

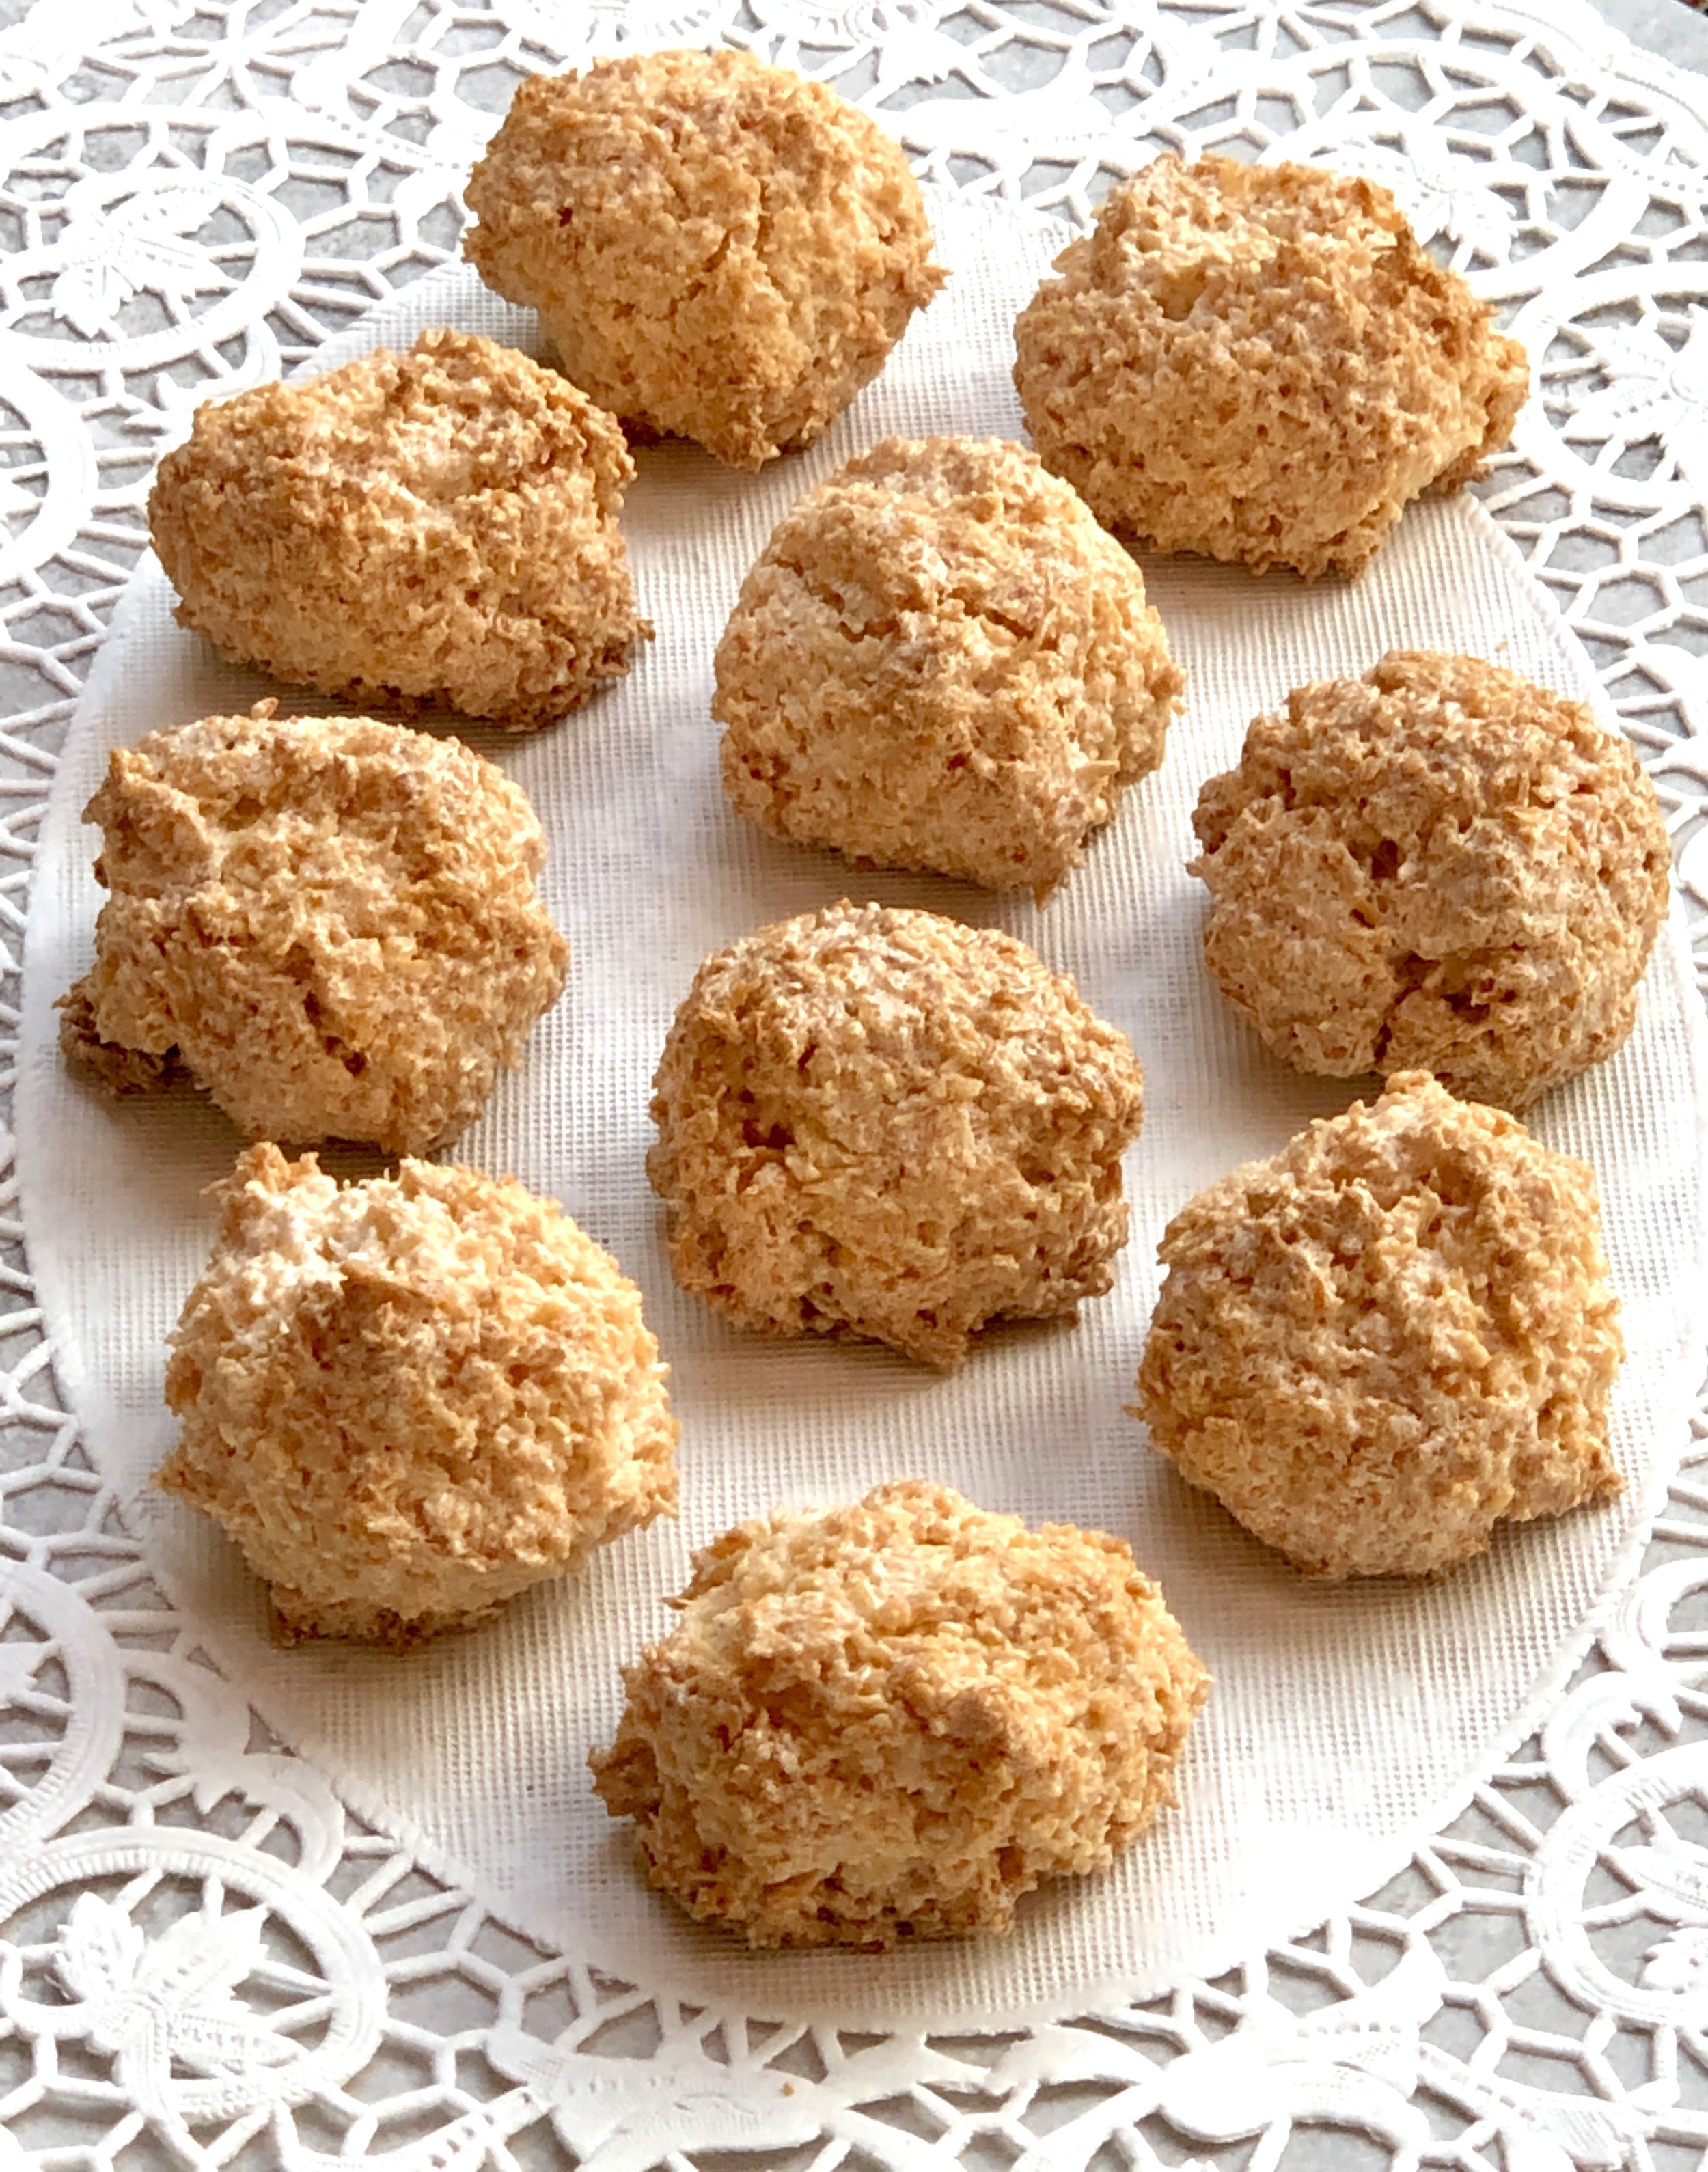
ALMOND AND COCONUT BUTTER COOKIES (PASSOVER)

  • 2 cups almond flour

  • 1/2 cup coconut flour

  • 1/2 teaspoon salt

  • 1/2 pound unsalted butter

  • 2/3 cup sugar

  • 2 large egg yolks

  • 1-1/2 teaspoons vanilla extract

  • jam, lekvar, chocolate chips, etc.

Preheat the oven to 350 degrees. Mix the almond flour, coconut flour and salt in a bowl and set aside. Place the butter and sugar in the bowl of an electric mixer and mix on medium speed for 1-2 minutes or until the ingredients are evenly combined and the mixture is light and fluffy. Add the almond flour mixture and mix another 1-2 minutes, or until the ingredients are almost blended. Add the egg yolks and vanilla extract. Mix the ingredients 1-2 minutes, or until a uniform dough forms. Refrigerate the dough for at least 45 minutes. Scoop pieces of dough and shape them into balls about 1" in diameter. Flatten the balls between your palms (about 1/8”). Press each circle with your thumb to make an indentation in the center. Place the cookies on a cookie sheet, leaving an inch of space between them. Fill the thumb print spaces with a small amount of lekvar, jam, etc. Bake for 18-23 minutes or until the cookies are golden brown.

Makes about 50

Nectarine and Blueberry Crisp II

My grand daughter and her friend decided to make my Nectarine and Blueberry Crisp recipe this weekend, but had to change it somewhat to make it gluten free. I told her what to substitute and how to change quantities. They said it was amazingly delicious, the top came out nicely browned and the fruit and sauce perfect! I say bravo! Here is the gluten free version:


NECTARINE AND BLUEBERRY CRISP


1 cup gluten free flour
3/4 cup old fashioned oats
1/2 cup brown sugar
1 teaspoon cinnamon
pinch of salt
1/2 cup butter (or use margarine, solid coconut oil, vegetable shortening or a combination of these)
3 large ripe nectarines or peaches
4 cups fresh blueberries
1/3 cup sugar
2 tablespoons lemon juice
4 teaspoons cornstarch

Preheat the oven to 375 degrees. Combine the 1 cup GF flour, oats, brown sugar, cinnamon and salt in a bowl. Cut the butter into chunks and work into the dry ingredients until the mixture is crumbly. Set aside. Cut the nectarines into chunks and place them in a bowl. Add the blueberries, sugar, lemon juice and cornstarch and toss ingredients. Spoon into a baking dish. Top with the crumb mixture. Bake for about 45 minutes or until the top is golden brown.

Makes 8 servings

#glutenfree #glutenfreecrisps #glutenfreeblueberrycrisp #blueberrycrisp #blueberrycrumble #glutenfreeblueberrycrumble #blueberrynectarinecrisp #fruitcrisp #fruitcrisps

Cranberry-Oat-Chocolate Chip Bars

Back in the day — before emailing — I hand-delivered hard copy of the food articles I wrote to the editors of the various media I wrote for (I snail-mailed copy to the people who were further away). After some years I would deliver (or send) “floppy discs.”

Of course that ended long ago and with it, the hundreds of cookies I baked, packed, decorated and delivered to the various newsrooms during the year-end holiday season.

Today? I still bake cookies — not as many! — because I always think of the end of the calendar year as cookie season. Christmas cookies. Hanukkah cookies. New Year cookies. Kwanzaa cookies. I give a lot away to friends but there’s always a load left for us in my freezer.

Whatever you want to celebrate, cookies always win.

Like these Cranberry-Oat bars. Bonus: they’re egg-free, dairy-free and gluten-free.

Happy Everything.

Cranberry-Oat-Chocolate Chip Honey Bars

  • 2 cups rolled oats

  • 1/2 cup chopped almonds

  • 6 tablespoons vegetable oil

  • 1/2 cup honey

  • 1/3 cup maple syrup

  • 1/4 cup brown sugar

  • 1/2 teaspoon salt

  • 1 teaspoon ground cinnamon

  • 1 cup dried cranberries

  • 3/4 cup chocolate chips

Preheat the oven to 350 degrees. Lightly grease a 9-inch square cake pan, line the pan with parchment paper, leaving an overhang (to pull the cookies out after baking) of about 3-inches on each side. Lightly grease the paper. Place the oats and almonds on a cookie sheet and bake for 4-5 minutes, stirring once or twice, or until the oats and almonds are lightly toasted and aromatic. Remove from the oven. In a medium saucepan, combine the vegetable oil, honey, maple syrup, brown sugar and salt and cook, stirring frequently for 2-3 minutes or until hot and smooth. Remove the pan from the heat and stir in the oat mixture. Stir in the cinnamon and cranberries. Let cool. Stir in the chocolate chips. Spoon the mixture into the prepared pan. Bake for 25-30 minutes or until lightly browned. Let cool. Remove by pulling the overhanging paper. Lift out, place on a cutting board and cut into 16-24 pieces.

Makes 16-24 cookies


Strawberry Pavlova

If you’re like everyone else who observes Passover, you’ve used a lot of eggs during the holiday!

Our usual family Passover menus use up more yolks than whites, so I’m always left with a load of egg whites. So, because I am one of those “waste not want not” people, I recently made a lot of meringues and meringue cookies and these Pavlovas.

Pavlovas, which are hard meringue shells filled with fruit, lavished with sauce and topped with whipped cream, are sugary sweet and you can do a lot with them. They’re also easy to make and are terrific for Passover because there’s no flour or any other ingredient we can’t eat during the holiday.

The meringue shell-cream-fruit dessert is named after a famous Russian ballet dancer named Anna Pavlova (1881-1931). Food historians say that a hotel chef in either Australia or New Zealand named the dessert after her visit there in 1926. The white meringue shell is said to mimic her tutu and in the original recipe, the shells were filled with kiwi fruit, in imitation of the decorations on one of her outfits. But any soft fruit will do.

Note: for more on beating egg whites properly, click here.

Pavolvas

Meringue Shells:

  • 4 large egg whites at room temperature

  • 1 tablespoon lemon juice

  • 1/4 teaspoon salt

  • 1 cup sugar

  • 3/4 teaspoon vanilla extract

  • whipped cream

  • sliced fruit such as strawberries, kiwi fruit, bananas, etc.

Preheat the oven to 275 degrees. Line a cookie sheet with parchment paper. Beat the egg whites in the bowl of an electric mixer with whisk attachment set at medium speed until the mixture is foamy. Add the lemon juice and salt and beat, gradually increasing the speed, until soft peaks form. Gradually add the sugar (2 tablespoons at a time) and the vanilla and continue to beat, gradually increasing the speed to high, until the mixture stands in stiff, glossy peaks. Spread 8-10 equal amounts of the meringue mixture onto the sheet. Flatten the mounds with the back of a large spoon, leaving the edges slightly higher. Bake for 45 minutes. Reduce the oven heat to 250 degrees. Bake for another 15 minutes. Remove the cookie sheet to a cake rack to cool. Gently release the meringues from the parchment. Fill the centers of the meringue shells with whipped cream. Top with sliced fresh fruit.

Makes 8-10

Coconut Meringue Cookies

I’ve been baking lots of gluten-free butter cookies lately, experimenting for Passover — using our family “fannies” or butter cookies as a base. But because the recipes use egg yolks I had a ton of whites left over. So …… I’ve also been experimenting with meringues (see how-to whip egg whites) and decided to use some for cookies. These coconut cookies are not only an easy way to use meringue but they are tender and sweet and perfect for Passover.

Here’s how: mix 2 cups of meringue (recipe below) with 1-1/2 to 2 cups shredded coconut (amount depends on the size of the shreds: you need enough to form a soft “dough”). Place blobs of the dough (about 1-1/2 inches) on a parchment lined cookie sheet. Preheat the oven to 325 degrees. Bake for 15-22 minutes or until lightly browned. Some people prefer these very light color; we like them honey colored.

I’ve now made these cookies several times. The less coconut you use, the softer and flatter the cookies will be. But either way, the cookies are tender, sweet and oh so tasty!

Meringue:

  • 4 large egg whites at room temperature

  • 1 tablespoon lemon juice

  • 1/4 teaspoon salt

  • 1 cup sugar

  • 3/4 teaspoon vanilla extract

Beat the egg whites in the bowl of an electric mixer with whisk attachment set at medium speed until the mixture is foamy. Add the lemon juice and salt and beat, gradually increasing the speed, until soft peaks form. Gradually add the sugar and continue to beat, gradually increasing the speed to high, until the mixture stands in stiff, glossy peaks. Stir in the vanilla extract.

How to Whip Egg Whites

Have you ever realized how many eggs we use during Passover?

LOTS!

And many Passover recipes, especially desserts, use whipped egg whites. So you read things like “soft peaks” and “stiff but not dry” and such.

What does it all mean? Looks easy but ……

sometimes the food preparations that look the easiest turn out to be the most intimidating.

Egg whites are among those. But if you want to make perfectly soft soufflés, tender Baked Alaska, crispy meringues  and other wonderful treats, it’s important to get it right.

These tips will help:

  • Use the freshest eggs possible; their thicker whites whip to greater volume and with more stability than the thin, runny whites of older eggs.

  • Separate the yolks and whites when the eggs are cold. This helps prevent even the tiniest particle of yolk from falling into the whites. Egg yolks contain fat, and any kind of fat inhibits volume.

  • For the best volume, let the egg whites come to room temperature (usually about 30 minutes) before you beat them.

  • Copper bowls are the best for the job, (the acid in the metal helps stabilize the foam), but stainless steel, ceramic or glass bowls are fine too. Don’t use plastic bowls because no matter how much you wash them the surface of retains some fat particles.

  • Use a balloon or large whisk or the whisk attachment of an electric mixer or hand mixer. Standard cake batter beaters don’t whip egg whites well; neither does a food processor.

  • Start beating the whites on slow and gradually increase the speed as volume increases.

  • Beat the whites to the foamy stage (photo #1)before you add ingredients such as cream of tartar, salt, lemon juice or vinegar.

  • Add any sugar gradually (about 2 tablespoonfuls at a time), and only after the whites have been beaten to the "soft peak" stage.

  • “Soft peaks” (photo #2) means beaten whites with tips that fall over when you lift the beater.

  • "Stiff but not dry" (photo #3) means beaten egg whites that are thick and glossy looking and with tips that stand up firmly with only a tiny bit at the top lopping over.

  • To test whether whites are stiff enough, either turn the bowl over – it’s ok! the whites won’t fall out! (photo #4) Or, spoon a small amount out of the bowl and turn the spoon over – the whites should cling, not fall out.

  • Photo#5 shows the meringue with eggs whipped and sugar added

Passover Butter Cookies Redux

Last year I posted a recipe for a Passover version of my Aunt Fanny’s famous butter cookies (which we call Fannies in her honor). They were a big hit at our house.

But this year, after reading an article in Hadassah magazine by food writer and cookbook author Adeena Sussman, I took yet another approach. The article suggested using the grain-free products such as almond flour and coconut flour that have become available in recent years.

I made several versions, experimenting with amounts (you can’t just substitute all-purpose flour or matza cake meal 1:1 for grain-free flour) and had my “tasters” try all of them.

We had two winners. Most people liked the almond and coconut flour recipe; it is tender and buttery. But some liked the matza cake meal and coconut flour recipe; it is dense, more crumbly, and suitable for nut-free diets.

I’m not finished experimenting. Aunt Fanny, wherever you are — your cookie recipe is immortal, now in the original and in Passover versions now and yet to come.

Here are both recipes.

Almond and Coconut Butter Cookies (Passover)

  • 2 cups almond flour

  • 1/2 cup coconut flour

  • 1/2 teaspoon salt

  • 1/2 pound unsalted butter

  • 3/4 cup sugar

  • 2 large egg yolks

  • 1-1/2 teaspoons vanilla extract

  • jam, lekvar, chocolate chips, etc.

Preheat the oven to 350 degrees. Mix the almond flour, coconut flour and salt in a bowl and set aside. Place the butter and sugar in the bowl of an electric mixer and mix on medium speed for 1-2 minutes or until the ingredients are evenly combined.or until the mixture is light and fluffy. Add the almond flour mixture and mix another 1-2 minutes, or until the ingredients are almost blended. Add the egg yolks and vanilla extract. Mix the ingredients 1-2 minutes, or until a uniform dough forms. Refrigerate the dough for at least 45 minutes. Scoop pieces of dough and shape them into balls about 1" in diameter. Flatten the balls between your palms. Press each circle with your thumb to make an indentation in the center. Place the cookies on a cookie sheet, leaving an inch of space between them. Fill the thumb print spaces with a small amount of lekvar, jam, etc. Bake for 18-23 minutes or until the cookies are golden brown.

Makes about 50

Matza Cake Meal and Coconut Butter Cookies (Passover)

  • 1 cup matza cake meal

  • 1 cup coconut flour

  • 1/2 teaspoon salt

  • 1/2 pound unsalted butter

  • 3/4 cup sugar

  • 4 large egg yolks

  • 1 teaspoon vanilla extract

  • jam, lekvar, chocolate chips, etc.

Preheat the oven to 350 degrees. Mix the matza cake meal, coconut flour and salt in a bowl and set aside. Place the butter and sugar in the bowl of an electric mixer and mix on medium speed for 1-2 minutes or until the ingredients are evenly combined.or until the mixture is light and fluffy. Add the dry ingredients and mix another 1-2 minutes, or until the ingredients are almost blended. Add the egg yolks and vanilla extract. Mix the ingredients 1-2 minutes, or until a uniform dough forms. Scoop pieces of dough and shape them into balls about 1" in diameter. Flatten the balls between your palms. Press each circle with your thumb to make an indentation in the center. Place the cookies on a cookie sheet, leaving an inch of space between them. Fill the thumb print spaces with a small amount of lekvar, jam, etc. Bake for 22-25 minutes or until the cookies are golden brown.

Makes about 50

Gluten-Free Peach Crisp

fullsizeoutput_945d.jpeg

Some summers the peaches are glorious.

And then there’s this year. I haven’t had an excellent peach or nectarine yet.

I bought a bunch a few times and they tasted ok, but not really flavorful. Some were cottony and mealy.

I used the cottony/mealy ones to make sauce — like applesauce only made with peaches (with a bit of cinnamon and a squirt of lemon juice). It was very good. We ate some and I used the rest for quickbread.

I used the sort-of-tasty ones for this peach crisp. This was perfect. Baking — plus some other stuff — brought out the best of the fruit.

And look how easy this dessert is!

Plus, it’s gluten-free, in case you need…

Gluten-Free Peach Crisp

Filling:

  • 6 ripe medium peaches

  • 2 tablespoons sugar

  • 2 tablespoons minute tapioca

  • 1 tablespoon lemon juice

Crust:

  • 1-1/2 cups quick cooking oats

  • 2/3 cup brown sugar

  • 1 teaspoon ground cinnamon

  • 1/4 teaspoon salt

  • 6 tablespoons butter (margarine or solid coconut oil), cut into chunks

To make the filling: Lightly butter a baking dish. Preheat the oven to 400 degrees. Slice the peaches and place the pieces in the baking dish. Add the sugar, tapioca and lemon juice, toss the ingredients and let rest for 15-20 minutes. 

To make the crust: Mix the oats, brown sugar, cinnamon and salt in a bowl. Add the butter and work it into the dry ingredients until the mixture is crumbly. Place on top of the fruit. Bake for 30-35 minutes or until the crust is golden brown.

Makes 6 servings


Orange-Vanilla Flavored Cheese Stuffed Dates

Sometimes I think life is a bunch of holidays with not much in between. Except for the entire month of January.

I suppose that's a good thing, because holidays are happy and celebratory.

Also, there's the food. Except for Yom Kippur, every holiday has food. And even when it comes to Yom Kippur, there's the break-the-fast when it's all over and the break-the-fast is all about food. 

As far as holidays go, at this point of the year, we've just finished Thanksgiving. So what’s next up?

Hanukkah!

Hanukkah is a really delicious holiday. Lots of fried stuff like latkes and doughnuts.

It's also a dairy holiday because of the story of Judith, which you can read about it here

For our family, in honor of Judith, I make lots of dairy items in addition to the usual potato latkes and doughnuts. I have served cheese latkes and potato latkes with a yogurt based sauce laced with lemongrass. And also Potato Galette with Caramelized Onions and Cheese and Almond Crusted Winter Squash and Noodle Kugel (actually that one’s a favorite). 

Desserts? Maybe Meyer Lemon Yogurt Pie (you can use regular lemons) or Baked Goat Cheese with Honey Sauce and Cranberries. Maybe even cheesecake. Or some fabulous cheesecake cookies!

And also these stuffed dates! Easy to make, not too sweet (no added sugar), these little morsels are perfect for the holiday. If you don't want to use almonds for garnish, crushed, toasted coconut will do nicely.

Btw, these make a nice tidbit for New Year’s, either as hors d’oeuvre or late night snack. 


Orange-Vanilla Flavored Cheese Stuffed Dates

  • 12 medjool dates

  • 1/2 cup cream cheese (4 ounces)

  • 2 tablespoons plain yogurt

  • 1 teaspoon grated orange peel

  • 1/4 teaspoon vanilla extract

  • 3 tablespoons crushed toasted almonds (or pistachios or crushed, toasted coconut)

Cut the dates through the center, but not all the way through to the bottom. Remove the pit and spread the date slightly to form a hollow for filling. Mix the cream cheese, yogurt, orange peel and vanilla extract in a small bowl until the mixture is smooth and soft. Fill the dates with the cheese mixture. Sprinkle with the nuts.

Makes 12 

Kaniwa Mujadarah

_DSC2680.jpg

Everyone who knows me knows that Mujadarah is among my favorite things to eat. I serve it for my annual break-the-fast. I serve it anytime I have lots of people over for a celebration, like a birthday or a welcome-to-the-world party for a new grandchild.

I've made Mujadarah using brown rice. I've made it with bulgur wheat

Sometimes I add mushrooms (there's a recipe for that in my book, Hip Kosher).

Recently, the good folks at Pereg sent me a bag of Kaniwa. 

What?

Have you heard of kaniwa?

It's similar to quinoa (in fact some call it baby quinoa), but the seeds are much smaller (about the same size as poppy seeds). It is a complete protein, it's gluten-free and high in iron. That is a big big deal when you are looking for nourishing, meat-free recipes.

Unlike quinoa, kaniwa does not have a coating of saponin on the surface, which means it does not have the somewhat bitter, somewhat soapy taste that some find objectionable in quinoa. You don't have to rinse kaniwa (in fact, if you do, these teeny things will fall right through the holes in the strainer!).

I've actually cooked with kaniwa. A while ago I posted a recipe for Kaniwa Salad with Roasted Tomatoes. It's a terrific base for salads. A nice soup filler. You can sweeten it and eat it like cereal, for breakfast.

But me, with my mujadarah love? I made some kaniwa mujadarah! Look how beautiful this is! Perfect dish for a meatless Monday.


Kaniwa Mujadarah

  • 3/4 cup lentils
  • water or stock
  • 3 carrots, diced
  • 1 cup kaniwa
  • 1-3/4 cup water
  • 1/2 cup olive oil
  • 4 large yellow onions, peeled and sliced
  • 10 ounces mushrooms, cut up
  • 1/2 cup chopped fresh parsley, optional
  • 1 teaspoon ground cumin, optional
  • salt to taste

Place the lentils in a saucepan, cover with water and bring to a boil over high heat. When the water starts to boil, lower the heat, cover the pan and cook the lentils for about 25 minutes or until they are tender. Drain the lentils and set them aside. While the lentils are cooking, place the carrots in a saucepan, cover with water and bring to a boil over high heat. When the water starts to boil, lower the heat, cover the pan and cook the carrots for 5-6 minutes or until they are tender. Drain the carrots and set them aside. Place the kaniwa in a saucepan, cover with 1-3/4 cups water and bring to a boil over high heat. Lower the heat, cover the pan and cook for about 15-18 minutes until all the water has been absorbed. While the kaniwa is cooking, heat 5 tablespoons of the olive oil in a large saute pan over medium heat. Add the onions and cook, stirring occasionally, for about 10 minutes or until beginning to brown. Add the mushrooms and cook an additional 5 minutes or until the onions and mushrooms are soft and brown. Place the lentils, carrots, kaniwa and most of the onion-mushroom mixture in a bowl. Stir gently to distribute the ingredients evenly. Stir in the remaining olive oil. Add the parsley and cumin, if desired and toss the ingredients. Sprinkle with salt to taste. Top with the remaining onion-mushroom mixture.

If serving at a later time, cover the pan and reheat in a covered baking dish in a preheated 350 degree oven.

Makes 6-8 servings