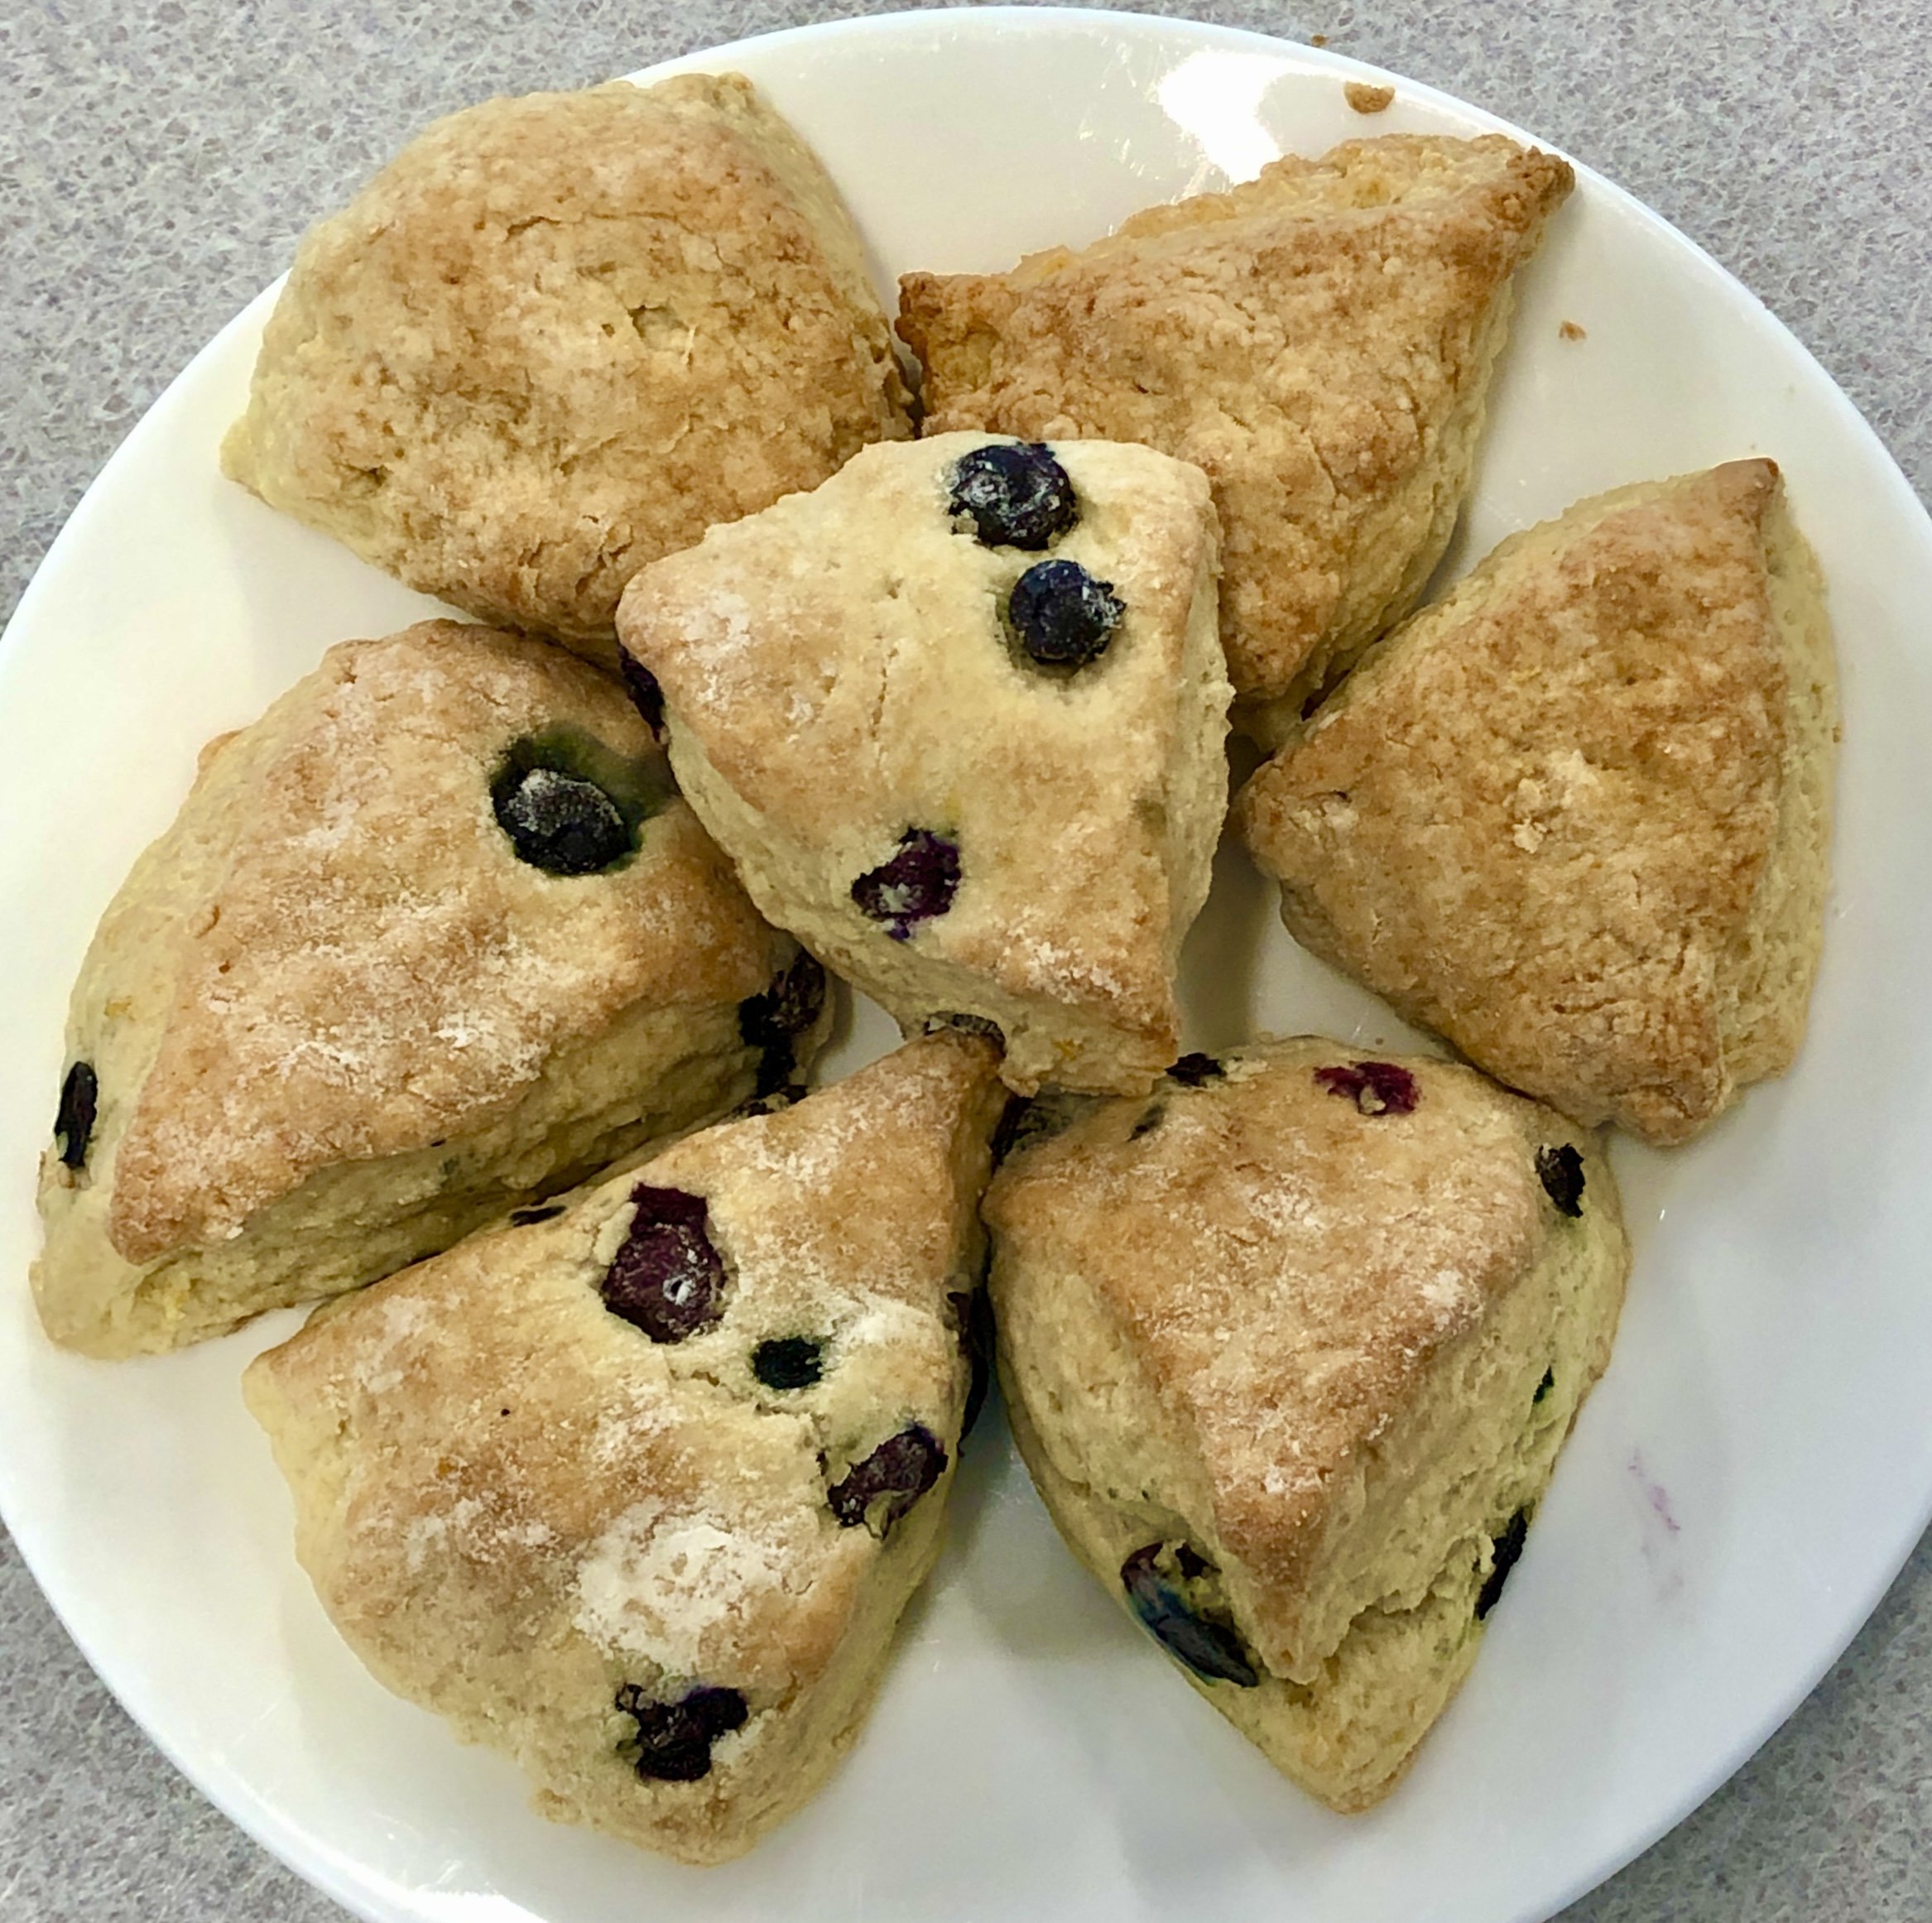
Yesterday I did a cooking demo for a Tea Party at @newcanaan_ymca (for its Forever Well program). I prepared the essentials of Afternoon Tea: mini sandwiches and scones (some plain, some with blueberries). What fun we all had! And we feasted of course! Here’s the recipe for the scones: BLUEBERRY SCONES
2 cups all-purpose flour
2 tablespoons sugar
2-1/4 teaspoons baking powder
3/4 teaspoon baking soda
1/2 teaspoon salt
1/2 teaspoon grated lemon zest
6 tablespoons butter
1 large egg
1/2 cup buttermilk
1 cup blueberries
Turbinado sugar, optional
Preheat the oven to 425 degrees. Lightly grease a cookie sheet or line it with parchment paper. Combine the flour, sugar, baking powder, baking soda, salt and lemon zest in a bowl. Add the butter in chunks and work the butter into the dry ingredients until the mixture resembles coarse meal. Mix the egg and buttermilk together and add them to the dry ingredients. Mix until a soft dough forms. Add the blueberries and gently mix the dough to incorporate them, taking care not to crush the fruit. Break the dough in half and place on a floured surface. Press each half into a circle about 3/4” thick. Cut each circle into six wedges and place on the prepared cookie sheet. Sprinkle with some turbinado sugar if desired. Bake for 12-15 minutes or until the scones are browned and well risen. Makes 12 #afternoontea #afternoonteatime #scones #sconesrecipe #blurberryscones #teatime
Bones and Blood
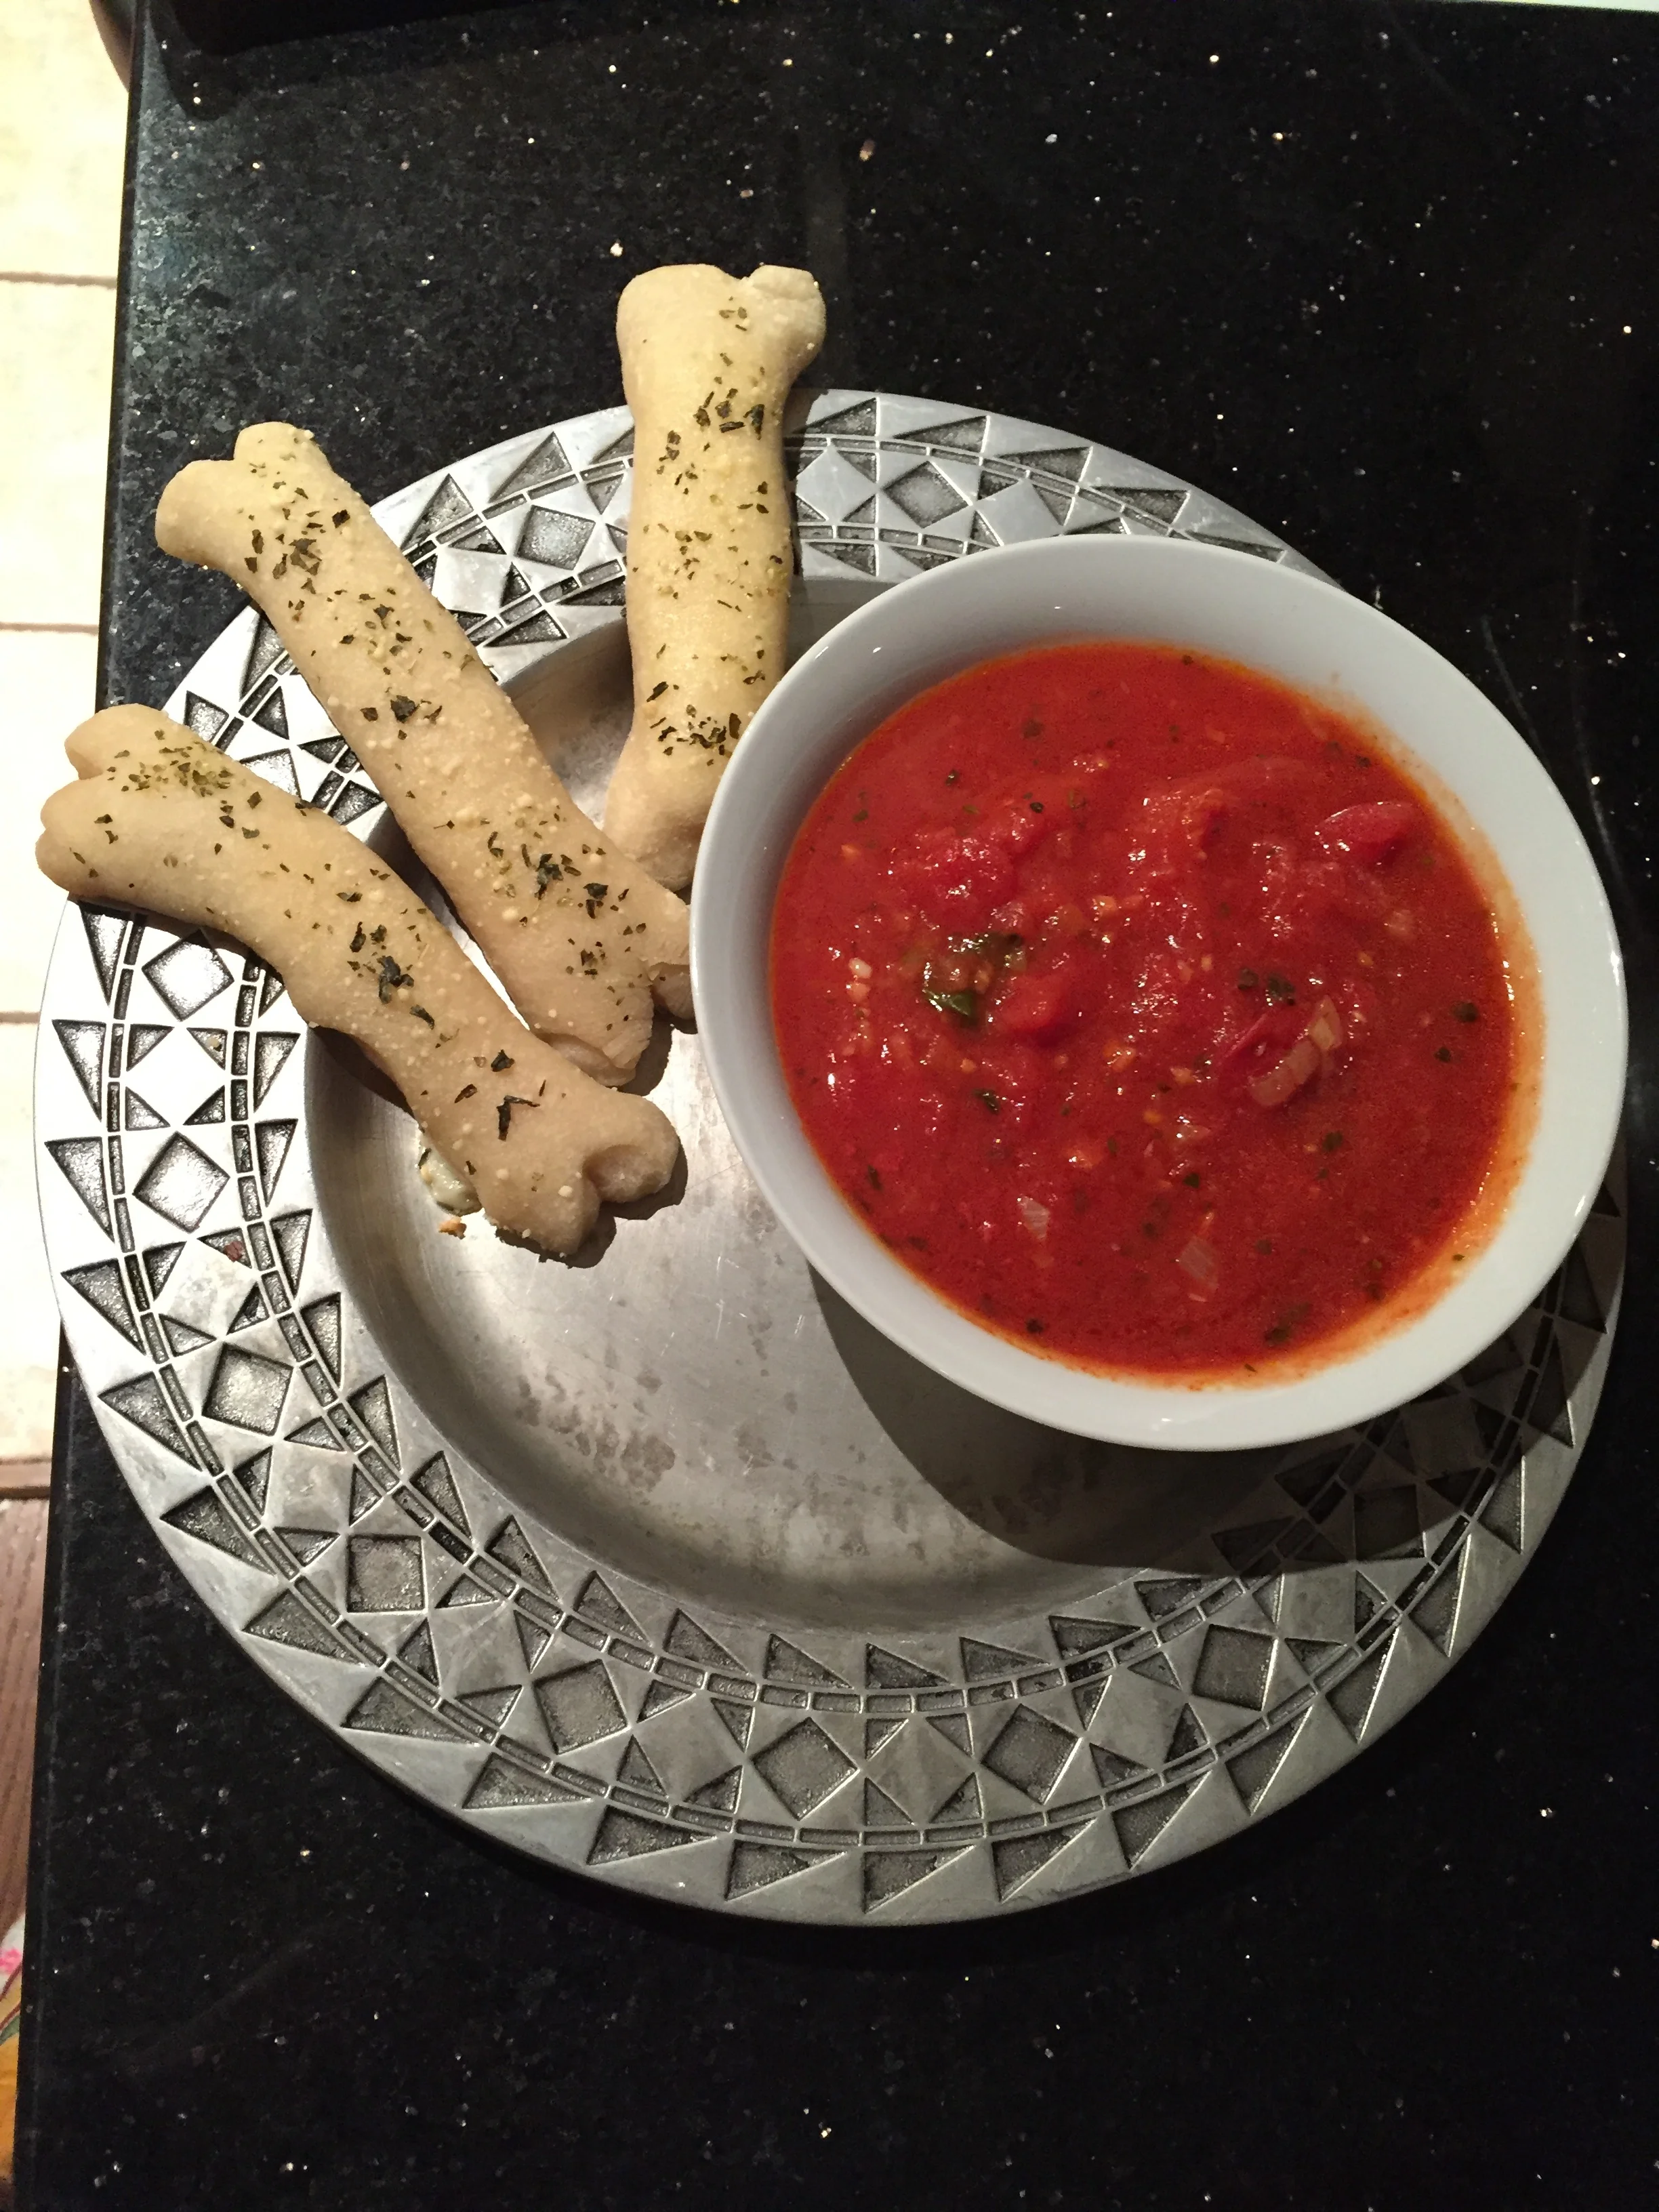
Last year my daughter Meredith (a board certified lactation consultant (IBCLC) who provides services for expectant and new parents), made these Hallowe'en snacks. Although I do not have young children at home, nor would I ever pass these out to trick-or-treaters, they were too cute to pass up. So I made my own. Just for us, for TV watching time.
Hers were baked with biscuit dough. I didn't feel like making dough, so I took the easy way out -- used packaged pizza dough. They looked the same as these, just a bit browner.
A cute snack for Hallowe'en and really easy to make:
Bones and Blood
- one pound pizza dough
- 6 tablespoons melted butter
- 2 tablespoons grated Parmesan cheese
- 2 teaspoons dried oregano
- sea salt to taste
- 2 cups marina sauce
Preheat the oven to 375 degrees. Line a baking sheet with parchment paper. Cut the dough into 10 equal pieces and roll each piece into a rope about 8 inches long. Cut a slit at each end of each rope, and curve the slit part out slightly to make the bone shape. Place the bones on the baking sheet. Brush with the melted butter, sprinkle with the cheese, oregano and salt. Bake for about 15 minutes or until vaguely tan. Serve with the marinara sauce.
Makes 10
Modern Jewish Baker by Shannon Sarna

When I got Shannon Sarna’s new book, Modern Jewish Baker, I wanted to run into the kitchen and start baking. It’s that kind of book – based on a few beloved, classic, Jewish bakery basics (challah, bagels, babka and so on) plus an amazing number of inventive variations that sound too seriously compelling to miss.
Exactly my kind of cooking.
One problem. I have to lose weight and get my glucose at normal levels before my doctor’s appointment next month.
OY! Which of these fabulous bakery items should I make and still be on the straight and narrow path until the doctor thing is over?
Challah was out because, ok, I had tasted Shannon’s pull-apart spinach-cheese version at the book launch party and had to stop myself from eating more only because it would have been rude and gluttonous not to leave some for the other guests.
Bagels? No way, because then I’d eat a couple of those fat, crispy-crusted, puffy-inside things, load them with cream cheese and lox and then have to promise to start my diet “tomorrow.”
Rugelach or babka? Tell me the truth -- could you eat just one piece?
Me either. I had several samples at that launch party and – see above for thoughts on my ability to control myself if I had this stuff in my kitchen.
So it was down to either matzo or pita.
I chose pita because matzo means butter. Lots of it, or matzo brei loaded with sour cream, so, no.
Pita it was, because then I could have it with the hummus I could make with the recipe from the book and that’s healthy, right? Also, how much pita can one person eat? It's plain old bread, no chocolate or cheese or other extras.
Believe it or not, one person can actually eat quite a bit of plain old pita when it’s this good. Plus, it is really a thrill to see those yeasty rounds come out of the oven and actually look like packaged pita! (But taste much fresher and better). I felt like a triumphant teenager who had baked her first cake. Who knew you can make pita at home?! I’ve been at this cooking thing for years and years and never did it before.
But I will again! This stuff is not only tasty, but fun to make.
And the hummus was quite good too!
I’ll start the diet tomorrow.
This book is a winner.
Bonus recipe from the book -- Classic Hummus (Modern Jewish Baker):
- 1 (15-ounce) can chickpeas, rinsed and shells removed
- 1/4 cup tahini
- 1/2 teaspoon cumin
- 1/2 teaspoon salt
- 2 whole garlic cloves
- 1/2 cup olive oil plus additional for serving
- 2-3 tablespoons water
- Paprika (optional), for garnish
- Za'atar (optional), for garnish
Place chickpeas, tahini, cumin, salt and garlic cloves in a food processor fitted with a blade attachment. Puree for 30 seconds. Add olive oil and process until smooth. Add water one tablespoon at a time until desired smoothness. Spoon onto plate or into a bowl. Top with paprika or za'atar and an extra drizzle of olive oil for serving.
Can be kept in an airtight container for 5-7 days in the refrigerator.
Makes 4-6 servings
Lullabye Bread

A few years ago Ed and I were in Berlin and checked out KaDeWe, the city's famous department store that has the biggest food halls in Europe and maybe in the world. They sell every kind of food you can imagine. Gorgeous cakes and pastries. Bountiful, beautiful fruit. Different kinds of eggs, dairy products, chocolates.
It was all familiar. Pineapples. Peaches. Sachertorte. Macarons. Freshly butchered chickens, and so on.
We stopped counting the different kinds of sausages after we reached 100. Apparently they sell sausages from every region in Germany.
But we were there for lookin', not cookin' -- so, in the two hours we walked through this place it was more like a visit to an art gallery.
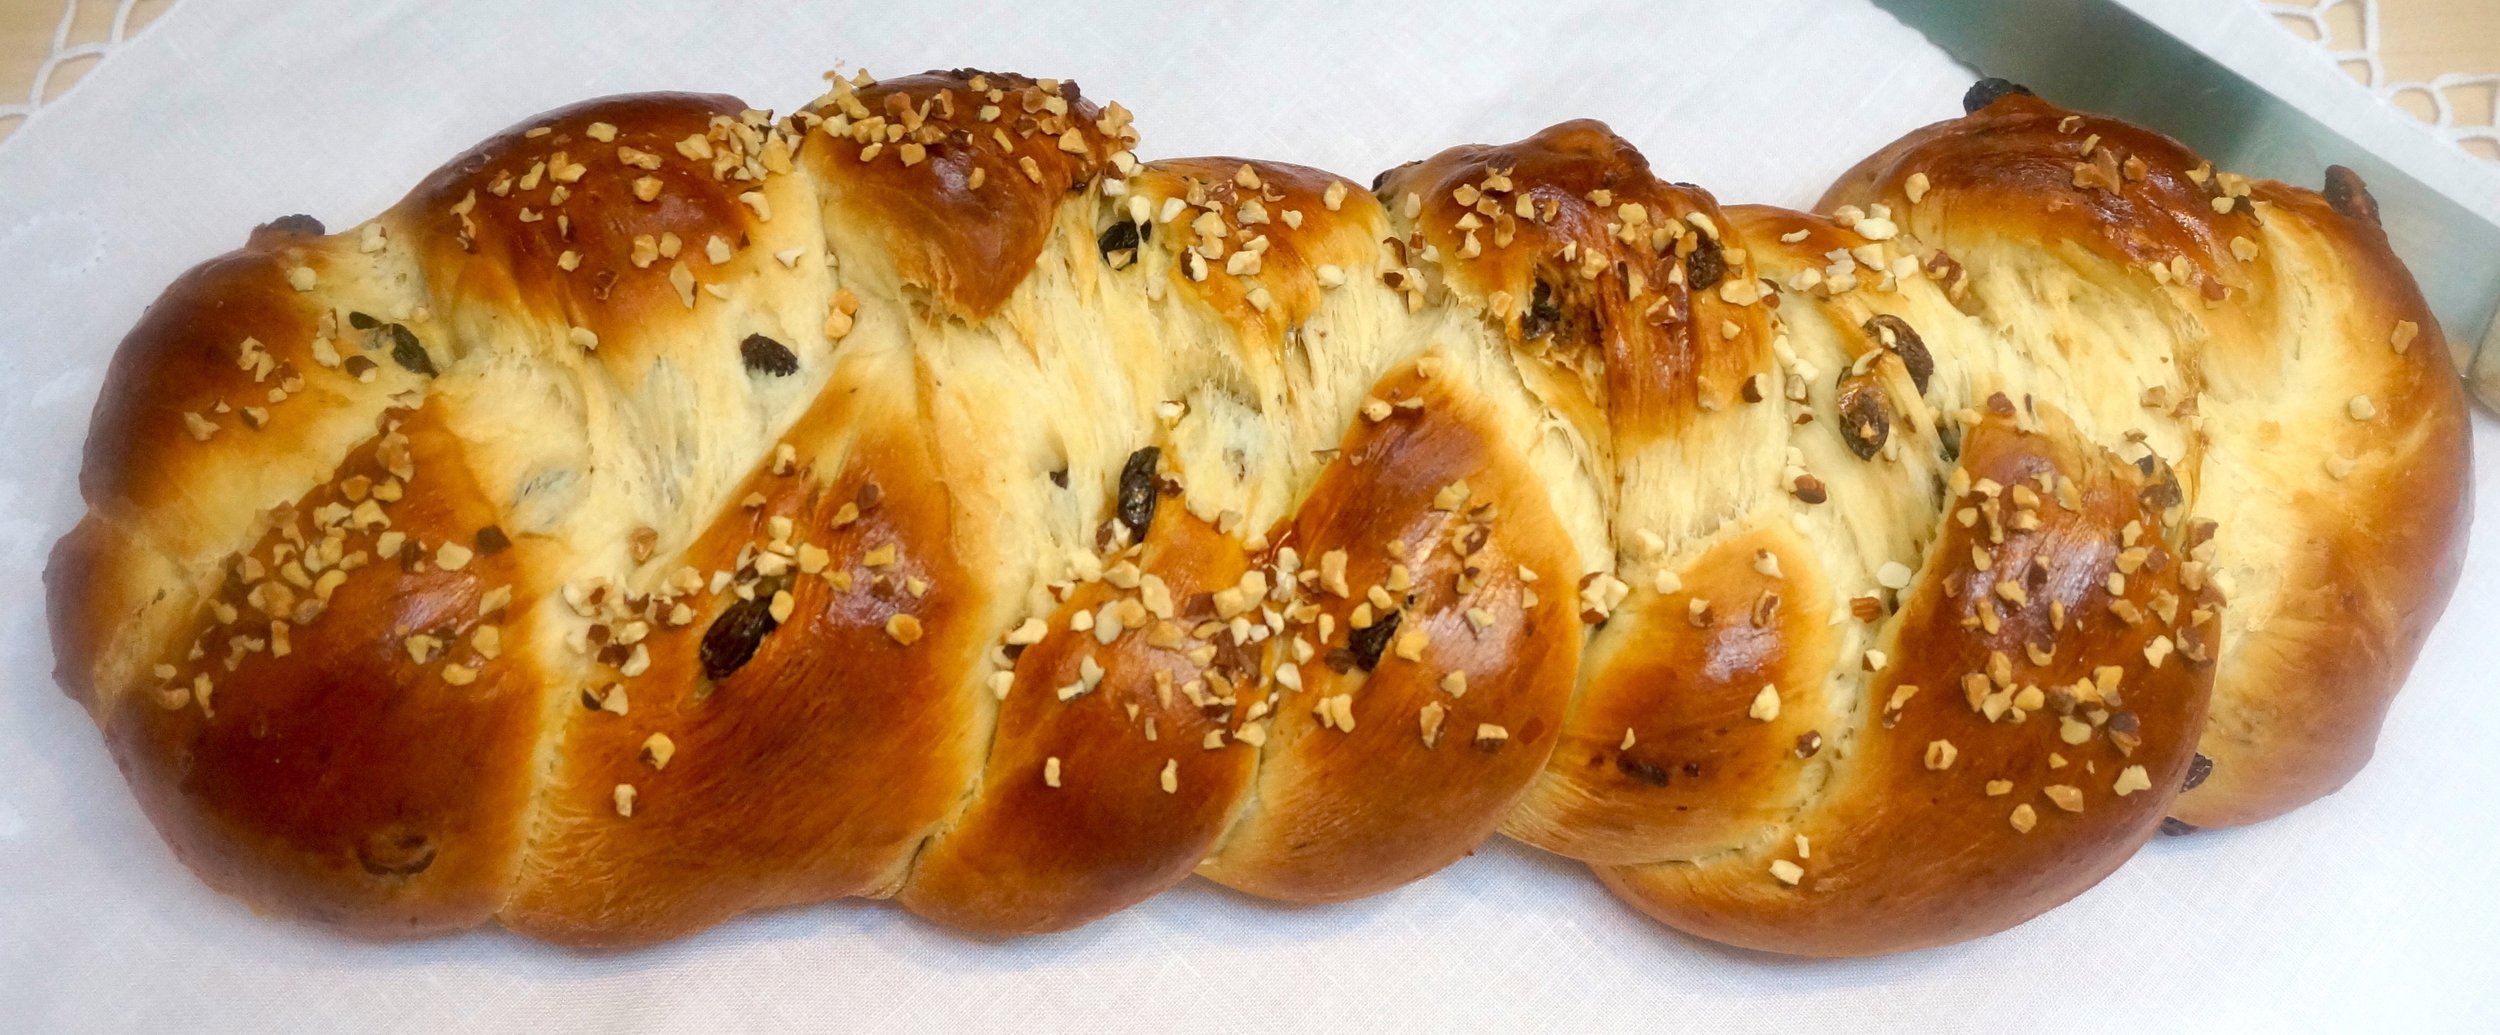
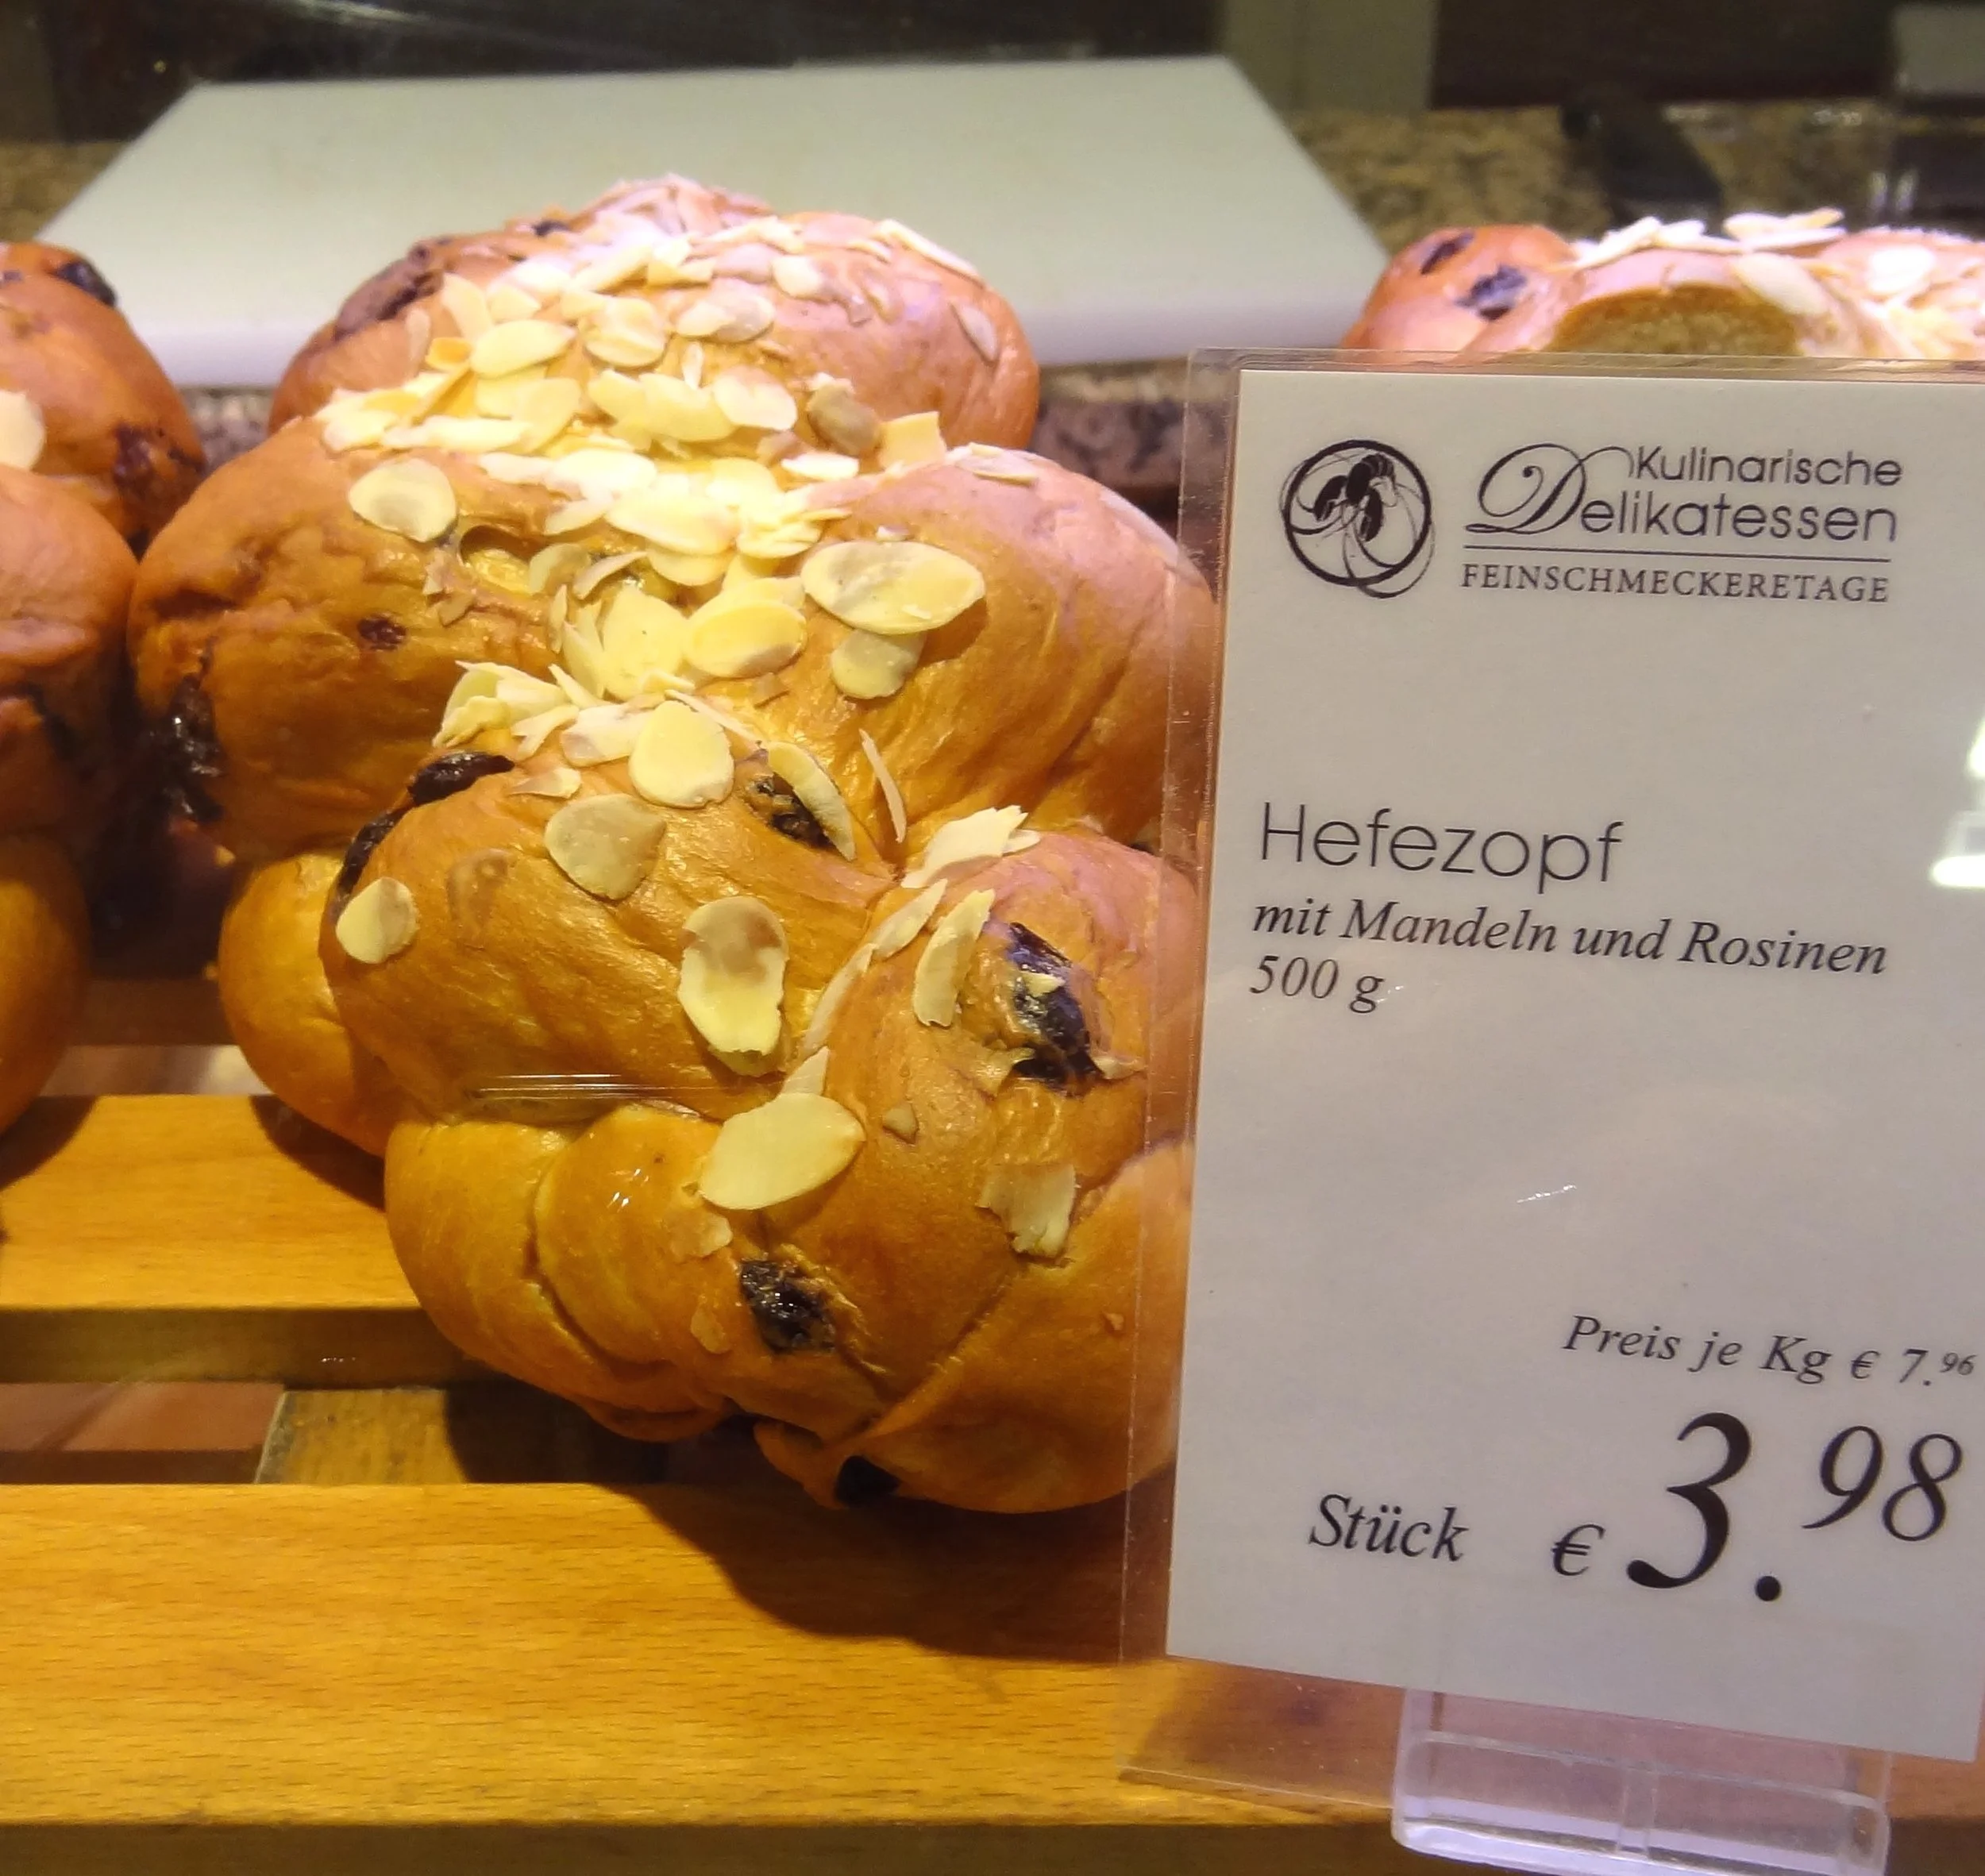
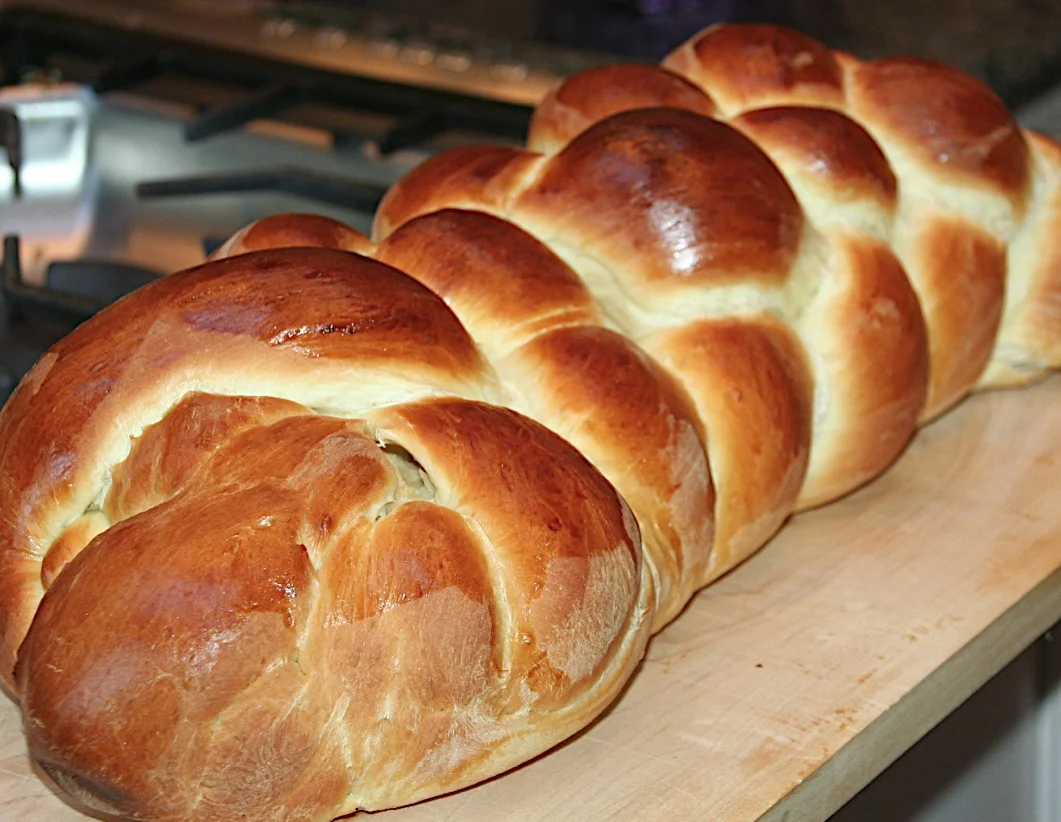
But then we came to the bakery and there, in the case, was a beautiful, braided loaf called Hefezopf, which is like a challah, but with raisins and almonds.
It was a vision. All at once my mind filled with memories of a lovely shabbat challah mixed with grandma singing rozhinkes mit mandlen, that hauntingly beautiful, classic Yiddish lullabye.
Oh my. My eyes well up even thinking about it.
This was something I had to try at home and get right.
I did, but it took several tries. At first I used my challah recipe and sweetened it a bit, but that just tasted like sweeter challah. The consistency wasn't right.
After doing some research about Hefezopf I realized it was more like brioche -- dense, buttery, dairy-laden, so I started tinkering with my brioche recipe.
Yes.
A taste is worth a thousand looks.
Try this. It's called Hefezopf, but like to call it Lullabye Bread.
Lullabye Bread (HEFEZOPF)
- 1 cup milk
- 1 3-inch piece of cinnamon stick, broken in half
- 2 2-inch strips of lemon peel
- 5 tablespoons butter
- 1/3 cup sugar
- 1 package active dry yeast
- 3-1/2 cups all purpose flour, approximately
- 1 teaspoon salt
- 2 large eggs
- 1 cup raisins, optional
- 2-3 tablespoons chopped almonds, optional
Lightly grease a baking sheet. Pour the milk into a saucepan. Add the cinnamon stick, lemon peel, butter and sugar cook over medium heat, stirring to dissolve the sugar, until bubbles form around the edges of the pan and the mixture is hot. Set aside to cool to lukewarm (about 105-110 degrees). Sprinkle the yeast over the milk mixture and whisk the ingredients to dissolve the yeast. Let rest for about 5 minutes or until thick bubbles form. Place the flour and salt in the bowl of an electric mixer. Remove the cinnamon stick pieces and lemon peel from the yeast mixture and pour the liquid into the mixer bowl. Add one egg and mix the dough with a dough hook for about 2 minutes. Add the raisins, if used, and mix for another 2 minutes or so, or until the dough is smooth. If the dough is sticky, add more flour as needed. (Kneading can be done in a food processor or by hand.) Cover the bowl and let rise in a warm place for about 1-1/2 hours or until doubled in bulk. Punch the dough down and cut it into 3 equal pieces. Working on a floured surface, roll the pieces to make strands of about 12-inches long. Braid the strands and place them on the baking sheet. Beat the remaining egg with one teaspoon water and brush the egg wash over the surface of the braid. Sprinkle with almonds, if used. Let rise again for 30 minutes. Preheat the oven to 350 degrees. Bake for about 30 minutes or until puffed and golden brown.
Makes one bread
Challah for a Special Event and Special Person
Challah
This coming weekend is my grand daughter’s bat mitzvah.
In addition to being a rather wonderful person, she is my first grandchild and named for my father, so she’s always had a special hold on my heart.
Her mother, my daughter Meredith, asked me to bake the challah for the celebration.
I find myself inexpressibly moved by this request.
I really can’t say anything more, so I’ll just give you the challah recipe. It’s already been posted on this blog, but never before has it seemed this delicious.
Challah
2 packages active dry yeast
1/2 cup warm water (105-110 degrees)
1/2 cup sugar
8 cups all purpose flour, approximately
1 tablespoon salt
5 large eggs
1/4 cup vegetable oil
1-1/2 cups lukewarm water (about 100 degrees)
1 teaspoon water
poppy seeds or sesame seeds, optional
Preheat the oven to 350 degrees. In a small bowl, mix the yeast, 1/2 cup warm water, 1/2 teaspoon of the sugar and a pinch of flour. Stir, set aside and let rest for 5 minutes or until the mixture is bubbly. In a bowl of an electric mixer, combine 7-1/2 cups flour with the remaining sugar and salt. In a small bowl, mix 4 of the eggs, the vegetable oil and the lukewarm water. Add to the flour mixture. Add the yeast mixture. Blend ingredients thoroughly. Using the kneading hook, knead for 4-5 minutes or until the dough is smooth and elastic, adding more flour as necessary to make sure the dough is not sticky. NOTE: you can make this dough in a food processor (halve the recipe). Cover the bowl of dough and put it in a warm place to rise for about 1-1/2 hours or until doubled in bulk. Punch down the dough, cover the bowl and let rise again for about 30 minutes or until doubled. Remove the dough to a floured surface. Cut dough in 6 or 12 pieces depending on whether you are making one large or two smaller loaves. Make long strands out of the pieces. Braid the strands. Place the braided dough on a lightly greased cookie sheet. Beat the last egg with the tsp. of water. Brush this over the surface of the bread. Sprinkle with seeds if desired. Let rise again for 30 minutes. Bake for about 35-40 minutes for large loaf, about 28-30 minutes for smaller ones (they should be firm and golden brown).
Braiding a 6-strand Challah:
Place 6 strands of dough on a floured board. Press the strands on the top to seal them together. Now:
1. Take the strand on the far right all the way over to the left
2. Former far left all the way over to the right
3. The now far left into the middle
4. Second from right to the far left
5. The now far right into the middle
6. Second from left to far right
7. Now far left into the middle
Repeat 4-7 until the strands are used up. Press the strands to seal the bottom of the loaf.
Za’atar
Anyone who reads this blog knows how much I love to use herbs and spices. It’s not that I am against mild food. It’s just that my tastes prefer stuff that’s more assertive or interesting.
I’ve tried all sorts of spices and blends for all sorts of foods. One of my favorites is Za’atar, an Arabic specialty.
There are lots of ingredient combinations to make this recipe but invariably, basic Za’atar is a mixture of sumac, sesame and thyme (in the Middle East it is made with an herb called za’atar that tastes like thyme). Some recipes include ground up pistachios or other nuts; some call for ground cumin and/or dried oregano or marjoram.
I fell in love with Za’atar years ago. It is so incredibly useful that I have several different versions of it in my spice cabinet. I sprinkle it on hummus and eggplant dip. I make homemade flatbread crisps with it (brush pita rounds with olive oil, add a few sprinkles of Za’atar and bake in a 400 degree oven until the bread is crisp). I’ve added it to marinades for grilled chicken, sprinkled it on top of roasted winter squash and beets.
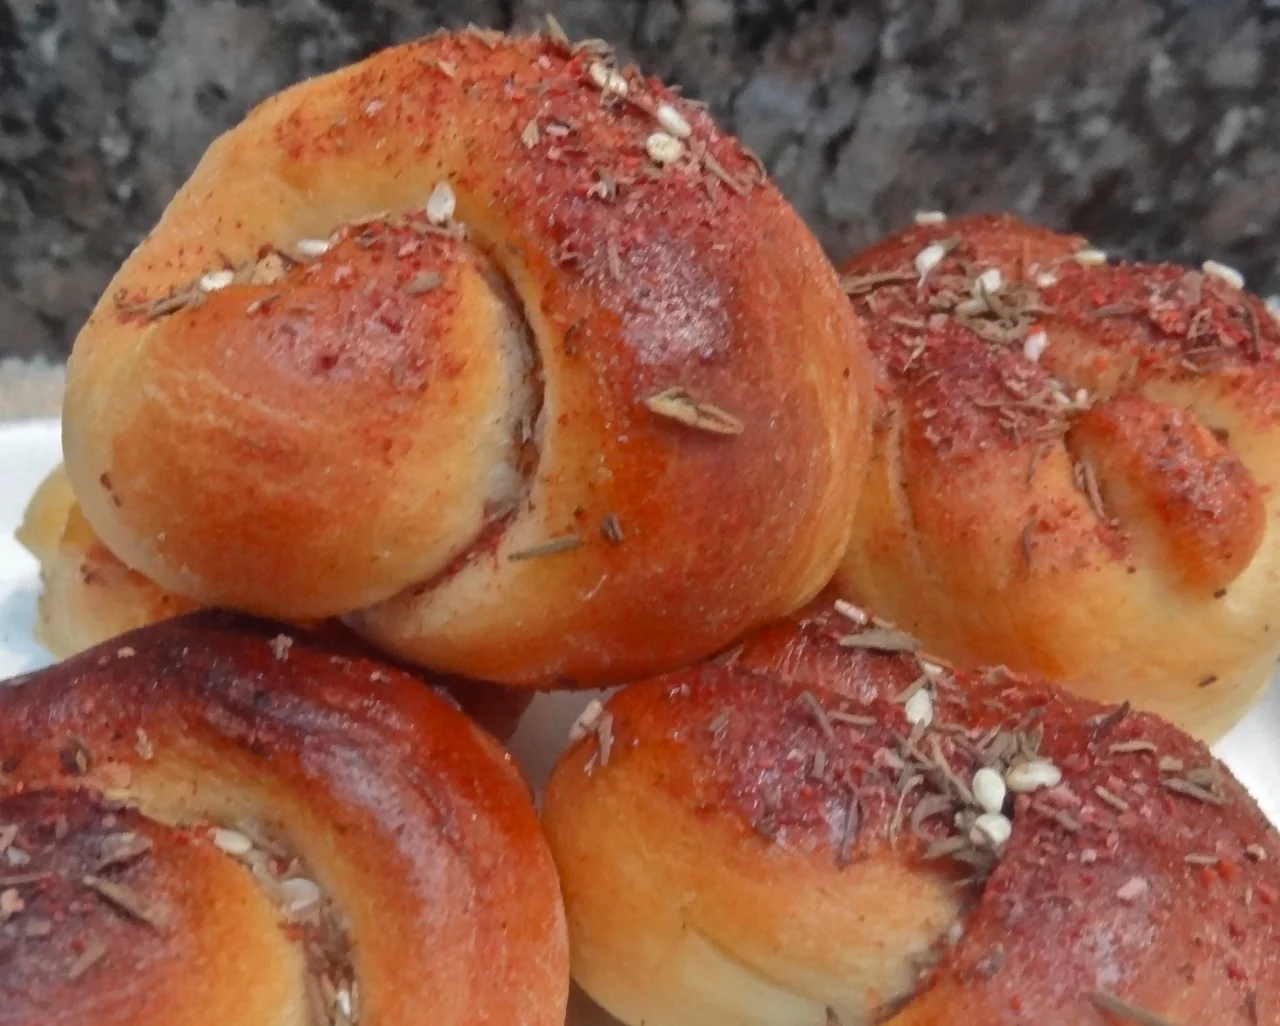
Recently I decided to sprinkle Za’atar onto challah rolls. I got the idea from a colleague of mine, Melinda Strauss, who wrote about Za’atar braided bread on her blog, Kitchen Tested.
It was an inspired thought on her part. So I proceeded to make my usual challah rolls, brushed the unbaked surface with vegetable oil, sprinkled with spice and baked.
Voila! More than delicious bread for sandwiches or for breakfast with eggs or to eat with Shakshouka or buttered and nibbled with coffee. You can figure all that out.
Za’atar
2 tablespoons dried sumac
2 tablespoons sesame seeds
1 tablespoon dried thyme
1 teaspoon dried oregano
1 teaspoon kosher salt
Mix ingredients well. Makes about 1/3 cup
Challah Rolls
If you think smoked salmon with a shmear of cream cheese tastes pretty good on a bagel, then you really ought to try some on a challah roll.
That’s the way I learned to eat smoked salmon, or, “lox” as we called it back in the day. Of course we had bagels too. But nothing beat those challah rolls. There isn’t a bread on earth as delicious as challah. And so, anything as awesome as lox or smoked salmon or whatever you call it that’s good on a bagel is equally good and probably better if you eat it on challah, or challah rolls, which are, after all, nothing more than mini challahs. They are unlike any other kind of roll except perhaps for brioche. Challah rolls are dense and thick and really there aren’t enough wonderful words for them.
As I said, I learned to eat lox and cream cheese on challah rolls when I was a youngster and my parents and our extended family spent many a Christmas vacation at Helferd’s Hotel in Lakewood, New Jersey. That’s how Helferd’s served smoked fish at breakfast. My cousin Leslie and I still talk about it and marvel about how delicious those rolls were.
So I made some the other day using my challah recipe, which, I have to say, is so, so delicious. My grandmother once won a prize for the recipe.
I actually made a double recipe of these and froze most of them.
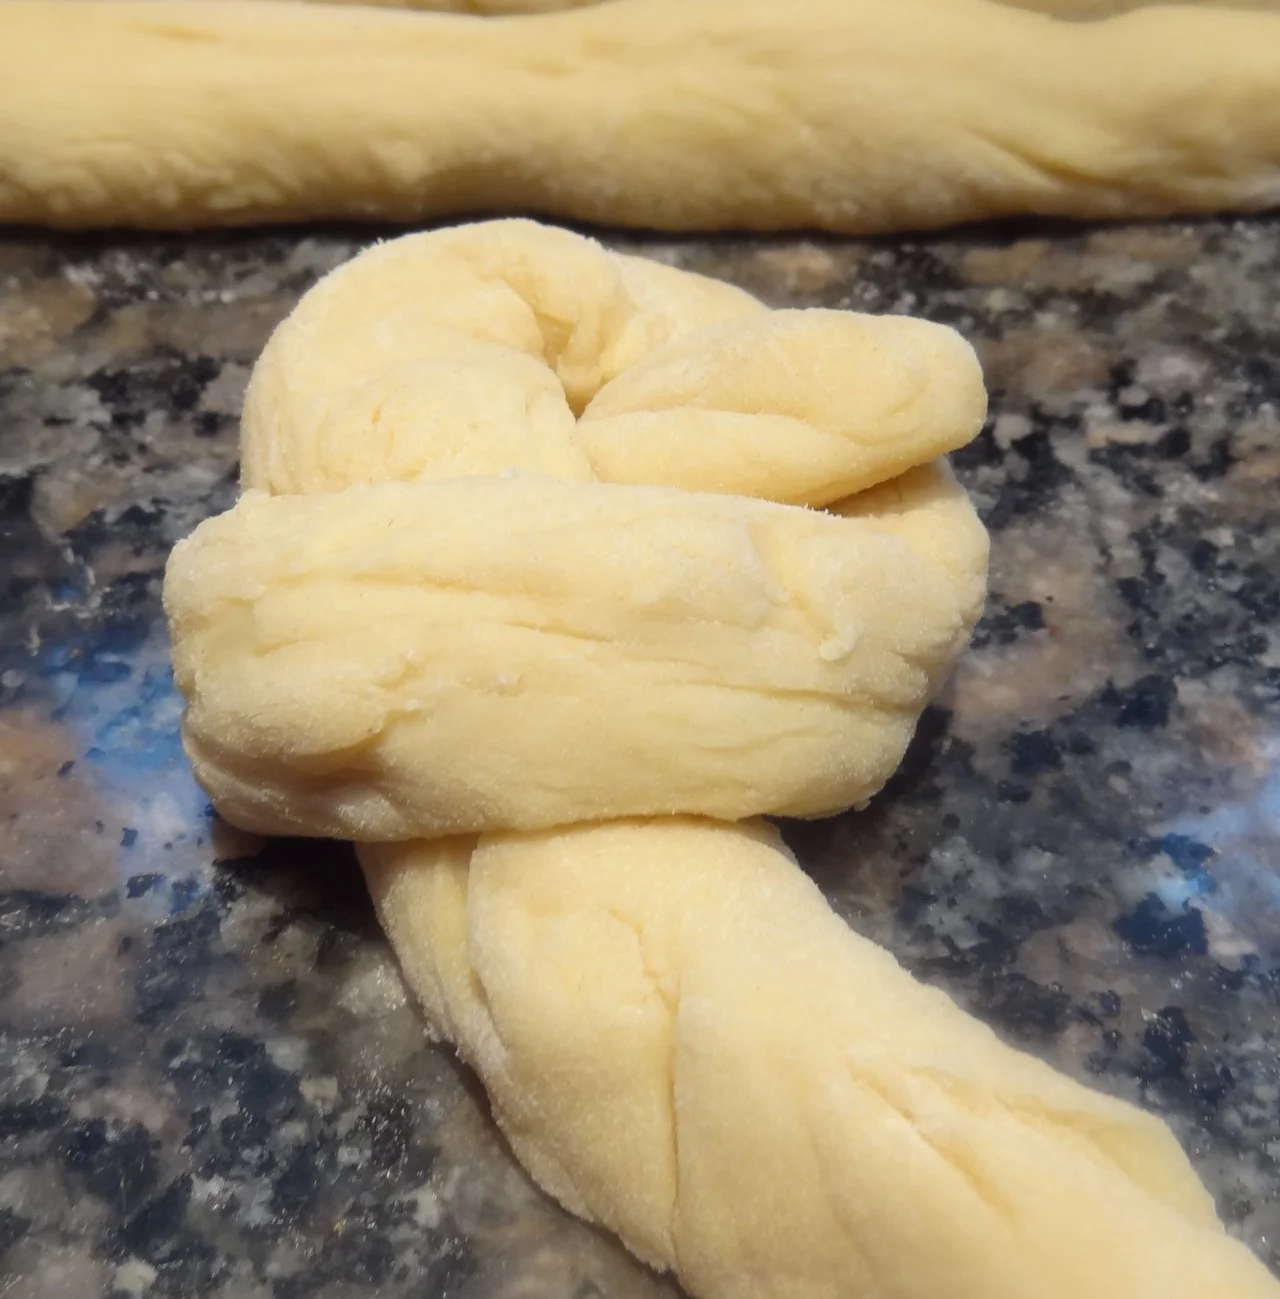
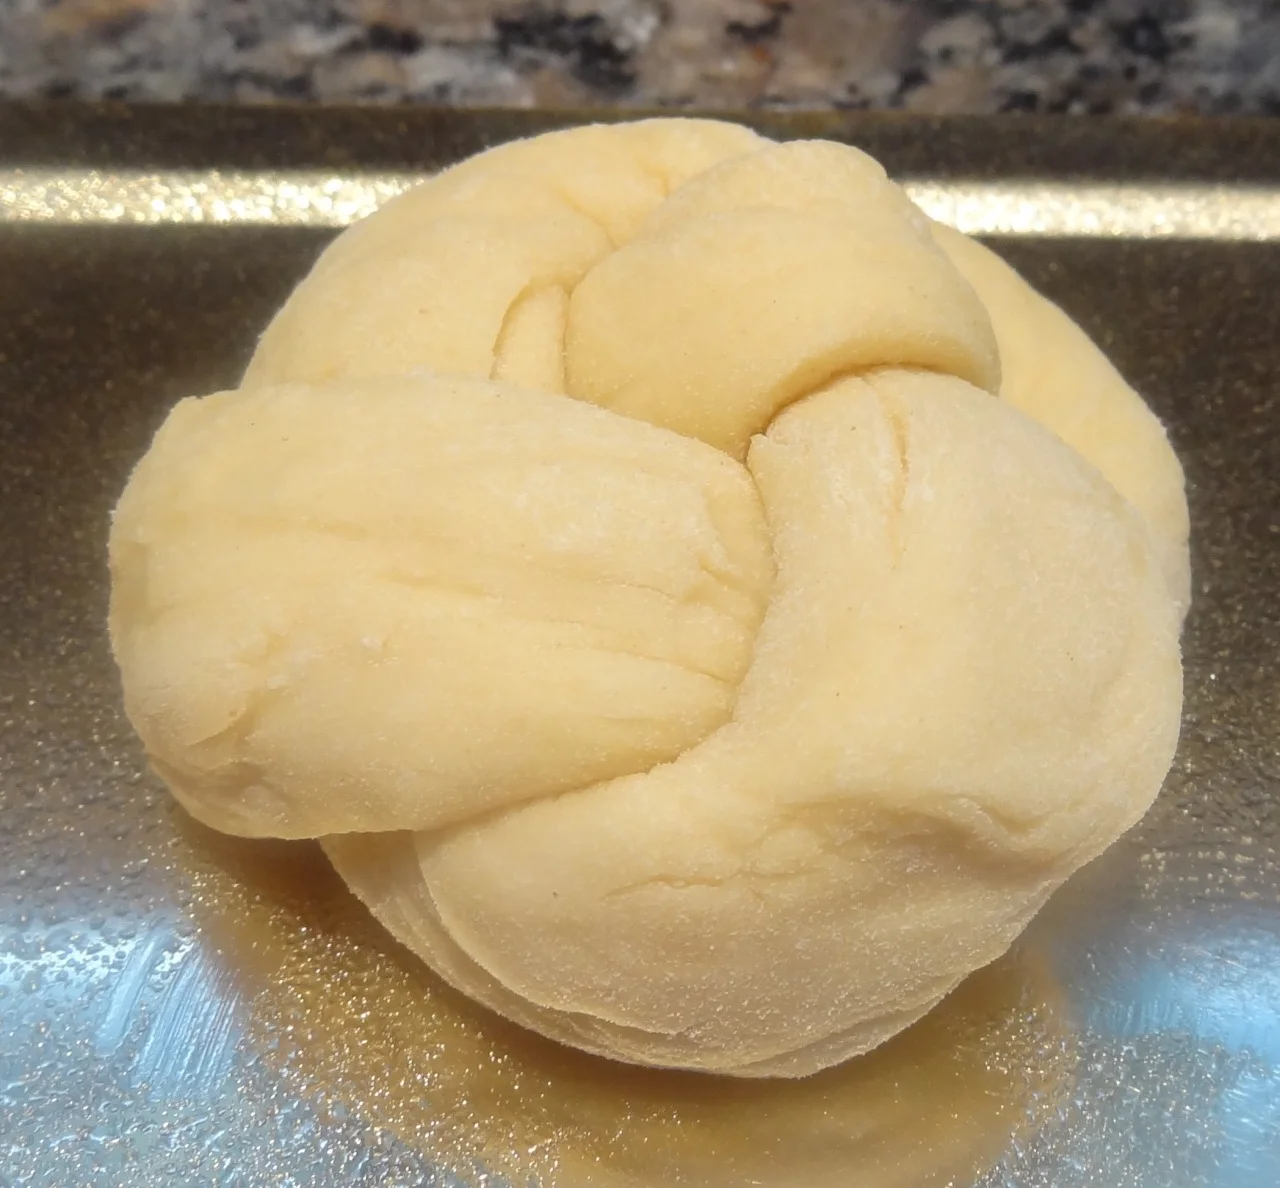
If you want to make challah rolls, check out the photos. Here are the basic shaping instructions:
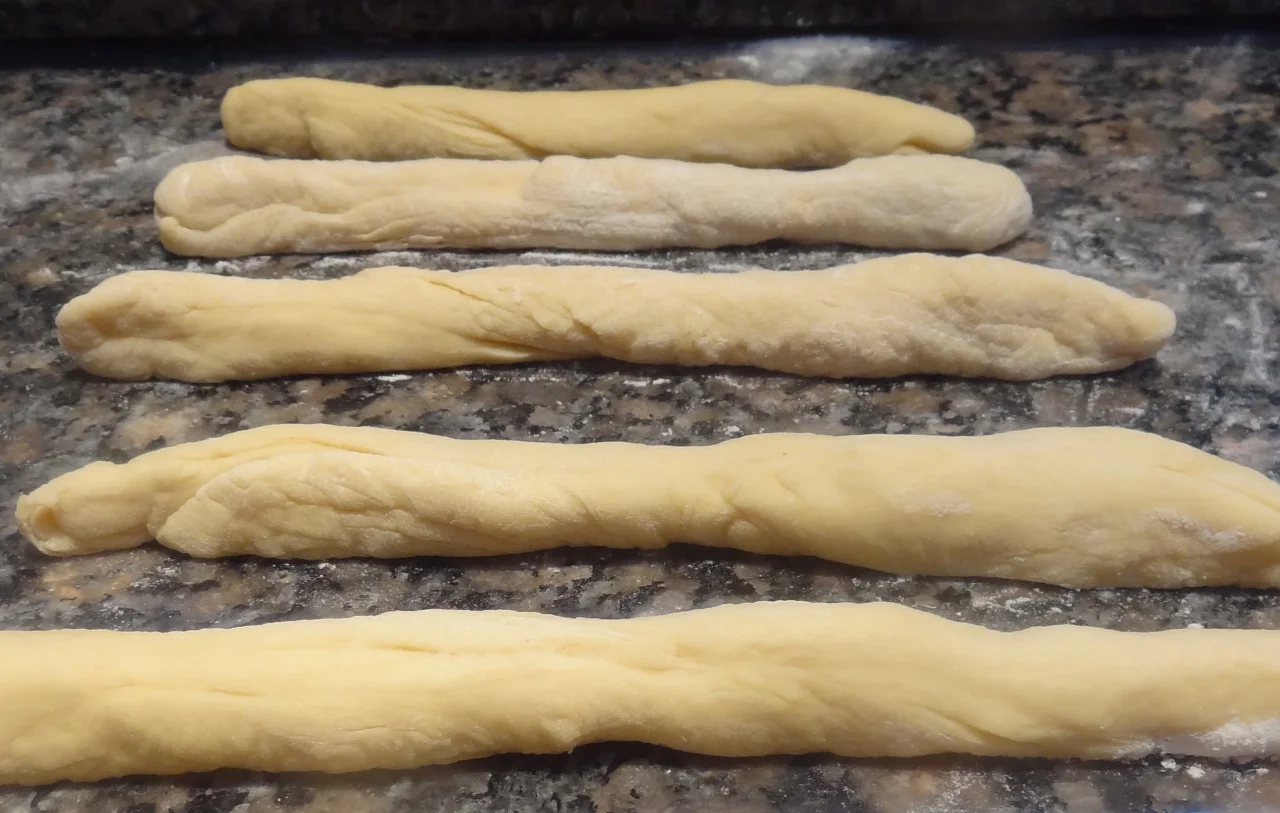
First: cut the dough into 12 equal strands about 10-inches long.
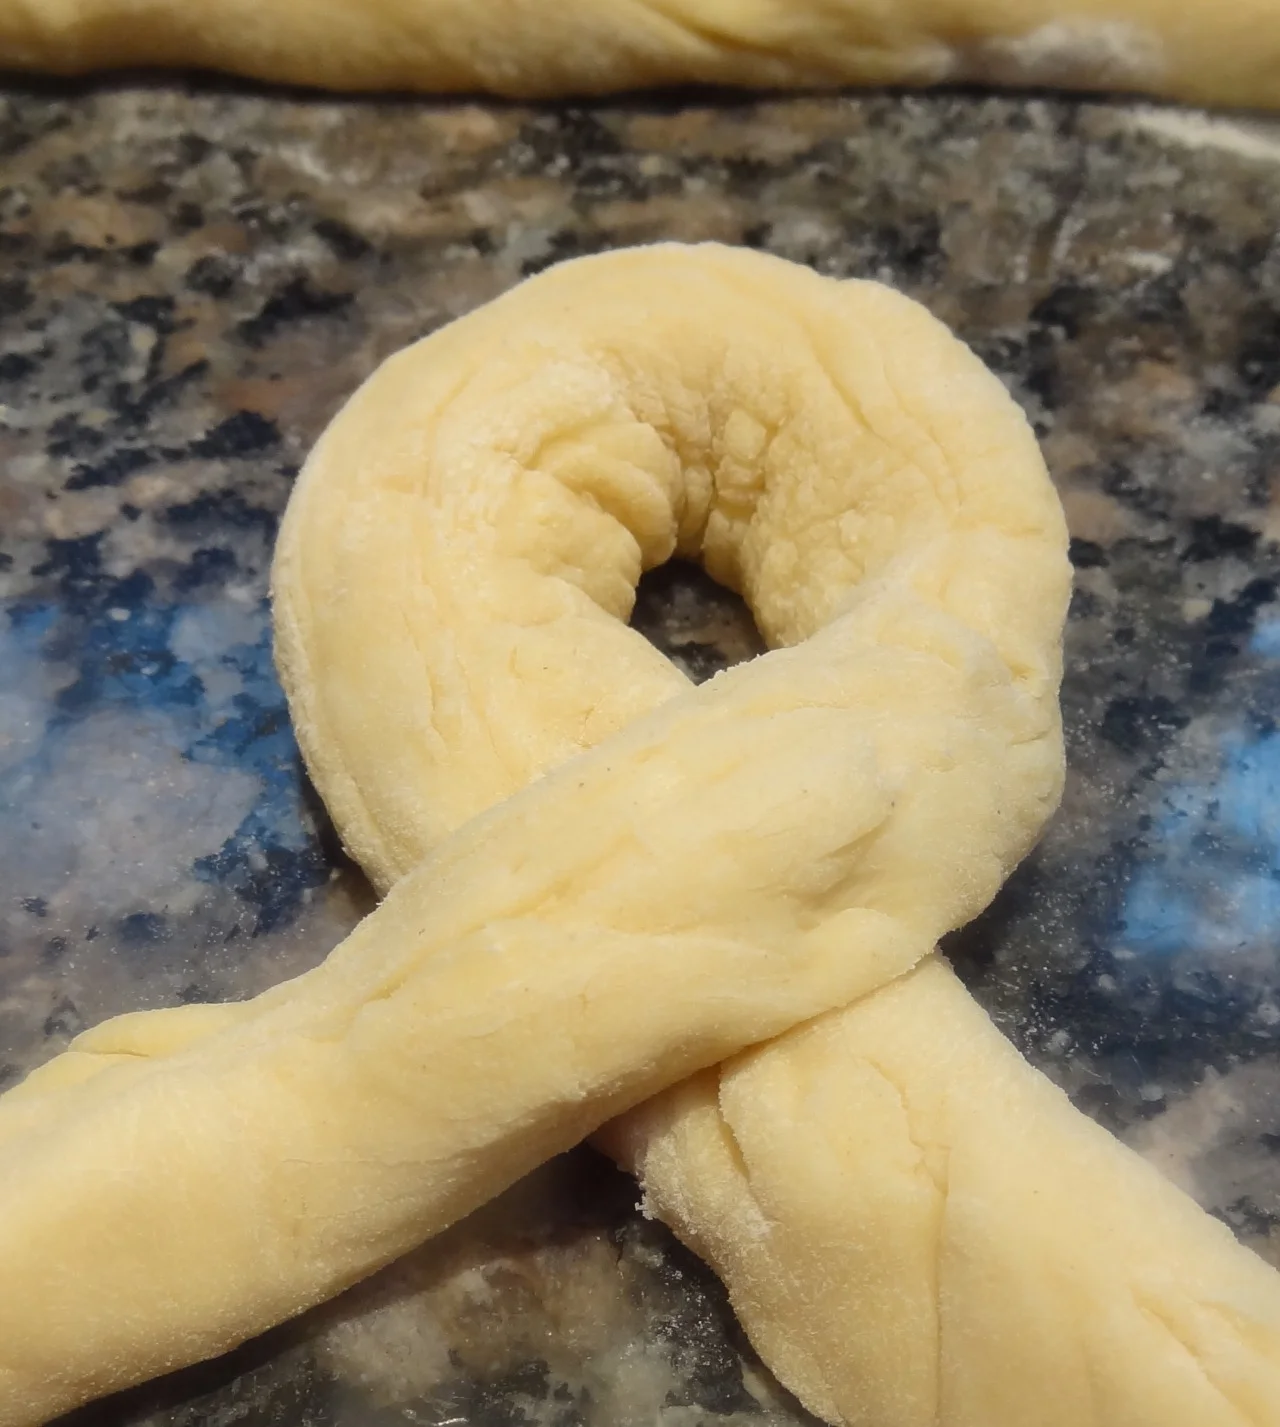
Second: working with one strand at a time, make a medium-size loop with two long strand lengths remaining at the bottom.
Third: take the strand length on the left and tuck it under the loop; then bring it up slightly through the loop.
Fourth: take the strand length on the right and bring it over the loop, tucking it into the center.
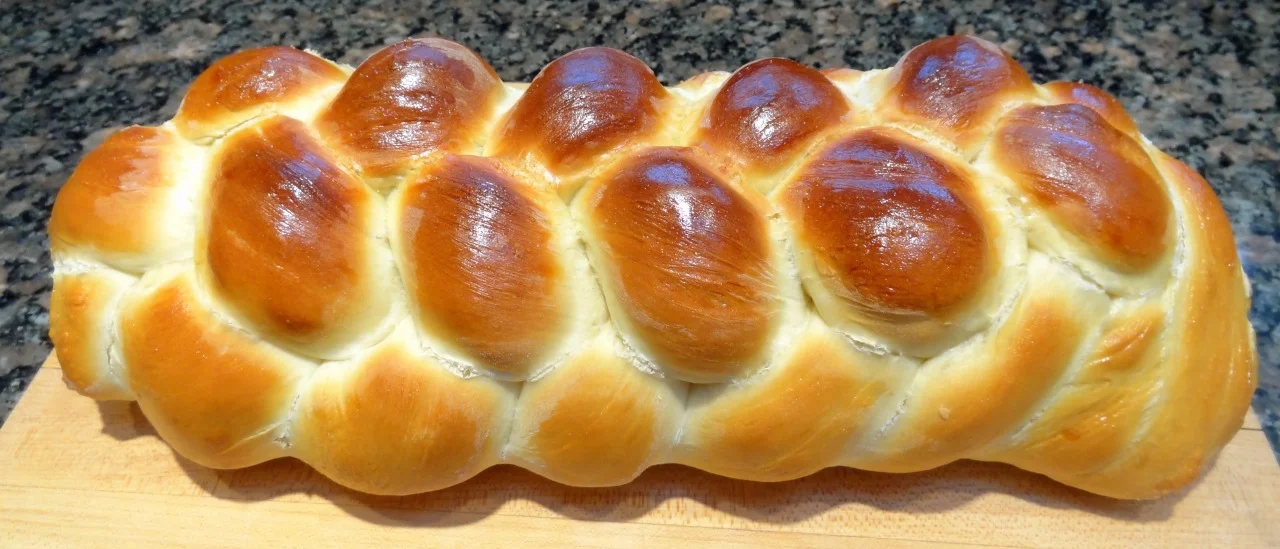
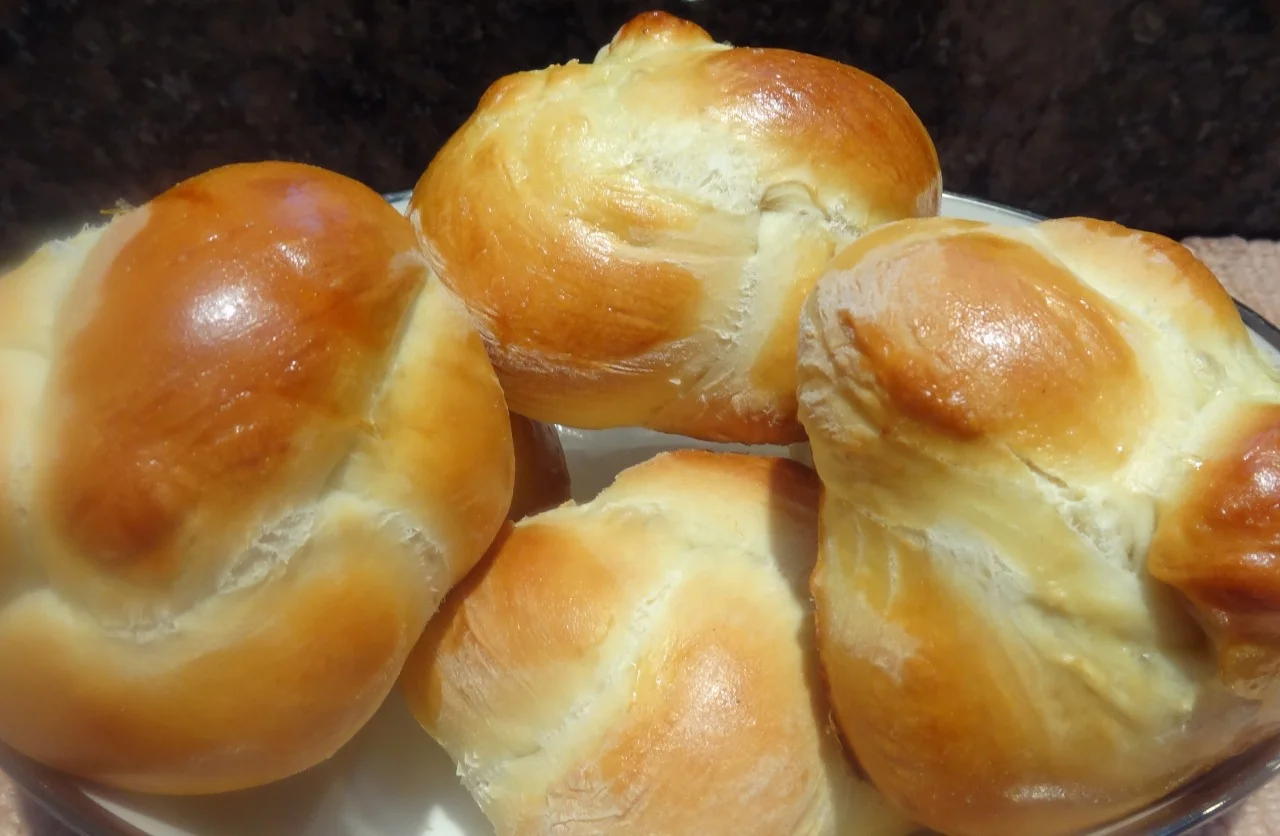
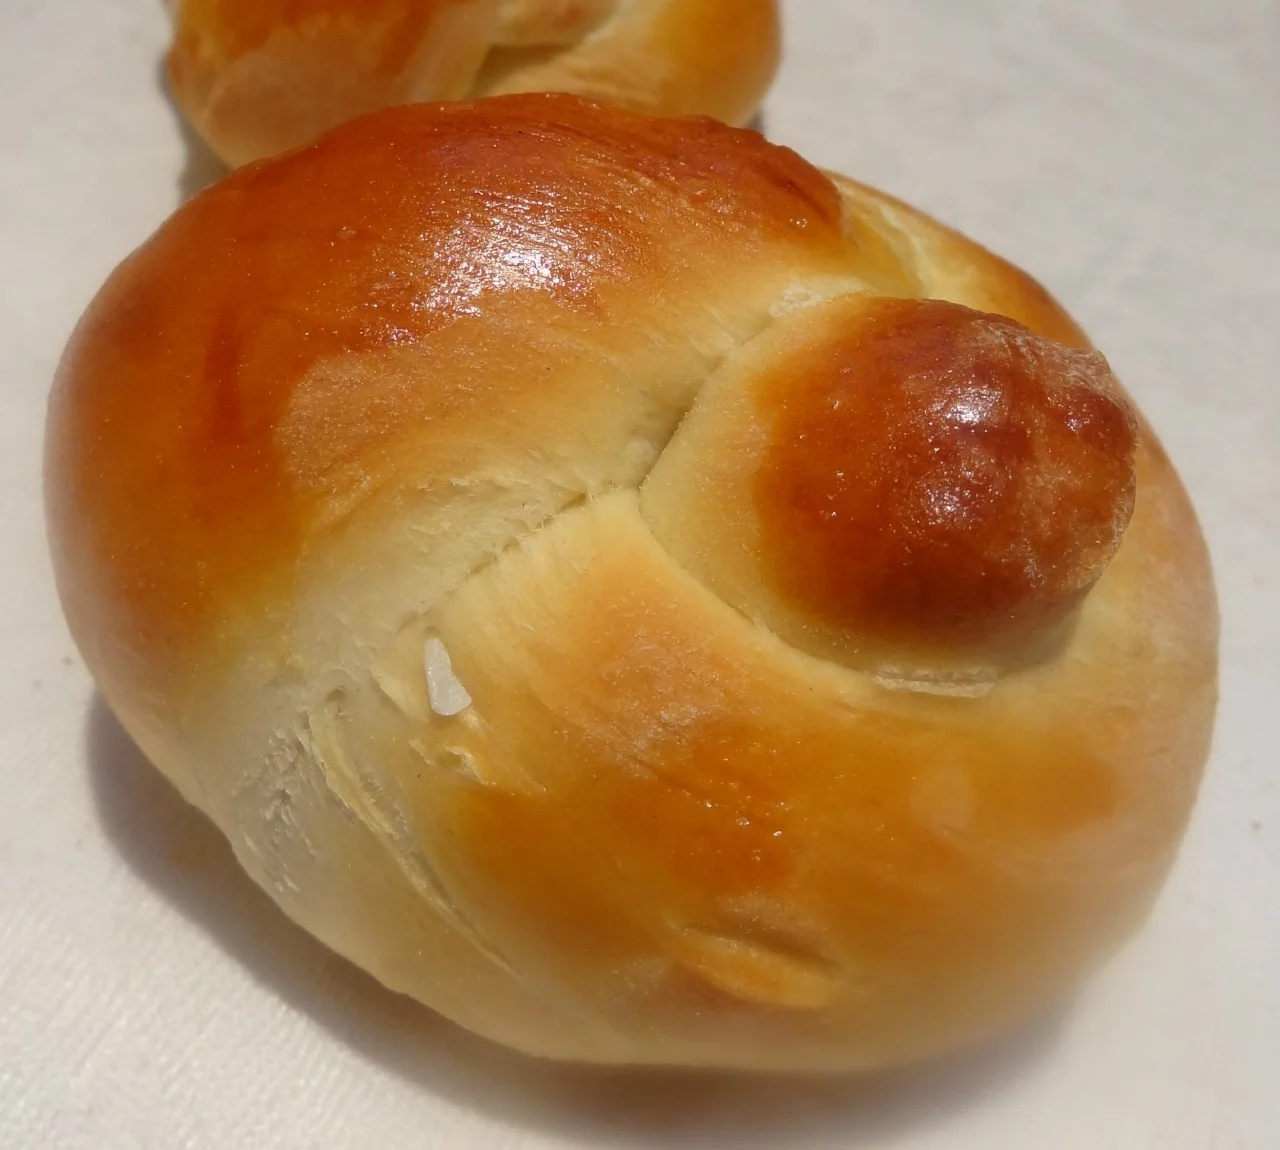
Fifth: brush the rolls with egg wash (see the recipe) and bake. You’ll have 12 rolls that look like the one in the last photo.
Challah Rolls
- 1 package active dry yeast
- 1/4 cup warm water (about 105 degrees; feels slightly warm to touch)
- 1/4 cup sugar
- 4 cups all-purpose flour, approximately
- 1-1/2 teaspoons salt
- 3 large eggs
- 2 tablespoons vegetable oil
- 3/4 cup warm water (about 105 degrees)
In a small bowl, mix the yeast, 1/4 cup water, 1/2 teaspoon sugar and a pinch of flour. Stir and set aside for about 5 minutes or until the mixture is bubbly. While the yeast is resting, place 3-1/2 cups flour with the remaining sugar and salt in the bowl of an electric mixer with a dough hook. Add 2 of the eggs, the vegetable oil and the 3/4 cup water. Mix, using the dough hook until well combined. Add the yeast mixture and blend in thoroughly. Knead for about 3-4 minutes or until the dough is smooth and elastic. Add more flour as needed to make the dough smooth and soft, but not overly sticky.
Cover the bowl and let the dough rise in a warm place for about 1-1/2 hours or until doubled in bulk. Punch the dough down, cover the bowl and let rise again for about 45 minutes or until doubled in bulk. Remove the dough to a floured surface.
Cut the dough into 12 pieces. Make 10-inch long strands out of each piece. Working with one strand at a time, make a loop at the top, leaving 2 stand lengths on the bottom left and right. Take the strand length on left and the bring it under the loop, then lift it through the loop slightly. Take the strand length on the right and bring it on top of the loop and tuck it in. Repeat with all the strands. Place the rolls on the cookie sheet. Beat the last egg. Brush the surface of each roll with some of the egg. Let rise in a warm place for 30 minutes.
While the dough is in the last rise, preheat the oven to 350 degrees. Bake the rolls for about 20 minutes or until firm and golden brown.
Makes 12
Milk and Honey White Bread

Milk and Honey Bread
Sometimes I’m just bored with all food. It frequently happens after a summer’s worth of grilling and when roasting a turkey or making a hearty stew doesn’t seem right yet.
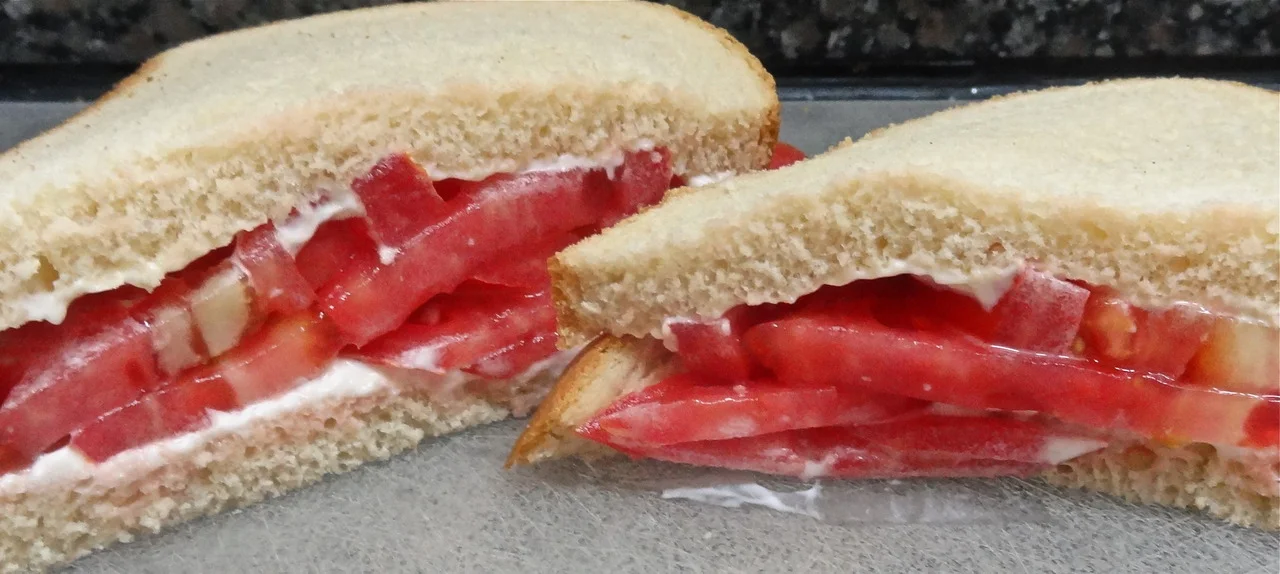
Also, the tomatoes are coming in now. Real tomatoes. Red, red ones. Aromatic, juicy, sweet, oozing seeds tomatoes. Late August tomatoes.
Then, for dinner, at least one night, I can make tomato sandwiches. Nothing special. I have no need for $40 olive oil or rare, aged Balsamic vinegar. No chili pepper additions. No teriyaki or hummus. No fusion version.
Just white bread, mayo and sliced tomatoes.
Nothing more. Life is sweet.
Packaged (not soft white) or bakery white bread will do. But if you like to bake and have a few moments, here’s a recipe for a spectacular bread that measures up to a good tomato.
Milk and Honey White Bread
1 package active dry yeast
1/4 cup warm water (105-110 degrees)
1/4 teaspoon sugar
4 cups all purpose flour, approximately
1-1/2 teaspoons salt
2 large eggs
2 tablespoons softened butter or vegetable oil
3/4 cup warm milk
2 tablespoons honey
In a small bowl, mix the yeast, water, sugar and 1/2 teaspoon flour. Stir, set aside and let rest for 5 minutes or until the mixture is bubbly. In a bowl of an electric mixer, combine the remaining flour and salt. Add the eggs, butter, milk and honey. Add the yeast mixture. Blend ingredients thoroughly, then knead using the kneading hook, for 4-5 minutes or until the dough is smooth and elastic (or knead by hand for about 10 minutes). Add more flour as necessary to keep the dough from being sticky. (Dough may be made in a food processor). Cover the bowl of dough and put it in a warm place to rise for about 1-1/2 hours or until doubled in bulk. Punch down the dough, cover the bowl and let rise again for about 30 minutes or until doubled. Lightly oil a 9” loaf pan. Place the dough in the pan. Let rise in a warm place for 30 minutes. Preheat the oven to 350 degrees. Bake for about 25 minutes or until firm and golden brown.
Makes one
How to Braid a 6-strand Challah

Baking challah? I posted my recipe last week and later realized that a lot of people don’t know how to braid a challah. A cousin of mine called a while ago to confirm that fact. She had wanted to make a challah but didn’t know how to make the bread look professional.
Btw, her name is Jenny Rosenstrach and she is a food writer and blogger, with a terrific book about getting dinner to the table every day (Time for Dinner) and book coming in June called Dinner: a Love Story and a wonderful, family-oriented blog with the same name: Dinner: a Love Story.
She wasn’t the first to consider the whole braiding issue (plus how to make a round challah at holiday time).
So I decided to tell you all how to do it.
I myself became a “pro” not to long ago, I should confess. I had been to a bakery on a tour with one of the women’s groups I belong to. The baker zipped through the braiding so fast it reminded me of those old time black and white movies where people are walking but they look as if they’re running. So we asked him to show us again but of course it was a “show” not a real instruction lesson so he went even faster the next time and no one figured it out.
I always made challah with a standard three-strand braid.
Then I found someone who showed how to do it on Youtube. I don’t remember which version it was or I would mention it here. But my eldest grand child and I were watching and trying to braid the challah as we watched. We had to stop the computer after each step so we could write it all down (and of course we got flour crumbs all over the keyboard) but we finally did get it right.
The next time we made a challah together he remembered it all.
I had to get my instruction sheet out and do it step by step.
I finally got it (after several times).
Okay, you can make a regular three-strand braided challah, the way I had done for years and years. The challah is still delicious. That kind of braid is like braiding someone’s hair. Left over middle, right over middle, left over middle, right over middle, etc.
But, making a 6-strand braid is a little more complicated.
Here’s how:
Lay the six strands alongside each other and press the strands together at the top to seal the top edge. Then braid the strands as follows:
1. far right strand all the way over to the left
2. former far left strand all the way over to the right
3. the now far left strand into the middle
4. the second from right strand all the way over to the left
5. the now far right into the middle
6. the second from the left all the way over to the right
7. the now far left into the middle
8. repeat 4 through 7 as many times as necessary to use up the strands
9. press the strands together at the bottom
Good luck! And enjoy.
My Grandma's Award-winning Challah
My house is going to smell GREAT today! It’s Friday. The grandkids are coming for the weekend. That means challah with dinner, Challah French Toast in the morning.
There are few things that smell as good as a challah baking in the oven.
This challah recipe is from my father’s mother. Last year I had lunch with a long lost cousin on my father’s side who had been brought up by that grandmother (and grandfather). I hadn’t seen him in 40 years. We started to talk about his life with them and at some point got to the cooking and of course, the challah. He told me that grandma’s challah was legendary and that once, one of her challahs went up at auction for their synagogue and it raised $100. And that was in the 1930s! A fortune of money, but I guess the buyer knew how good that challah would be.
Grandma’s recipe, as handed down by my mother, had no instructions and the list of ingredients said stuff like “8 hands of flour” and “1/2 hand of sugar.”
It took several tries for me to work this out but I finally did get it right.
Here is the award-winning challah recipe:
Challah
2 packages active dry yeast
1/2 cup warm water (about 105 degrees; feels slightly warm to touch)
1/2 cup sugar
8 cups all-purpose flour, approximately
1 tablespoon salt
5 large eggs
1/4 cup vegetable oil
1–1/2 cups warm water (about 105 degrees)
Poppy seeds or sesame seeds, optional
In a small bowl, mix the yeast, 1/2 cup water, 1/2 teaspoon sugar and a pinch of flour. Stir and set aside for about 5 minutes or until the mixture is bubbly.
While the yeast is resting, place 7-1/2 cups flour with the remaining sugar and salt in the bowl of an electric mixer with a dough hook. Add 4 of the eggs, the vegetable oil and the 1-1/2 cups water. Mix, using the dough hook until well combined. Add the yeast mixture and blend in thoroughly. Knead for about 3-4 minutes or until the dough is smooth and elastic. Add more flour as needed to make the dough smooth and soft, but not overly sticky.
Cover the bowl and let the dough rise in a warm place for about 1-1/2 hours or until doubled in bulk. Punch the dough down, cover the bowl and let rise again for about 45 minutes or until doubled in bulk. Remove the dough to a floured surface.
Cut the dough into 3 or 6 pieces, depending on whether you are going to make a 3 or 6 strand braid. Make long strands out of each piece. Braid the strands and seal the ends together by pressing on the dough. Place the bread on a lightly greased cookie sheet. Beat the last egg. Brush the surface with some of the egg. Sprinkle with seeds if desired. Let rise in a warm place for 30 minutes.
While the dough is in the last rise, preheat the oven to 350 degrees. Bake the challah for about 30 minutes or until firm and golden brown.
Makes one large challah. You can cut the dough in half to make two smaller loaves (bake for about 22-25 minutes) or make a half recipe. (For half recipes you can use a food processor to make and knead the dough).
****If you want to make a6-braid challah, click here: 6-braid challah