Sukkot

Vegetarian Stuffed Red Pepper Halves

Sukkot, which begins at sunset September 29th, is a harvest holiday, which means that in addition to all the ritual and religions traditions, there’s lots of food, especially stuffed foods which are proof of the harvest bounty of fruits and vegetables.

Like stuffed peppers.

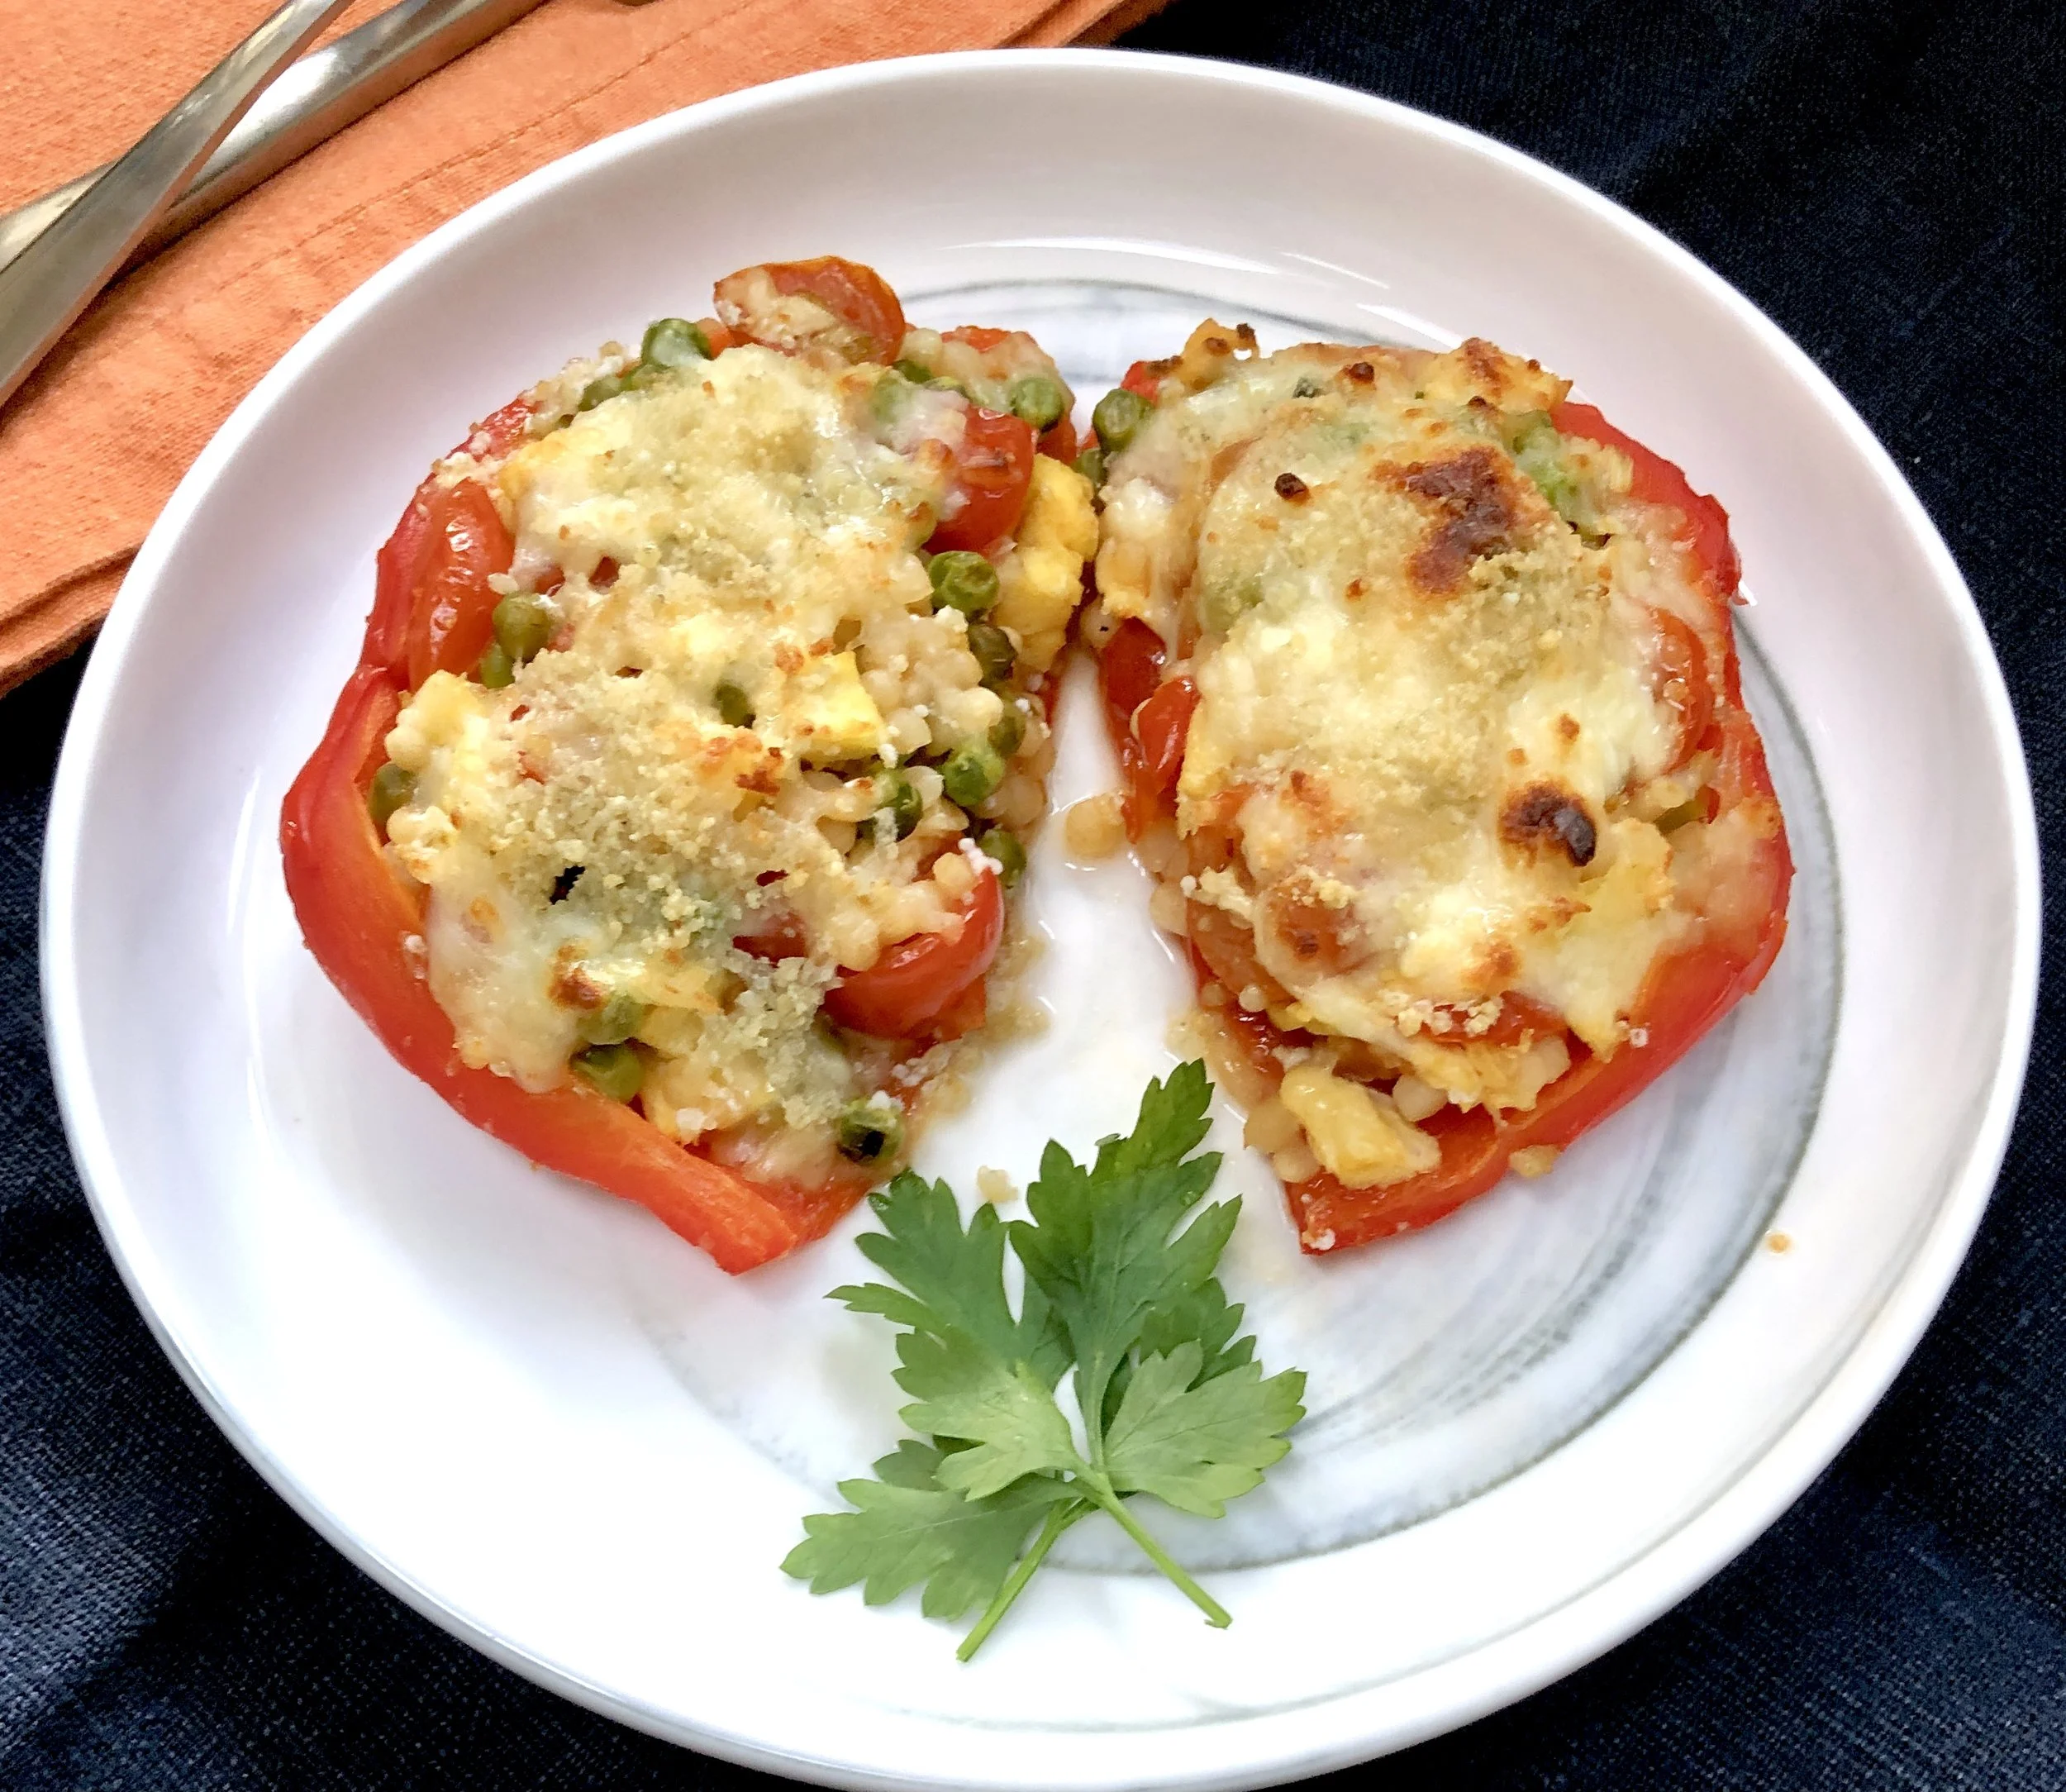
I have made stuffed peppers many times for Sukkot, but in recent years have found it easier to cut them into halves. The halves are still filled, but easier to cook and to eat. They are also easier to tote to a Sukkah.

This is one of the versions that my family has loved. I’ve made it with both Israeli and Moroccan couscous and also with rice and barley. The point is to include a starchy pasta or whole grain.

Btw, I cut the peppers in the middle, into top and bottom halves but obviously you can cut them from the stem down and have two top-and-bottom halves.

Vegetarian Stuffed Red Pepper Halves

  • 4 red bell peppers

  • 1/2 cup couscous (or use rice, barley, etc.)

  • 2 tablespoons olive oil

  • 1 medium onion, chopped

  • 2 cups halved cherry or grape tomatoes

  • 1 cup thawed frozen peas

  • 2 beaten eggs

  • 1 cup shredded mozzarella cheese

  • 3 tablespoons grated Parmesan cheese

Preheat the oven broiler. Cut the peppers in half. Discard the stems and seeds. Place the pepper halves, skin side up, on a parchment paper lined baking sheet. Broil the pepper halves for 4-5 minutes or until the skin darkens and blisters. Remove the peppers, wrap them in foil or place them in a bag and let them cool. When cool, remove the skin and place the pepper halves, hollow side up, on a parchment paper lined baking sheet. Set aside. Turn the oven to 425F.

Cook the couscous. Place the cooked couscous in a bowl and set aside. Heat the olive oil in a saute pan over medium heat. Add the onion and cook 2-3 minutes. Add the cherry tomatoes and peas and cook 1-2 minutes. Remove from the heat and add to the cooked couscous. Pour the eggs into the pan and cook, stirring, until the eggs are set. Place them on a cutting bord and chop them into small pieces. Add them to the couscous. Spoon equal amounts of the couscous mixture inside the pepper halves. Sprinkle with equal amounts of mozzarella cheese, then sprinkle with Parmesan cheese. Bake for 12-13 minutes or until the cheese has melted and begins to turn golden brown.

Makes 4-8 servings


Beet and Chickpea Salad

fullsizeoutput_867c.jpeg

I realize beets are available throughout the year. We are a beet-loving family, so I buy them all the time. Throughout the year.

And yet, I still associate beets with autumn. In my memory, September, October, November — those months are the real “season” for harvesting beets. In fact, I remember them as an integral part of the meals during Jewish holidays.

Sukkot, the “harvest holiday” is a good time to include beets on the menu. Look for beets with the greens still attached — they are from a current harvest. They are sweeter and tastier. Lovely however you cook them, including this salad, which you can make ahead. Serve it at room temperature.

Beet and Chickpea Salad

  • 4 large beets

  • 1 15-ounce can chickpeas, drained and rinsed

  • 1 tablespoon olive oil

  • 2 teaspoons fresh thyme leaves

  • sea salt

  • 3 tablespoons olive oil

  • 3 tablespoons white wine vinegar

  • 2-3 tablespoons chopped fresh parsley

  • salt and freshly ground black pepper to taste

Preheat the oven to 450 degrees. Trim the beets, cutting away the greens, if any, and discarding any hard, fibrous parts of the stem. Wash and drain the greens and use them for other purposes. Scrub the beets, wrap them in aluminum foil and roast for 50-60 minutes or until they are tender. Peel the beets when they are cool enough to handle. Cut the beets into bite size pieces and place in a bowl. While the beets are cooking, place the chickpeas on a foil-lined baking sheet. Pour the one tablespoon olive oil on top and shake the pan to coat all the chickpeas. Sprinkle with thyme and sea salt to taste. Shake the pan again. Roast for 20 minutes, shaking the pan every 5 minutes or so, or until golden brown and crispy. Add the roasted chickpeas to the beets. Pour the remaining olive oil over the vegetables and toss, then pour in the white wine vinegar and toss again. Sprinkle with parsley and salt and pepper to taste. Let rest for 10-15 minutes before serving.

Makes 8 servings


GIANT Knish

Anyone who reads this blog knows that potatoes are my go-to comfort food. My magic medicine for when I'm stressed out.

So I'm definitely going to need something potato tonight when Ed and I have our debate-watch group over. (By the time this election is over my potato consumption for the year will be way over the limit.)

So I made a stuffed potato roll. Actually mashed potatoes with caramelized onions wrapped inside puff pastry.

Actually, a giant knish.

And guess what!? This dish is absolutely perfect for my Vegetarian Break-the-Fast, so I made one for that occasion too!

And also guess what!? It's also perfect for Meatless Monday. And also for Sukkot, when it is traditional to serve stuffed foods.

All in all, this is a big, big winner for whenever. Really. Whenever.


Giant Knish

  • 3 pounds all-purpose potatoes
  • 4 tablespoons olive oil
  • 1 large sliced onion
  • 1 large egg
  • 1 teaspoon salt or to taste
  • freshly ground black pepper to taste
  • 2 sheets frozen parve puff pastry

Preheat the oven to 375 degrees. Lightly grease a flat baking sheet. Peel the potatoes, cut them into chunks and boil them in lightly salted water for about 15 minutes, or until they are cooked through. Drain the potatoes and return them to the pan. Add 2 tablespoons of the olive oil and mash the potatoes until they are fluffy. While the potatoes are cooking, heat the remaining 2 tablespoons olive oil in a sauté pan over medium heat. Add the onion and cook for 12-15 minutes or until lightly browned. Add the onions to the potatoes. Add the egg, salt and pepper and stir gently to mix ingredients. Let cool. Using one sheet of puff pastry at a time, roll the dough slightly thinner. Place half the potato filling down the center of the dough, using up the middle 1/3 of the dough and leaving a one-inch margin at both of the short ends. Enclose the filling: place one side of the dough over the filling, then place the other side of the dough over the filling. Press the short ends to enclose the filling at the top and bottom. Place the roll, seam side down, on the prepared baking sheet. Refrigerate for about 30 minutes or until the dough feels cool and firm. Bake for 30-35 minutes, or until golden brown. Cut with a serrated knife. 


Makes 2 rolls, each serving 6 people


Easier Than Pie Fruit Galette

If you're ever in need of a recipe for a gorgeous, fabulous tasting dessert that looks as if you fussed to create a culinary artistic masterpiece when it really was one of the easiest desserts you ever made -- here it is.

Plum galette.

Even the name is fancy. But this one is a cinch to make and guaranteed to please.

President (Empress, Italian-prune) plums are coming to the end of their season, so get them while you can. Use them for lots of recipes, like Plum Tart or  or Clove and Lemongrass Poached Plums.

Or for this easy puff pastry tart. It's a lovely dessert for family, company, Rosh Hashanah, Sukkot, Shabbat or any old time.

Plum Galette with Orange and Rosemary

(If you can’t find frozen dough pastry squares in the frozen section of your supermarket, buy regular puff pastry sheets and cut the sheets into squares.)

  • 6 puff pastry squares (4-inch)
  • 3 peaches or 6 President or Empress (or about 8 Italian prune) plums, cut into wedges (about one pound)
  • 3-4 tablespoons sugar
  • 1 teaspoon grated fresh orange peel
  • 1 teaspoon chopped fresh rosemary

Preheat the oven to 425 degrees. Place the pastry squares on a parchment paper lined baking sheet. Prick the dough in a few places. Arrange equal amounts of the fruit on top of each square, leaving a border of 1/2-inch. Mix the sugar, orange peel and rosemary. Sprinkle equal amounts of the sugar mixture on top of the fruit (using the extra sugar if you have a real sweet tooth). Pinch the dough border to make it slightly higher and closer to the fruit. Refrigerate for about 20 minutes. Bake for about 20 minutes or until golden brown.


Makes 6 servings


Pear and Ginger Crisp

Sukkot, which begins at sundown tomorrow (October 12th) is very much like Thanksgiving. Both holidays celebrate the harvest and there’s a feast of good food to eat. 

The difference is that on Sukkot, according to Rabbinic tradition, you’re supposed to eat all your meals in a sukkah (a “hut” or “booth”), outside. Which is probably the way the colonial Pilgrims ate their Thanksgiving dinner, now that I think of it.

A lot of Jewish families build sukkahs. Of course you have to have a backyard or some sort of property. Or a fire escape. Or some place where you can build a makeshift hut, even if it is just a “representation” of a real sukkah. If you belong to a synagogue you can go to a communal sukkah of course. 

In any event, I don’t know anyone who actually eats all their meals outside in a hut. I know maybe one or two who build a sort of sukkah and they have dessert out there on the first night of the holiday. My family never built one when I was a kid. The closest I ever got to eating in a sukkah was when my cousin Leslie and I hung a bedspread over a card table, crawled inside and ate potato chips.

To tell the truth, my husband and I didn’t build one for our kids either. They visited the one at their Sunday school.

But Sukkot food is really good no matter where you eat it. Because it follows the season and the harvest, like all good food. Sukkot food features end-of-summer and beginning-of-autumn fruits and vegetables: apples, pears, squash, pumpkin, eggplant and stuff like that.

Sukkot foods are also usually easily transportable too — for those people who will be carrying the food out to the hut.

Here’s a seasonal dessert that’s yummy, easy and you can take anywhere:

Pear and Ginger Crisp

6 ripe pears

juice of half lemon

1-1/2 teaspoons finely chopped fresh ginger

1/2 teaspoon cinnamon

1/3 cup brown sugar

2 tablespoons all-purpose flour

pinch of salt

Crust:

3/4 cup all-purpose flour

1/2 cup brown sugar

1/4 teaspoon salt

6 tablespoons butter

Preheat the oven to 400 degrees. Peel, core and slice the pears into a bowl. Add the lemon juice, ginger, cinnamon, 1/3 cup brown sugar, flour and salt. Toss the ingredients and place in a baking dish. Make the crust: Combine the 3/4 cup flour, 1/2 cup brown sugar and salt in a bowl. Add the butter in chunks and work into the flour mixture until it resembles coarse crumbs. Scatter over the pears. Bake for about 35 minutes or until the crust is golden brown. Let cool slightly before serving (or serve at room temperature). Makes 6-8 servings

Lily Vail’s Famous and Wonderful Apple Crisp

Soup’s done, turkey’s ready to roast, challah is baking (and the house smells too wonderful to leave, so I’m not going to). Vegetables washed and trimmed, prepared for cooking. Sweet potato casserole finished. It’s holiday time. Festive dinner, candles, apple slices and honey.

Dessert of course.

What?

My mother’s famous Apple Crisp. She used to make it every autumn. It was one of my Dad’s favorites and I like to make it for the Jewish holidays because it brings back such wonderful memories of my parents. I miss them both.

My Mom made her Apple Crisp with Raisin Bran but yesterday, when I shopped for the dinner, I bought Oat Bran flakes and used them instead. Guess what?

It was as delicious as ever.

Here’s the recipe. Make it anytime you want something especially delicious for dessert. Maybe too late for Rosh Hashanah, but definitely perfect for a Yom Kippur Break-the-Fast or, even better, for Sukkot.

Lily Vail’s Famous and Wonderful Apple Crisp

  • 5-6 tart apples, peeled and sliced

  • 1/4 cup sugar or honey

  • 2 tablespoons melted butter

  • 1 teaspoon cinnamon

  • 1/4 teaspoon salt

  • 3 tablespoons butter

  • 1/3 cup sugar

  • 1 tablespoon all-purpose flour

  • 2 cups raisin bran or oat bran flakes

Preheat the oven to 350 degrees. Place the apple slices in a baking dish. Add the 1/4 cup sugar, melted butter, cinnamon and salt and toss the ingredients to mix them completely and coat the apples with the seasonings. In a mixer bowl beat the butter, 1/3 cup sugar and flour together until well blended. Add the cereal and stir until the mixture looks like crumbles. Scatter the crumbles over the apples. Cover the pan with foil or a lid. Bake for 25 minutes. Remove the cover and bake for about 15 minutes or until the apples are tender and the top is golden brown and crispy. Best when still warm.

Makes 6 servings

Maple Glazed Chicken

If you need a good entree for Sukkot, or for any family dinner or even a good company dish, think chicken.

Chicken is like a basic black dress. You can dress it up or make it plain, season it with almost any herb or spice and cook it by almost any method. It’s a good main dish for family but also suitable for company. Eat it cold. Eat it hot. We’d miss a lot if we didn’t cook chicken.

Here’s an easy chicken dish that’s perfect now as the weather gets cooler and we turn to fall foods. It’s a little sweet (maple syrup and orange peel), but also has a little heat (mustard and crushed dried red pepper). This dish doesn’t take long to prepare and it is easy to transport so it’s great if you’re bringing food to a sukkah or just planning an end of season picnic. Or having a meal at your kitchen table. You can make it ahead up to the actual cooking or cook it completely ahead if you want to eat the dish at room temperature.

Maple Glazed Chicken

  • 4 large bone-in chicken breast halves or whole legs (or one quartered chicken)
  • 6 tablespoons maple syrup
  • 2 tablespoons Dijon mustard
  • 2 tablespoons olive oil
  • 1 teaspoon finely grated fresh orange peel
  • 1/2 teaspoon crushed red pepper (flakes)
  • salt to taste

Preheat the oven to 350 degrees F. Rinse and dry the chicken pieces and place them in a baking dish, leaving space between each piece. In a small bowl, combine the maple syrup. Dijon mustard, olive oil, orange peel and red pepper flakes. Stir well, then spoon the mixture over the chicken. Turn the chicken to coat all sides with the glaze. Sprinkle with salt if desired. Place chicken skin side down. Bake for 10 minutes. Turn chicken skin side up. Cook for another 15 minutes, basting occasionally. Raise heat to 450 degrees F and cook for another 10 minutes or until browned on top and cooked through. Serve with the pan juices.

Makes 4 servings

Ask Ronnie a question: http://ronniefein.com/ask

To comment: http://ronniefein.com/submit