dessert

Passover Orange Cake with Roasted Oranges and Zabaglione

fullsizeoutput_89c2.jpeg

When I was growing up the standard Seder dessert was sponge cake. Everyone made fun of it and said it was true to its name and that frankly, biting into a sponge was not a good thing.

I actually never cared because as long as I got chocolate covered macaroons I was a happy girl.

By the time I began to host the Seders, flourless chocolate cakes had become fashionable and my aunt Rozzie's recipe for sponge cake was tucked away in a recipe file.

Now more time has gone by and my family got bored with flourless chocolate cake. So I spent years experimenting with flourless rolled cakes and cakes made with nut crumbs instead of wheat and going fancy with layers of jelly-roll pan cakes. Some of those were absolutely fabulous.

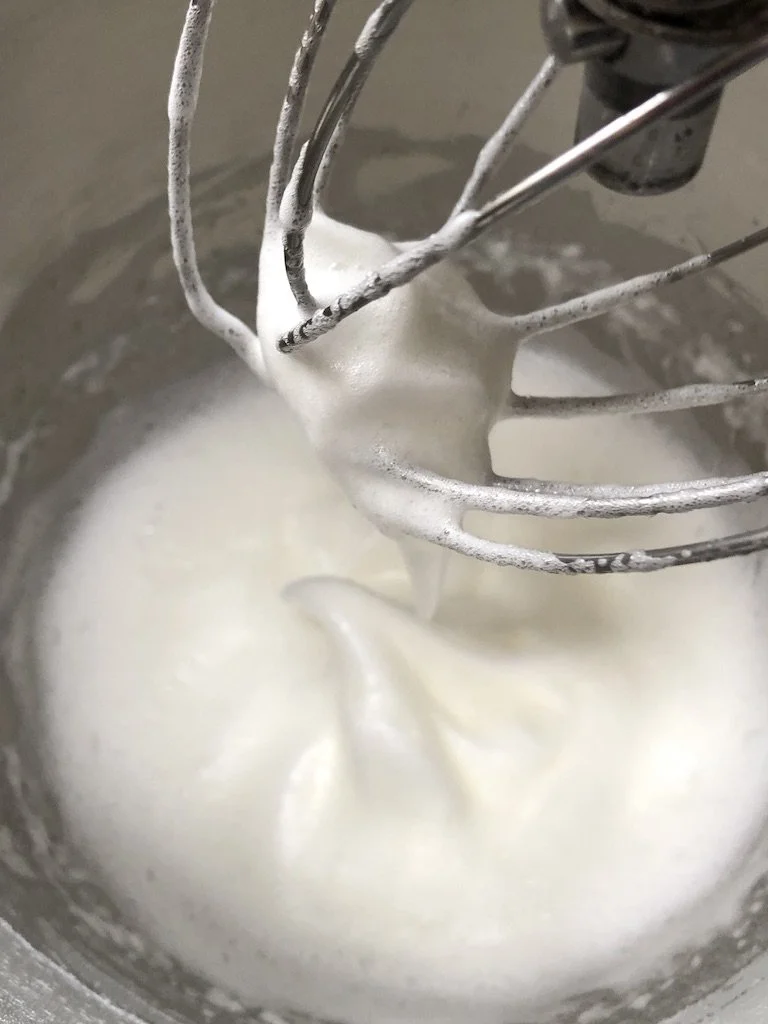
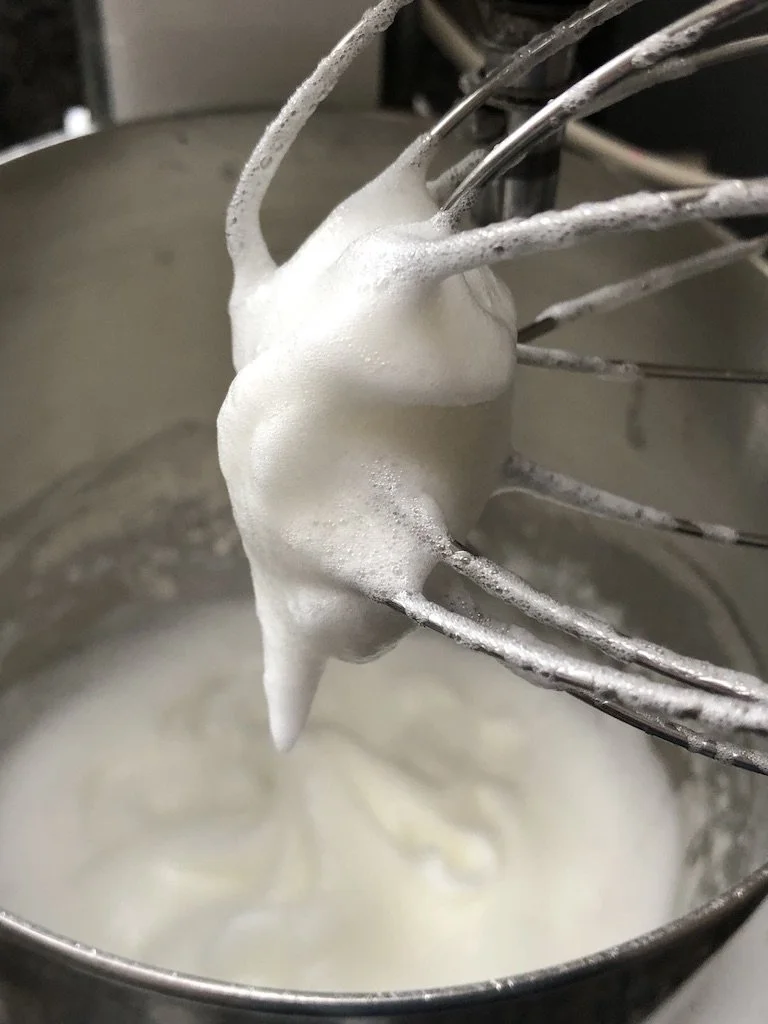
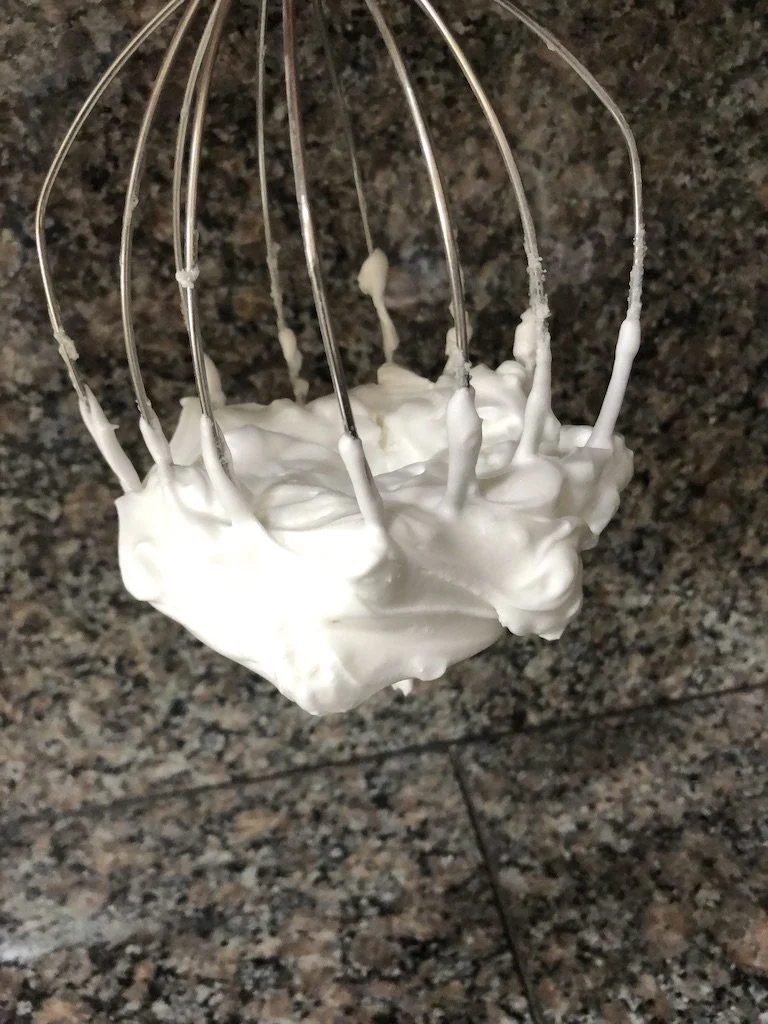
But a few years ago I decided to pull out the family recipe. That sponge cake isn't spongy at all. The trick is not to overbeat the egg whites, which are supposed to be thick and glossy with tips that fall over slightly (not so beaten that you can cut a chunk off). Also — fold in the beaten whites rather than mixing them in vigorously.

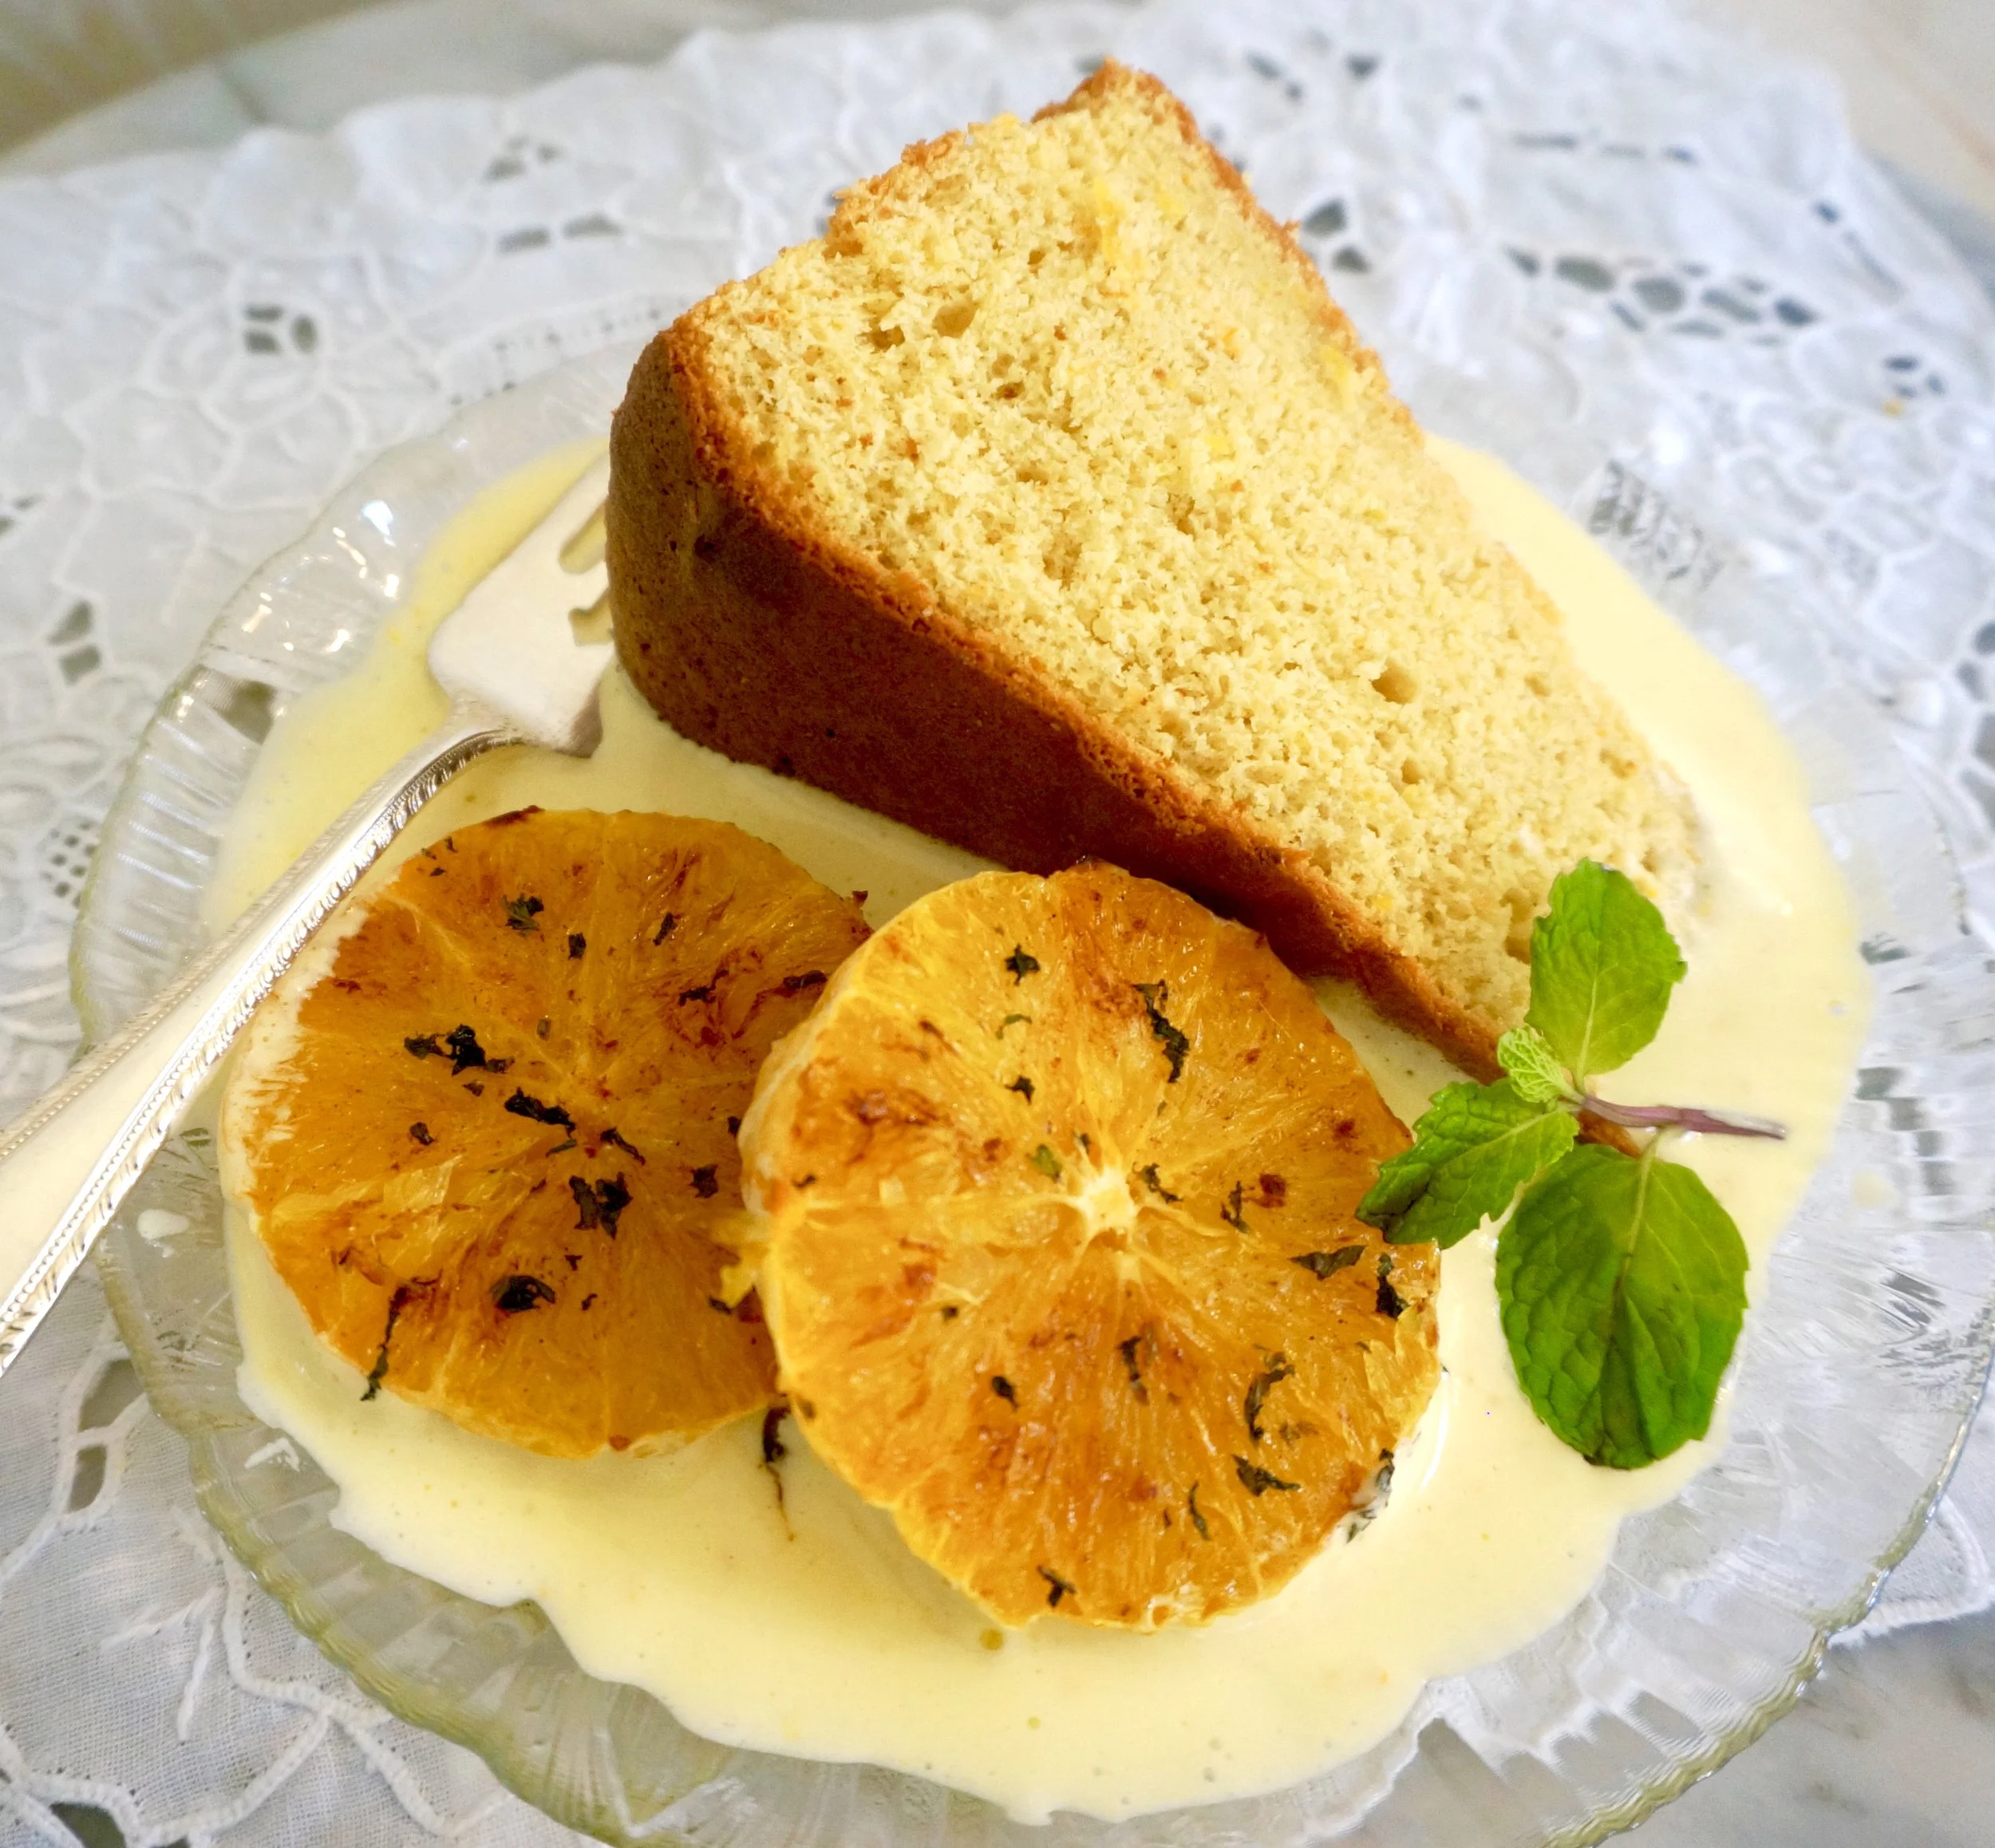
Although the cake is just fine, plain or served with sorbet, I have served it with a rich and creamy zabaglione sauce and some roasted oranges, which provide a tangy contrast to the sweet cake. They also make a plain sponge cake a bit more festive looking, so it’s a good bet for the holiday.

Bonus: you can make all parts in advance!


Passover Orange Cake with Roasted Oranges and Zabaglione

  • 12 large eggs, separated, at room temperature

  • 1-3/4 cups sugar

  • 6 tablespoons orange juice

  • 1/4 cup lemon juice

  • 2 tablespoons finely grated orange peel

  • 1 tablespoon finely grated lemon peel

  • 1 cup matzo cake meal, sifted after measuring

  • 1/3 cup potato starch

  • Passover Zabaglione

  • Roasted Orange Slices

Preheat the oven to 350 degrees. Line the bottom of a large (10-1/2-inch - 11-inch springform pan with parchment paper and lightly grease the paper. Beat the egg yolks and 1-cup of the sugar in a mixer bowl at medium-high speed for 3-4 minutes or until the mixture is thick and pale yellow. Stir in the orange juice, lemon juice, orange peel and lemon peel, mix thoroughly and set aside. In another bowl, beat the egg whites at medium speed until they are foamy. Continue to beat, gradually increasing the speed and gradually adding the remaining 3/4 cup sugar. Beat until the whites are stiff but not dry, and look glossy. Stir about one-quarter of the beaten whites into the yolk mixture. Gently fold the remaining beaten whites into the yolk mixture, until the mixture is uniform in color. In a small bowl whisk the matzo cake meal and potato starch until they are thoroughly blended. Using about 1/4 of the matzo meal mixture at a time, fold the mixture into the egg mixture until the ingredients are thoroughly blended. Pour the batter into the prepared pan. Bake for 55-60 minutes or until a cake tester inserted into the center comes out clean. Cool the cake in the pan on a wire rack. When ready to serve, spoon some zabaglione onto serving dishes, place a slice of cake on top and surround with some roasted orange slices. (Or serve with sorbet, whipped cream, ice cream, etc. to suit your meal.)

Makes 12 servings

Passover Zabaglione

  • 8 large egg yolks

  • 3/4 cup sugar

  • 2 tablespoons finely grated orange peel

  • 1/2 cup sweet white Passover wine

  • fresh mint as garnish

Place the egg yolks, 3/4 cup sugar and the orange peel in the top part of a double boiler set over barely simmering water. Beat the ingredients with a hand mixer at medium speed for about 3 minutes or until the mixture is thick and pale yellow. Continue to beat, gradually increasing the speed to high and gradually adding the wine. Beat for 8-10 minutes or until the mixture is thick and fluffy. You may use the zabaglione warm, immediately, or let it cool to room temperature.

Makes about 3 cups

Roasted Orange Slices

  • 6 navel oranges

  • 2 tablespoons melted coconut oil (or butter)

  • 1 tablespoon sugar

  • ground cinnamon (approximately 1/2 teaspoon)

  • 2 tablespoons finely chopped fresh mint

Preheat the oven to 450 degrees. Line a baking sheet with parchment paper. Peel the oranges removing as much of the white pith as possible. Cut the oranges crosswise into 24 even slices (there should be 4 center slices from each orange; reserve the ends for other purposes). Place the slices on the baking sheet. Brush the tops with the coconut oil. Sprinkle with the sugar. Sprinkle lightly with cinnamon and the mint. Roast for about 4 minutes. Turn the slices over and roast for another 4-6 minutes or until lightly browned. Remove from the oven and set aside.

Makes 12 servings

Coconut Meringue Cookies

I’ve been baking lots of gluten-free butter cookies lately, experimenting for Passover — using our family “fannies” or butter cookies as a base. But because the recipes use egg yolks I had a ton of whites left over. So …… I’ve also been experimenting with meringues (see how-to whip egg whites) and decided to use some for cookies. These coconut cookies are not only an easy way to use meringue but they are tender and sweet and perfect for Passover.

Here’s how: mix 2 cups of meringue (recipe below) with 1-1/2 to 2 cups shredded coconut (amount depends on the size of the shreds: you need enough to form a soft “dough”). Place blobs of the dough (about 1-1/2 inches) on a parchment lined cookie sheet. Preheat the oven to 325 degrees. Bake for 15-22 minutes or until lightly browned. Some people prefer these very light color; we like them honey colored.

I’ve now made these cookies several times. The less coconut you use, the softer and flatter the cookies will be. But either way, the cookies are tender, sweet and oh so tasty!

Meringue:

  • 4 large egg whites at room temperature

  • 1 tablespoon lemon juice

  • 1/4 teaspoon salt

  • 1 cup sugar

  • 3/4 teaspoon vanilla extract

Beat the egg whites in the bowl of an electric mixer with whisk attachment set at medium speed until the mixture is foamy. Add the lemon juice and salt and beat, gradually increasing the speed, until soft peaks form. Gradually add the sugar and continue to beat, gradually increasing the speed to high, until the mixture stands in stiff, glossy peaks. Stir in the vanilla extract.

How to Whip Egg Whites

Have you ever realized how many eggs we use during Passover?

LOTS!

And many Passover recipes, especially desserts, use whipped egg whites. So you read things like “soft peaks” and “stiff but not dry” and such.

What does it all mean? Looks easy but ……

sometimes the food preparations that look the easiest turn out to be the most intimidating.

Egg whites are among those. But if you want to make perfectly soft soufflés, tender Baked Alaska, crispy meringues  and other wonderful treats, it’s important to get it right.

These tips will help:

  • Use the freshest eggs possible; their thicker whites whip to greater volume and with more stability than the thin, runny whites of older eggs.

  • Separate the yolks and whites when the eggs are cold. This helps prevent even the tiniest particle of yolk from falling into the whites. Egg yolks contain fat, and any kind of fat inhibits volume.

  • For the best volume, let the egg whites come to room temperature (usually about 30 minutes) before you beat them.

  • Copper bowls are the best for the job, (the acid in the metal helps stabilize the foam), but stainless steel, ceramic or glass bowls are fine too. Don’t use plastic bowls because no matter how much you wash them the surface of retains some fat particles.

  • Use a balloon or large whisk or the whisk attachment of an electric mixer or hand mixer. Standard cake batter beaters don’t whip egg whites well; neither does a food processor.

  • Start beating the whites on slow and gradually increase the speed as volume increases.

  • Beat the whites to the foamy stage (photo #1)before you add ingredients such as cream of tartar, salt, lemon juice or vinegar.

  • Add any sugar gradually (about 2 tablespoonfuls at a time), and only after the whites have been beaten to the "soft peak" stage.

  • “Soft peaks” (photo #2) means beaten whites with tips that fall over when you lift the beater.

  • "Stiff but not dry" (photo #3) means beaten egg whites that are thick and glossy looking and with tips that stand up firmly with only a tiny bit at the top lopping over.

  • To test whether whites are stiff enough, either turn the bowl over – it’s ok! the whites won’t fall out! (photo #4) Or, spoon a small amount out of the bowl and turn the spoon over – the whites should cling, not fall out.

  • Photo#5 shows the meringue with eggs whipped and sugar added

Passover Butter Cookies Redux

Last year I posted a recipe for a Passover version of my Aunt Fanny’s famous butter cookies (which we call Fannies in her honor). They were a big hit at our house.

But this year, after reading an article in Hadassah magazine by food writer and cookbook author Adeena Sussman, I took yet another approach. The article suggested using the grain-free products such as almond flour and coconut flour that have become available in recent years.

I made several versions, experimenting with amounts (you can’t just substitute all-purpose flour or matza cake meal 1:1 for grain-free flour) and had my “tasters” try all of them.

We had two winners. Most people liked the almond and coconut flour recipe; it is tender and buttery. But some liked the matza cake meal and coconut flour recipe; it is dense, more crumbly, and suitable for nut-free diets.

I’m not finished experimenting. Aunt Fanny, wherever you are — your cookie recipe is immortal, now in the original and in Passover versions now and yet to come.

Here are both recipes.

Almond and Coconut Butter Cookies (Passover)

  • 2 cups almond flour

  • 1/2 cup coconut flour

  • 1/2 teaspoon salt

  • 1/2 pound unsalted butter

  • 3/4 cup sugar

  • 2 large egg yolks

  • 1-1/2 teaspoons vanilla extract

  • jam, lekvar, chocolate chips, etc.

Preheat the oven to 350 degrees. Mix the almond flour, coconut flour and salt in a bowl and set aside. Place the butter and sugar in the bowl of an electric mixer and mix on medium speed for 1-2 minutes or until the ingredients are evenly combined.or until the mixture is light and fluffy. Add the almond flour mixture and mix another 1-2 minutes, or until the ingredients are almost blended. Add the egg yolks and vanilla extract. Mix the ingredients 1-2 minutes, or until a uniform dough forms. Refrigerate the dough for at least 45 minutes. Scoop pieces of dough and shape them into balls about 1" in diameter. Flatten the balls between your palms. Press each circle with your thumb to make an indentation in the center. Place the cookies on a cookie sheet, leaving an inch of space between them. Fill the thumb print spaces with a small amount of lekvar, jam, etc. Bake for 18-23 minutes or until the cookies are golden brown.

Makes about 50

Matza Cake Meal and Coconut Butter Cookies (Passover)

  • 1 cup matza cake meal

  • 1 cup coconut flour

  • 1/2 teaspoon salt

  • 1/2 pound unsalted butter

  • 3/4 cup sugar

  • 4 large egg yolks

  • 1 teaspoon vanilla extract

  • jam, lekvar, chocolate chips, etc.

Preheat the oven to 350 degrees. Mix the matza cake meal, coconut flour and salt in a bowl and set aside. Place the butter and sugar in the bowl of an electric mixer and mix on medium speed for 1-2 minutes or until the ingredients are evenly combined.or until the mixture is light and fluffy. Add the dry ingredients and mix another 1-2 minutes, or until the ingredients are almost blended. Add the egg yolks and vanilla extract. Mix the ingredients 1-2 minutes, or until a uniform dough forms. Scoop pieces of dough and shape them into balls about 1" in diameter. Flatten the balls between your palms. Press each circle with your thumb to make an indentation in the center. Place the cookies on a cookie sheet, leaving an inch of space between them. Fill the thumb print spaces with a small amount of lekvar, jam, etc. Bake for 22-25 minutes or until the cookies are golden brown.

Makes about 50

Irish Whiskey Cake

Purim is an extraordinarily joyous holiday and it’s been Jewish tradition to celebrate with a glass or two of wine or some other alcoholic beverage. The focus on drinking has its roots in something that Rabbi Rava said in the Talmud: on Purim, people should drink until they can no longer distinguish between "Cursed be Haman" and "Blessed is Mordecai."

Well, I’m not giving advice on how much booze anyone should drink

BUT

the fact that Purim comes on the same day as St.Patrick’s Day, gave me this most stupendously delicious thought about whiskey and such: eat Irish Whiskey Cake.

I have made this particular cake often. There is never a crumb left.

Celebrate Purim AND St. Patrick’s Day. Make Merry! Have cake!

Irish Whiskey Cake

  • 1 cup golden raisins

  • 1 tablespoon grated fresh orange peel

  • 1/4 cup Irish whiskey

  •  2 cups all-purpose flour

  • 2 teaspoons baking powder

  • 1 teaspoon baking soda

  • 1/2 teaspoon salt

  • 1/2 teaspoon freshly grated nutmeg

  • 1/4 teaspoon ground cloves

  • 3/4 cup butter at room temperature

  • 3/4 cup sugar

  • 2 large eggs

  • 1/3 cup orange juice

Frosting

  • 3/4 cup butter, at room temperature

  • 2 cups confectioners' sugar

  • 1/4 cup Irish whiskey

Preheat the oven to 350 degrees. Lightly grease two eight-inch cake pans. Line the bottoms with parchment paper and lightly grease the paper. Place the raisins and orange peel in a bowl, pour in the whiskey and let soak for at least 30 minutes. Combine the flour, baking powder, baking soda, salt, nutmeg and cloves in a bowl. Set aside. Beat the butter and sugar in the bowl of an electric mixer set at medium speed for 2-3 minutes or until smooth and well blended. Add the eggs and beat for another 2-3 minutes or until the mixture becomes smooth (scrape down the sides of the bowl with a spatula). Add the flour mixture and beat for 1-2 minutes to incorporate it into the other ingredients. Add the raisins (with any remaining liquid) and the orange juice and beat for another 1-2 minutes until a uniform batter has formed. Spoon the mixture into the cake pans. Bake for 20-22 minutes until a cake tester inserted into the center comes out clean. Let the cake cool in the pans for 10 minutes, then remove the cakes and let them cool completely. Make the frosting by beating the butter and confectioners’ sugar together until smooth. Gradually add the whiskey and beat until smooth. Frost the bottom layer, place the second layer on top and frost the top of the second layer.

 Makes 8 servings

Chocolate Sour Cream Bundt Cake

_DSC0080.jpg

Is it part of my Jewish DNA that whenever a holiday (religious or otherwise) comes I think — “what food do I cook for this one?”

So, Valentine’s Day is coming. Also Ed’s birthday.

What do I cook for this one?

Chinese food. Maybe Beef with Orange or Chicken with Peanuts.

Scallion cakes?

He loves those Duck Legs with Hoisin sauce…….

Definitely cake.

Thinking this one ………

Chocolate Sour Cream Bundt Cake

  • 4 ounces bittersweet chocolate

  • 2 cups flour

  • 1 teaspoon baking soda

  • 1 teaspoon baking powder

  • 1/2 teaspoon salt

  • 1 cup sugar

  • 1/2 cup butter

  • 2 eggs

  • 1 cup sour cream

  • 1-1/2 teaspoons vanilla extract

Preheat the oven to 350 degrees. Lightly grease a bundt pan. Melt the chocolate in the top part of a double boiler set over barely simmering water. When the chocolate has melted, remove the top pan and let the chocolate cool slightly. Mix the flour, baking soda, baking powder and salt in a bowl. Set aside. In the bowl of an electric mixer, cream the sugar and butter on medium speed for 3-4 minutes, or until the mixture is smooth and creamy. Add the eggs and beat for 2-3 minutes, until well blended. Add the flour mixture alternating with the sour cream. Stir in the vanilla extract. Stir in the melted chocolate and mix until the batter has a uniform color. Pour the batter into the prepared bundt pan. Bake for 45 minutes or until a cake tester inserted into the center comes out clean. Cool the cake in the pan for 10 minutes. Invert onto a cake rack to cool completely.


Makes 12-16 servings

Pear and Cranberry Strudel

My freezer failed a while ago.

Fortunately I discovered the problem before everything defrosted.

Still, with that error message signaling that I should call for service immediately, I brought most of the food to my spare freezer in the basement. I don’t want to give this old freezer a kinahurra so I won’t tell you how old it is.

I discarded lots of stuff too. Freezer burned, too old, no longer needed. Whatever.

And I cooked with some of the items that were partially defrosted (like this fabulous pizza) or because it was time to use them before they become fossils.

I had some seasonal pears on hand and some cranberries so I made strudel using a package of phyllo dough that I didn’t want to refreeze. I baked this dessert a few times: used most of the pears and cranberries. But I wanted to try the recipe using some dried cranberries (I had some in my pantry that also needed using before they dried beyond redemption).

We actually liked it better with the dried cranberries.

So here’s the recipe. If you don’t have dried cranberries, use any dried fruit: cherries would be especially good. Fresh cranberries work too — add a tablespoon more sugar.

PEAR AND CRANBERRY STRUDEL

  • 1/2 cup dried cranberries

  • 2 tablespoons orange juice

  • 2 ripe pears, peeled, cored and cut into bite sized pieces

  • 1 tablespoon all-purpose flour

  • 1/4 teaspoon ground cinnamon

  • 1/4 teaspoon ground ginger

  • 8 sheets phyllo

  • 3-4 tablespoons melted butter

  • 1/4 cup sugar

Preheat the oven to 400 degrees. Line a baking sheet with parchment paper. Place the dried cranberries in a bowl, pour the juice over them and let rest for 30-40 minutes or until they have softened. Place the pears in a mixing bowl. Add the flour, cinnamon, ginger, cranberries and any remaining orange juice and toss the ingredients to distribute them evenly. Set aside. Working with one piece of phyllo at a time, brush the phyllo with a film of melted butter. Butter a second sheet and place it on top of the first. Repeat using two more sheets. Add the sugar to the pear mixture. Spoon half the pear mixture down the long side of the buttered phyllo, leaving an inch at each end. Roll the phyllo, enclosing the fruit mixture, then place seam-side down on the parchment paper. Repeat with the remaining four sheets of phyllo and the remaining pear mixture. Brush the tops of the phyllo rolls with the remaining melted butter. Bakes for about 25 minutes or until the pastry is browned and crispy.

Makes 2 rolls, each serving 4 people

Snails! The Dessert Kind (M'Hencha)

Years ago, when we were in Egypt, I tried this dessert, called m’hencha, because it looked so pretty.

It was like a Proustian moment because it tasted so similar to my Romanian Jewish grandma’s turte, which is like baklava only made with almonds instead of walnuts, and sweetened with sugar syrup, not honey.

Unlike my grandma’s version, m’hencha is shaped like a snail, which I think looks much lovelier and so I decided to make this for New Year’s, when the cousins come for a visit. (I’m using honey instead of the syrup my grandma used.)

I’ll be curious to see if my cousin also remembers this delicious pastry from back in the day.

M’Hencha

  • 2-1/2 cups ground almonds

  • 1/2 pound butter, melted

  • 1/4 cup sugar

  • 1-1/2 teaspoons grated fresh orange peel

  • 3/4 teaspoon ground cinnamon

  • 1/2 pound phyllo dough

  • 6-8 tablespoons honey

Preheat the oven to 375 degrees. Mix the almonds, 4 tablespoons melted butter, sugar, orange peel and cinnamon until well combined. Set aside. Using one phyllo sheet at a time, spread the dough out on a flat surface and brush lightly with melted butter. Top with the next phyllo sheet and repeat, using 4 sheets of phyllo. Spread about an inch of the almond mixture in a line about an inch from the edge on the long side. Roll the dough, jelly roll style, then coil it into a snake shape. Place the pastry on a cookie sheet. Brush with butter. Repeat 5 more times to make 6 pastries. Bake for about 25 minutes or until golden brown. While the pastries are baking, heat the honey until it is warm and liquefied. Pour the warm honey over the pastries and serve. NOTE: you can make smaller pastries: cut the phyllo sheets in half and proceed as above (makes 12).

Makes 6 servings

Funeral Pie (Custard and Raisin Pie)

fullsizeoutput_92ff.jpeg

I don’t mean to be a downer during the holiday season, but recently I wrote an article for for Kveller about how to help/what to bring to mourners when they’re sitting shiva and they’ve asked you not to bring food.

During my research I also did some reading about other cultures’ food/mourning customs and came across this fabulous “Funeral Pie,” which apparently is traditional at Amish and Old Mennonite wakes. Sometimes it has a lattice crust, sometimes it is non-dairy. I’ve made it a couple of ways and think this version is the most delicious.

Forget the name — just eat and enjoy.

Funeral Pie

  • 1/2 cup sugar

  • 2 tablespoons plus 1 teaspoon cornstarch

  • 1/8 teaspoon salt

  • 1-1/2 cups milk

  • 1-1/2 cups seedless raisins

  • 3 large egg yolks, beaten

  • 2 tablespoons lemon juice

  • 1 teaspoon grated lemon peel

  • 2 tablespoons butter

  • 9” fully baked pie crust

  • 3 large egg whites

  • 6 tablespoons sugar

Preheat the oven to 350 degrees. Mix the 1/2 cup sugar, cornstarch and salt in a bowl and set aside. Heat the milk and raisins in a saucepan over medium heat for 6-8 minutes or until the raisins start to plump. Turn the heat to low. Add the cornstarch mixture and cook, stirring until mixture has thickened. Add some of hot mixture to the egg yolks then pour yolk mixture into the pan. Cook for 2-3 minutes or until the mixture is very thick. Don’t let mixture come to boil. Remove the pan from heat. Add the lemon juice, lemon peel and butter and stir until the butter melts. Set aside in the refrigerator to cool. Pour the cold mixture into the baked pie crust. Beat the egg whites until they stand in soft peaks. Continue beating, gradually adding the 6 tablespoons sugar, until the whites stand in stiff, glossy peaks. Spread the beaten whites over pie, making sure to seal edges and cover the custard completely. Bake for 15 minutes or until meringue is lightly browned. Let cool and serve.

Makes 8 servings


Cranberry Orange Ice Cream

fullsizeoutput_c050.jpeg

Summer, fall, winter, spring — as far as I’m concerned, ice cream is always in season.

But, because it is cranberry time of year and I love all things cranberry-and-orange, I offer: cranberry and orange ice cream. I have made it with both fresh and dried cranberries (prefer the dried because of the texture but both are really delicious).

Cranberry Orange Ice Cream

  • 1/2 cup dried cranberries

  • 1/2 cup orange juice

  • 1/4 cup orange marmalade

  • 2/3 cup brown sugar

  • 4 large egg yolks

  • 2-1/2 cups cream (any kind)

  • 1 teaspoon finely grated fresh orange peel

  • 1/4 teaspoon salt

  • 1 teaspoon vanilla extract

Place the cranberries, orange juice and orange marmalade in a saucepan and bring to a simmer over medium heat. Cook at a simmer for 3-4 minutes or until the mixture has thickened and most of the liquid is gone. Remove from the heat and set aside. Place the brown sugar and egg yolks in the bowl of an electric mixer (or use a bowl and hand mixer) and beat for 3-4 minutes, scraping the bowl occasionally, or until light, fluffy and well blended. Heat 2 cups of the cream until the liquid is warm and bubbles appear on the side of the pan. Gradually pour the warmed cream into the brown sugar-egg mixture, add the orange peel and salt and stir to blend the ingredients thoroughly. Pour the liquid into a saucepan and cook over medium heat, stirring frequently, for about 8-10 minutes or until the mixture has thickened enough to coat the back of a spoon. Do not let the liquid come to a boil. Remove the pan from the heat. Stir in the remaining cream and vanilla extract. Mix until well blended; refrigerate for at least 2 hours or until chilled. Place in an ice cream maker and churn according to manufacturer’s instructions. When the ice cream has thickened but is still soft, add the cranberry mixture and continue churning until the ice cream is thick. Spoon the soft ice cream into a container. Place in the freezer until very cold and firm.

Makes about 6 cups