Shavuot

Spinach Pie

Every Hanukkah in our family, we retell the story of Judith, who played a major role in the Maccabees’ victory some 2000 years ago. According to the story, Judith visited Holofernes, a general in the enemy camp; he fell in love with her and asked her to dine with him.

During the meal Judith gave him great quantities of cheese, which made him very thirsty! To quench his thirst he drank so much wine that he fell asleep and Judith cut off his head with his own sword.

Thus was she able to get word to the Maccabees about the best time to strike.

Note: there are dozens of artworks depicting the event, including this well-known painting which hangs in the Uffizi gallery.

Since that fateful victory we have been making merry every year with an 8 day Hanukkah celebration.

Our celebrations are known to include latkes!

But did you know that the first “traditional” Hanukkah ingredient was cheese!

And that’s because of Judith.

Long ago it was Cheese Latkes that Jewish cooks prepared for Hanukkah.

But so many people couldn’t afford cheese so they substituted potato. Not bad, that.

Still. I always serve something made with cheese, every Hanukkah.

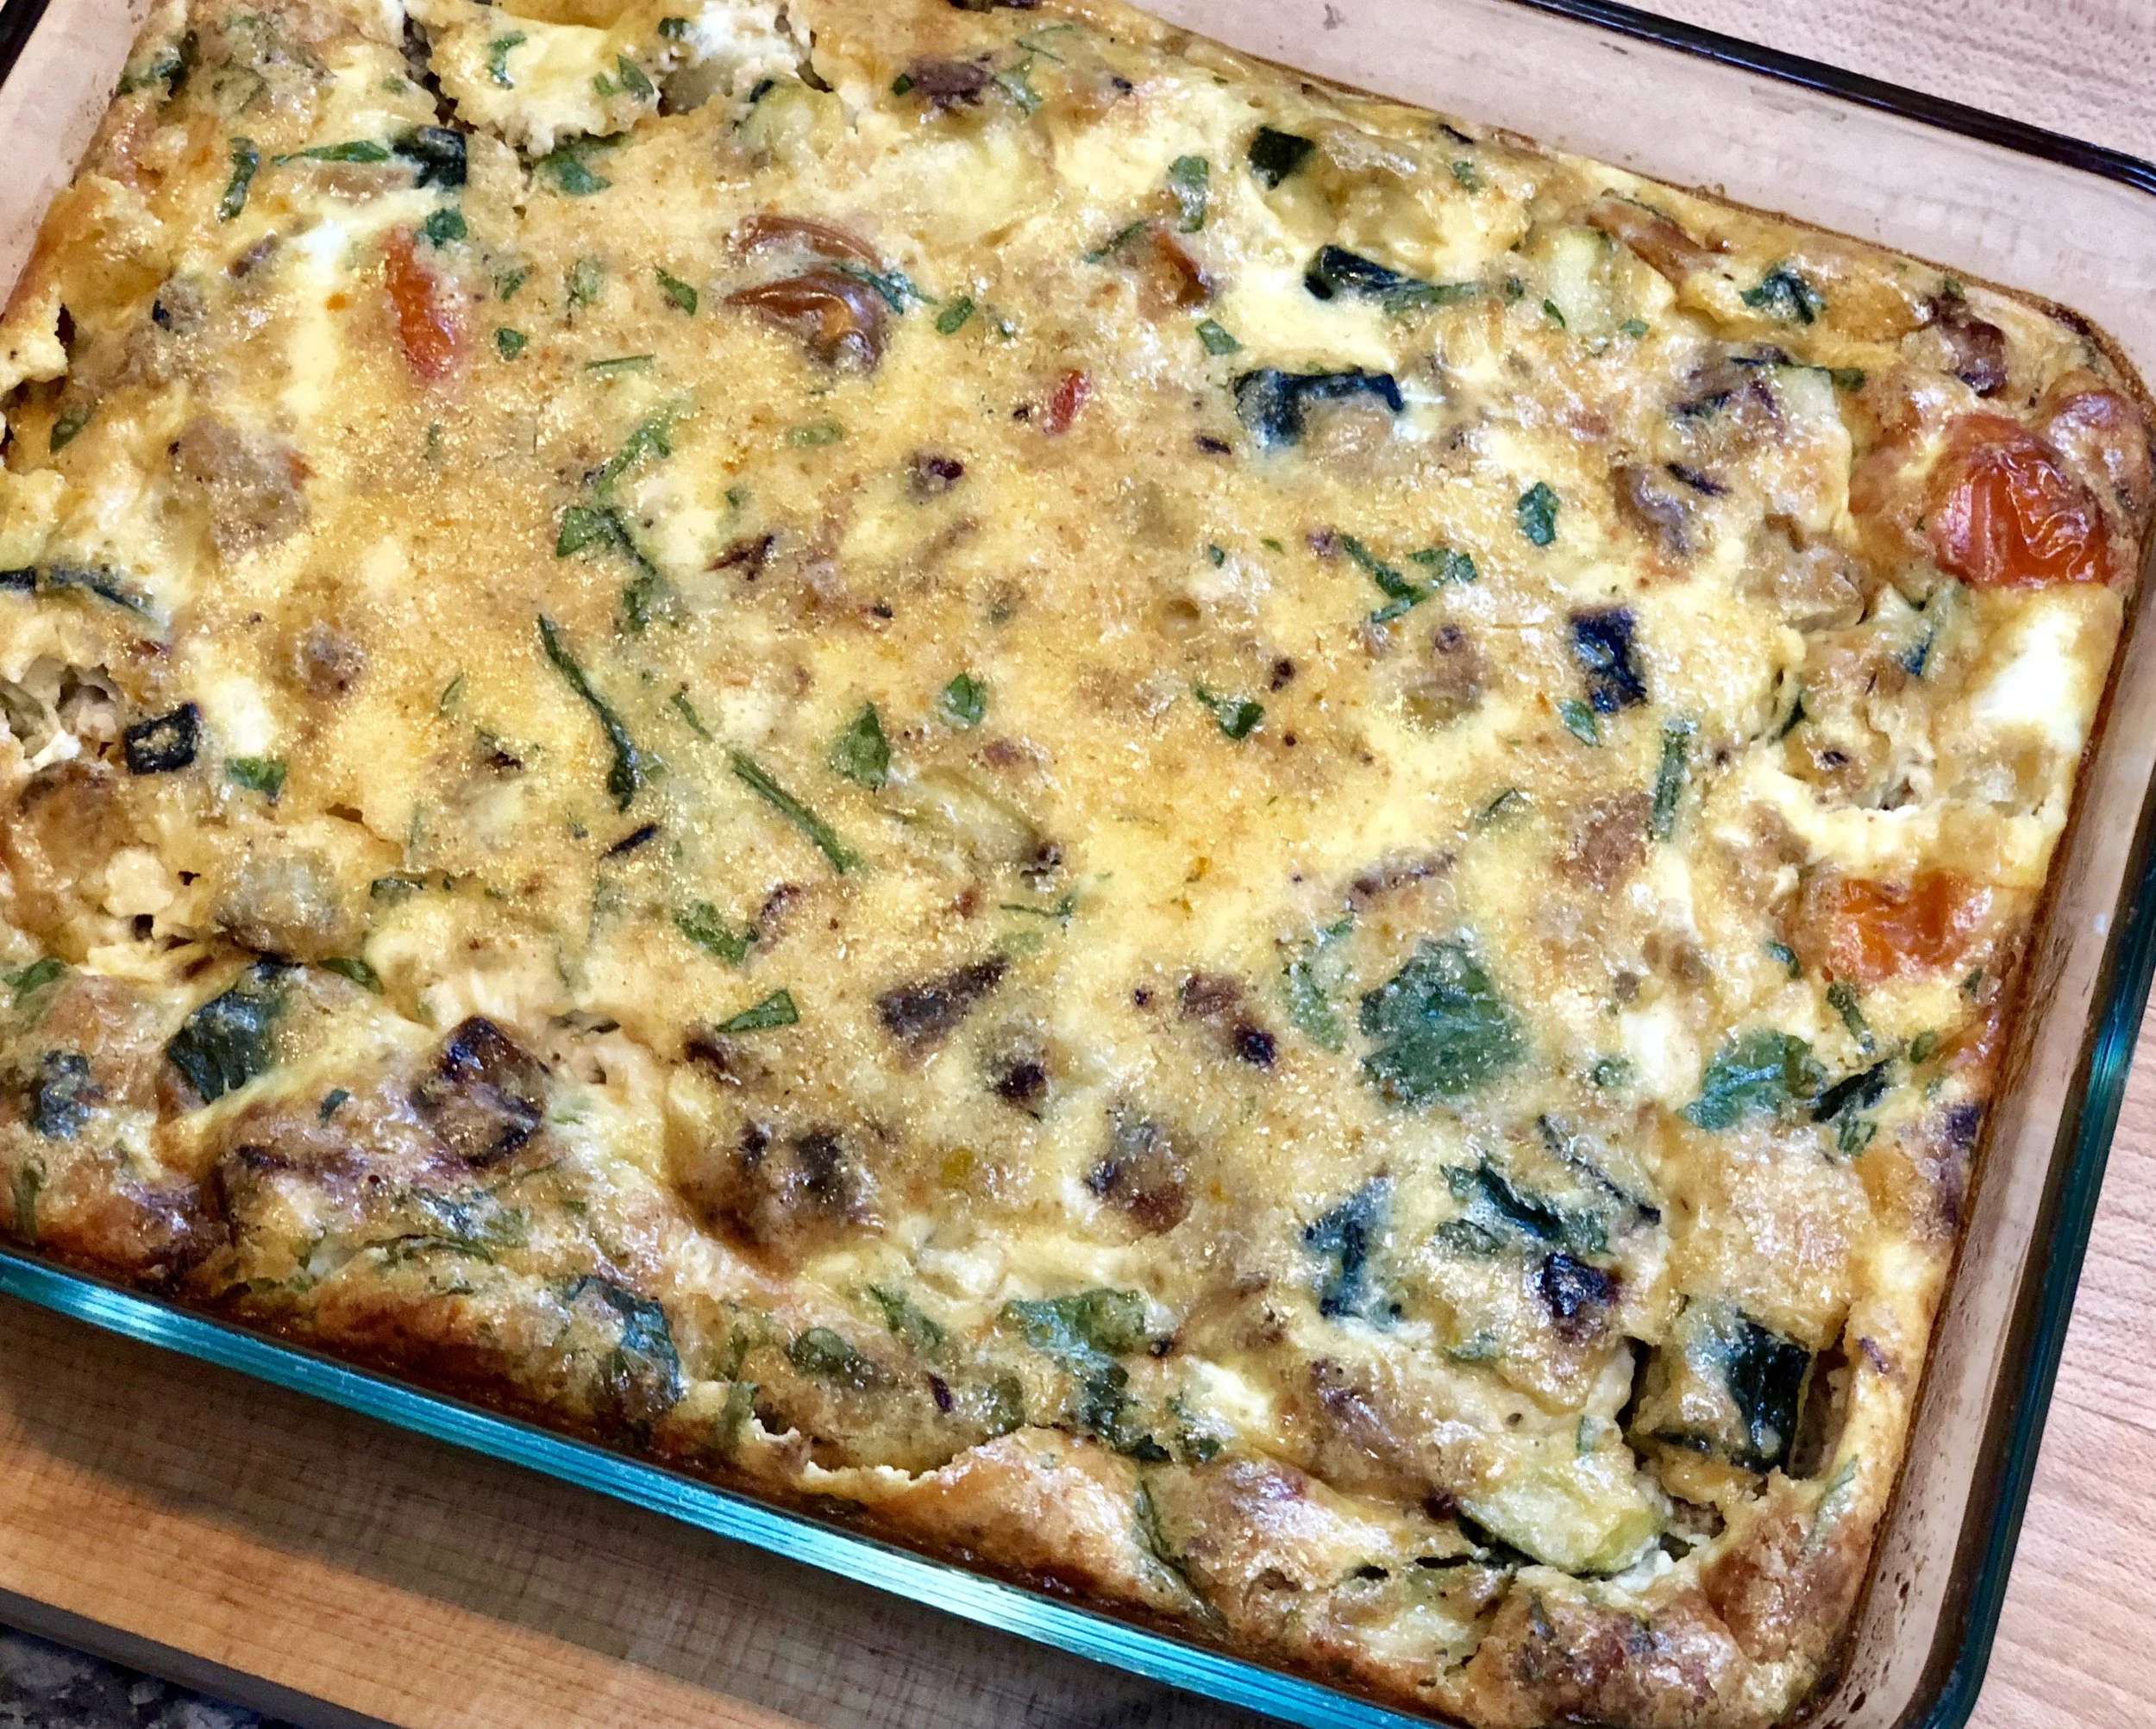
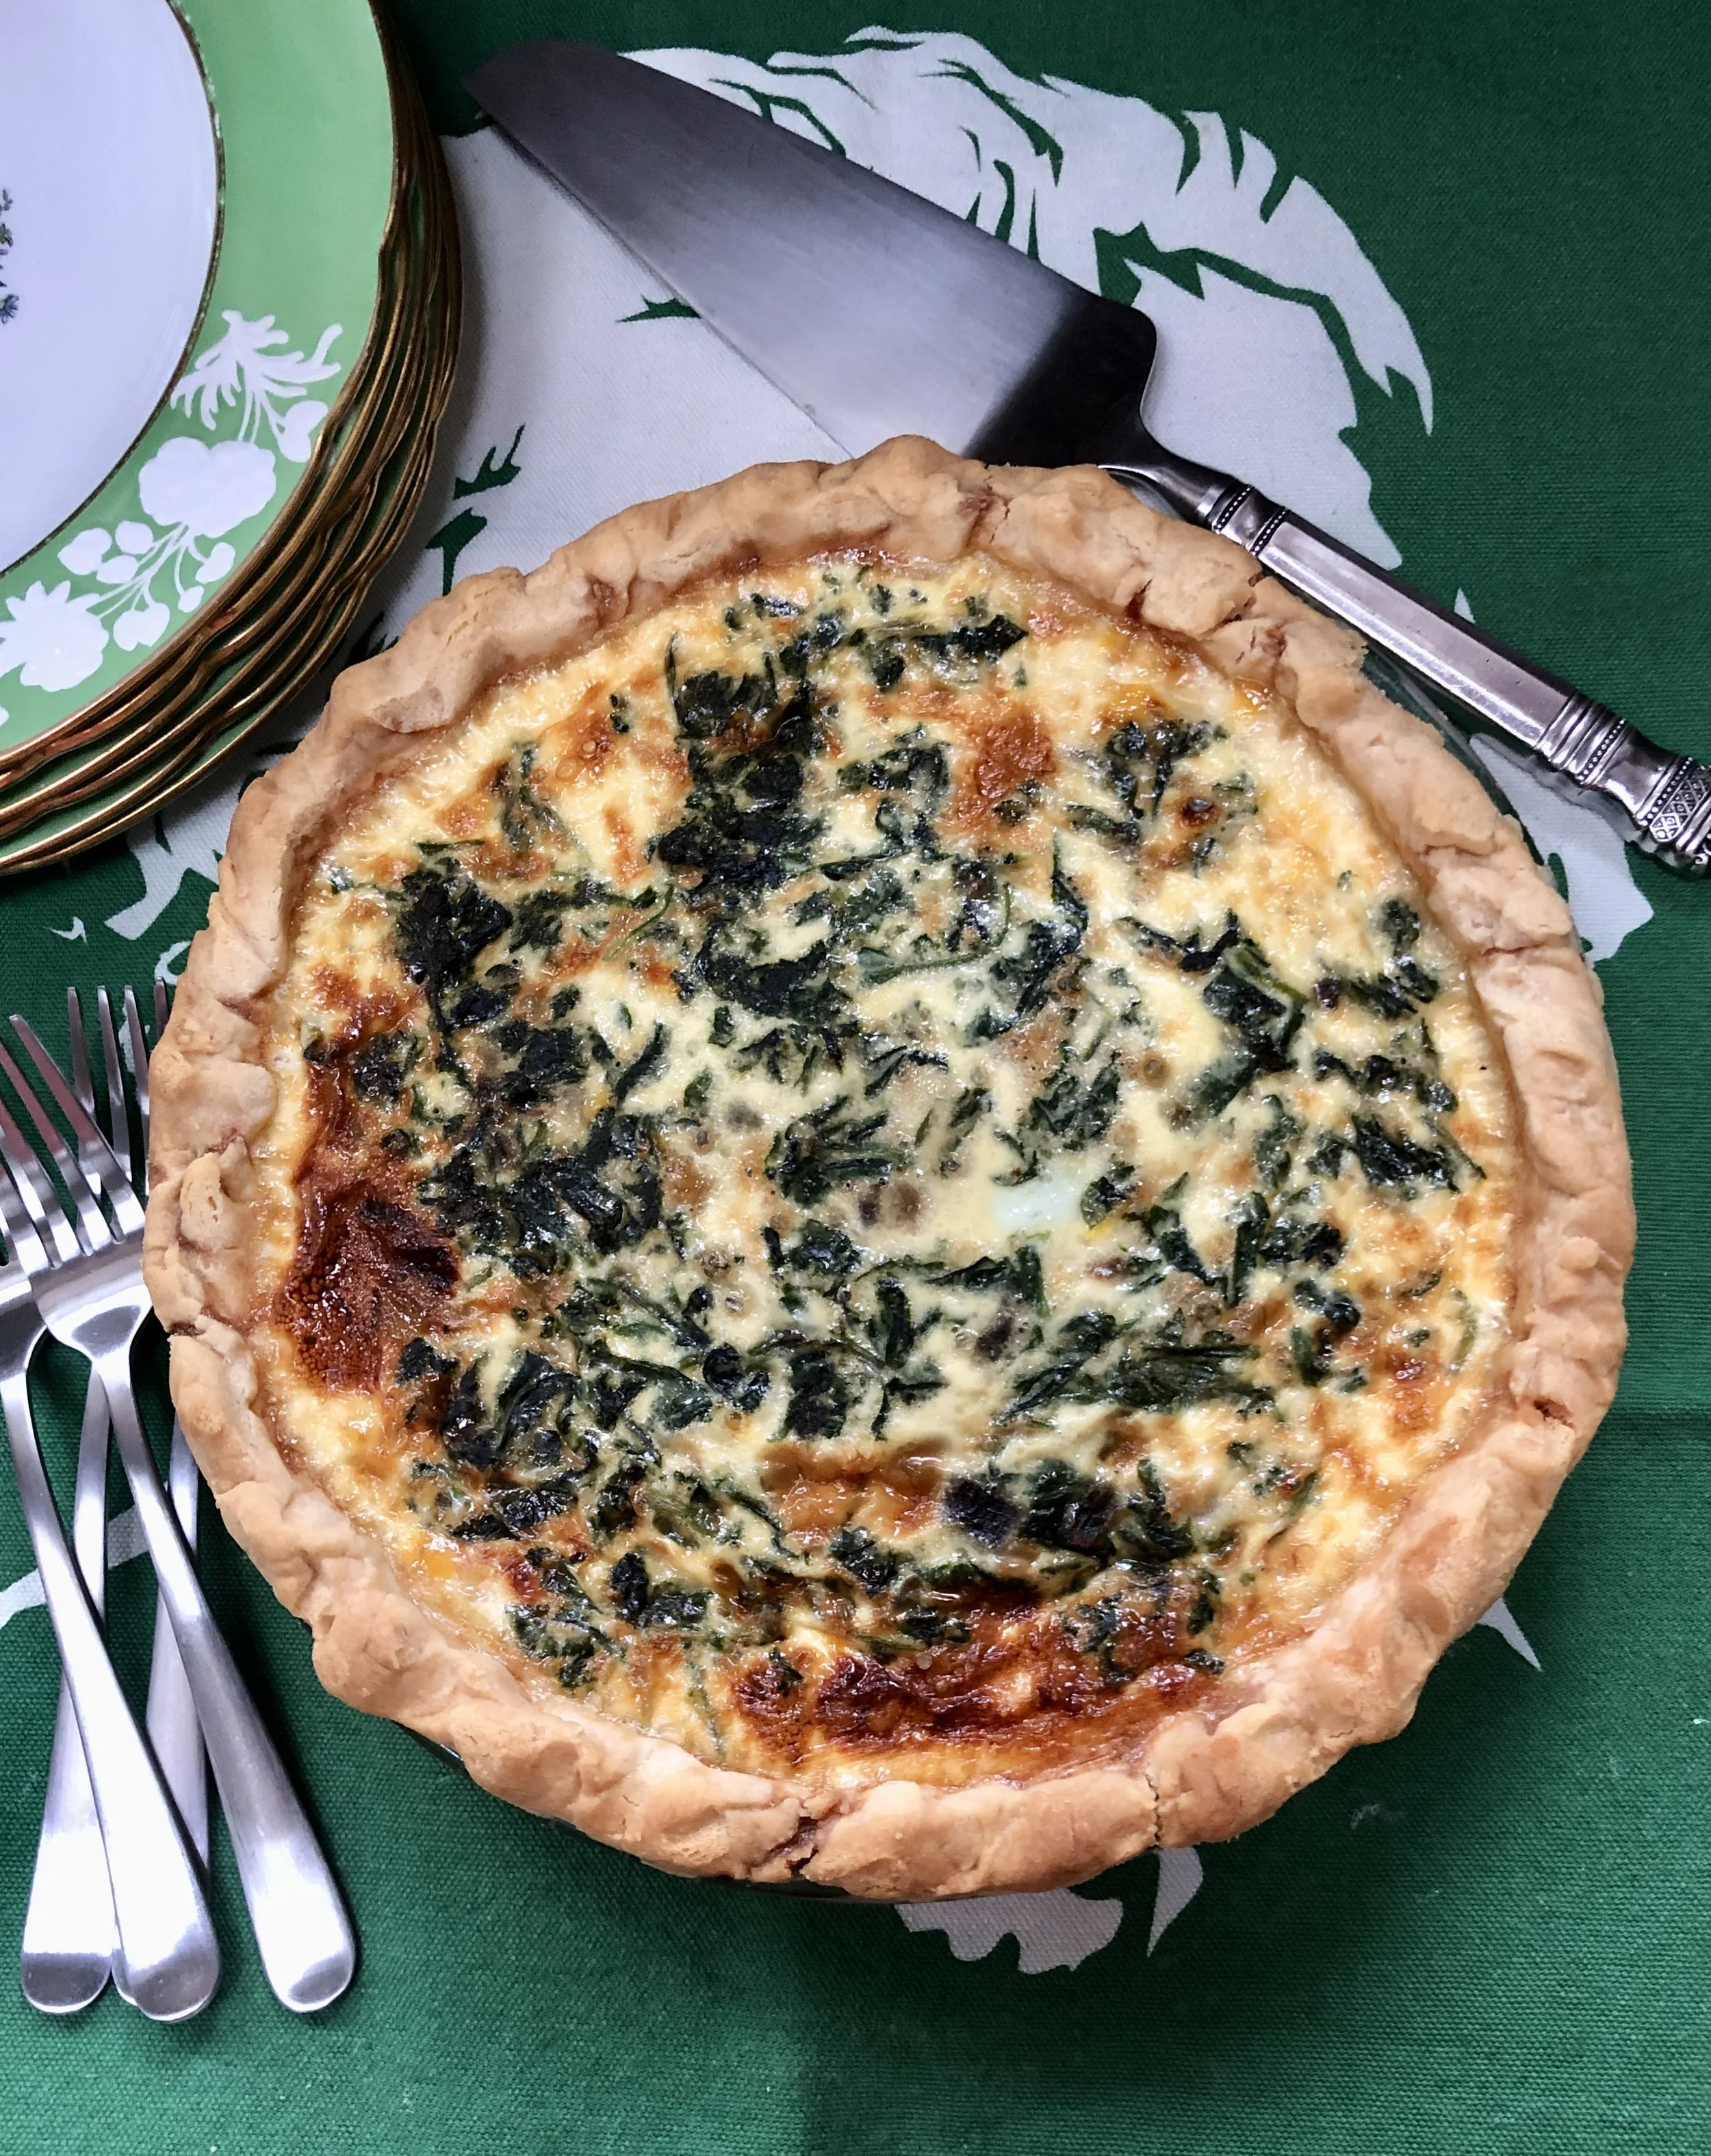
This year, how about this Cheese-loaded Spinach Pie to to remember the brave, intrepid Judith?

Cheese Loaded Spinach PIE

  •  1 tablespoon butter

  • 1/4 cup chopped red onion

  • 6 ounces fresh spinach

  • 1 partially baked 9-inch pie crust

  • 3-4 ounces grated Swiss cheese

  • 4 large eggs

  • 2 cups half and half cream

  • salt and pepper to taste

Preheat the oven to 375 degrees. Heat the butter in a sauté pan over medium heat. When the butter has melted and looks foamy, add the red onion and cook for 1-2 minutes to soften it slightly. Add the spinach and cook for another 2-3 minutes or until the spinach is completely wilted. If there is liquid in the pan, continue to cook until the spinach is dry (alternatively, place in a strainer and press out the excess liquid). Place the spinach inside the partially baked pie crust. Sprinkle the cheese on top. Beat the eggs and cream together with salt and pepper to taste. Pour over the ingredients in the pie crust. Bake for 40-45 minutes or until golden brown and set.

Makes 6-8 servings

Asparagus Salad with Potatoes, Tomatoes and Feta Cheese

We’re big dairy eaters. And when the weather turns warmer, we’re big salad eaters too.

So this salad is perfect for us as summer approaches. I’ve made it a zillion times. Sometimes I substitute green beans or zucchini for the asparagus. Sometimes I use blue cheese (I’ve tried it with firm cheeses such as cheddar but prefer a soft, crumbly one). Sometimes I add leftover cooked fish, but mostly serve it as a side dish.

If you’re having a dairy meal for Shavuot, this would make a delicious first course or side dish. It’s filling, but light, so you have some room for cheese cake!

Asparagus Salad with Potatoes, Tomatoes and Feta Cheese

  • 12 baby potatoes (such as Yukon Golds or Red Bliss)

  • 1 bunch (about 12-16 ounces) asparagus, trimmed and cut into pieces about 2-inches long

  • 1 cup cut up grape or cherry tomatoes (or chopped large tomato)

  • 3 scallions, chopped or 1/3 cup chopped red onion

  • 1/4 cup olive oil or avocado oil

  • 2 tablespoons wine vinegar, approximately

  • 1/2 cup crumbled feta, blue or goat cheese

  • freshly ground black pepper to taste

  • chopped parsley or chives

Place the potatoes in a saucepan and cover with water. Bring to a boil over high heat. Turn the heat to medium and cook for about 15 minutes or until barely tender. Add the asparagus to the saucepan and cook for about 3 minutes. Drain the vegetables and cool them down under cold running water. Drain and place on paper towels to dry. Peel the potatoes and cut them into smaller pieces. Place the potatoes and asparagus in a mixing bowl. Add the tomatoes and scallion and toss the ingredients to distribute them evenly. Pour in the olive oil and toss the ingredients. Add the vinegar and toss again. Add the cheese and sprinkle to taste with pepper. Taste and add more vinegar if needed. Place in a serving bowl and sprinkle with parsley.

Makes 6 servings

Mini Khachapuri

Mini Khachapuri

Khachapuri is one of life’s culinary treasures. I’ve eaten it at restaurants, made it at home. Sometimes I make my own dough, but frequently I use store-bought pizza dough which — I confess — isn’t exactly like khachapuri dough but makes this dish much easier to prepare.

Also, cutting the classic long, boat-shaped khachapuri into single servings is fine, I’ve done it many times, but it’s much more convenient to serve individual ones. Also they’re much easier to prepare if you make them round, like pizza, rather than shape them into boats.

These days? I like easy.

So I made a recent batch of khachapuri into individual “pizzas.”

Yes, this is not the authentic way. You don’t have to tell me that. I know. I know.

But jeeeeez! They are so good! So it’s okay.

I added spinach to the last batch I made. Nope, that’s not traditional either. But it was delicious. And added some color too.

Khachapuri is a good dish any time for any meal! But because it’s a dairy — cheese item — it’s perfect for Shavuot. Hanukkah too.

Mini spinach Khachapuri

  • cornmeal

  • 3/4 cup shredded mozzarella cheese

  • 3/4 cup crumbled feta cheese

  • 1/2 cup farmer cheese (or use dry curd cottage cheese)

  • 1/2 cup chopped fresh spinach

  • 1 large egg

  • 1 pound pizza dough

  • egg yolks, optional

  • 1 tablespoon butter, cut into 8 small pieces, optional

Preheat the oven to 450 degrees F. Line a baking sheet with parchment paper. Sprinkle the paper lightly with cornmeal. Place the mozzarella cheese, feta cheese, farmer cheese, spinach and egg in a bowl and mix for a minute or so until well combined. Set aside. Cut the dough into 8 pieces. Stretch or roll each piece into a 4-inch circle. Form a higher edge around the perimeter of each circle. Spoon equal amounts of filling into the center of each circle. Place each filled circle on top of the parchment paper. Bake for about 15 minutes, until the edges are lightly browned. If desired, place an egg yolk and/or a small piece of butter on top of the filling if desired. Bake for another 5 minutes or until the pizza crust is browned.

Makes 8

Ataulfo Mango Carpaccio with Burrata

I had this for lunch again. If you’ve never feasted on slices of the ultimate ataulfo mango with the freshest burrata you are missing out on one of the most special and delicious meals ever. I garnished with a bit of red onion and mint, a squeeze of lime juice and some freshly ground pepper.

Heaven.

Ataulfo Mango Carpaccio with Burrata

  • 1 Ataulfo (or similar) mango

  • 2-3 ounces burrata cheese

  • a few thin slices of red onion

  • a few mint leaves

  • lime juice

  • freshly ground black pepper to taste

Slice the mango and arrange the slices on a dish. Add a piece of Burrata cheese. Garnish with some red onion and fresh mint, squeeze some lime juice over the ingredients, then season with the some freshly ground black pepper.

Makes one

Mushroom Pot Pie

If you’re looking for a fabulously delicious meatless meal, it doesn’t get better than Mushroom Pot Pie.

No more needs be said. Try it and see for yourself.

Mushroom Pot Pie

  • 2 tablespoons olive oil

  • 1 tablespoon butter

  • 1/2 cup chopped shallots

  • 2 medium garlic cloves, chopped

  • 1 pound mixed fresh wild mushrooms, chopped

  • salt and freshly ground black pepper to taste

  • 1 tablespoon all-purpose flour

  • 1 cup plain Greek yogurt or dairy sour cream

  • 1 cup vegetable stock

  • 1 tablespoon lemon juice

  • 1/4 cup chopped fresh parsley

  • 1 teaspoon fresh thyme leaves

  • 1/2 cup grated Parmesan cheese

  • 1 sheet puff pastry

Preheat the oven to 375 degrees. Heat the olive oil and butter in a sauté pan over medium heat. When the butter has melted and looks foamy, add the shallots and cook for 2-3 minutes, or until softened. Add the garlic and cook briefly. Add the mushrooms, salt and pepper and cook for 4-6 minutes or until the mushrooms are tender and all the liquid has evaporated. Add the flour and stir it to dissolve it completely. Add the yogurt and stir it into the mushrooms until completely incorporated as a sauce. Pour in the stock and lemon juice and mix the ingredients thoroughly. Add the parsley and thyme. Reduce the heat and simmer for 10-12 minutes or until the sauce has reduced has thickened. Stir in the Parmesan cheese, cook for another 1-2 minutes and remove the pan from the heat. Spoon the mixture into a 6-cup casserole dish. Roll the puff pastry slightly thinner and cut it to the shape of the casserole used. Place the puff pastry over the mushroom mixture. Bake for about 25 minutes or until the dough is puffed and golden brown.

Makes 4 servings


Pashtida

If you haven’t tried Pashtida, you’re missing out. This dish — so popular in Israel — is kind of like a cross between a quiche, a frittata and a kugel. Sometimes it’s made with meat, sometimes dairy and sometimes just vegetables. Any way at all — this is one delicious treat!

Pashtida is filling and hearty enough for dinner (add a side salad) but light enough for lunch. It’s also the kind of dish that’s made for weekend brunch. Leftovers are good too — easily reheated for weekday breakfast.

If you’re looking for a new dairy dish for Shavuot (and, thinking ahead, during the Nine Days or for your Break-the-fast) I encourage you to try this one. My recipe is a melange of eggs, cheese and veggies that you spoon into a casserole and bake until the eggs are set and the top is crispy.

This dish is also amazingly versatile, so I’ve listed a variety of options for substitution.

Vegetable Pashtida

  • 1 large Yukon Gold potato, peeled and diced

  • 1 tablespoon butter

  • 1 tablespoon olive oil

  • 1 medium onion, chopped (3 scallions; 2 shallots)

  • 1 cup chopped fresh: spinach; kale; (diced) zucchini; or chopped cooked veggies (such as green beans, carrots, bell pepper, asparagus; eggplant); or thawed frozen peas or corn

  • Halved mini-tomatoes (such as grape or cherry; about 7-8); chopped sun-dried tomatoes, optional

  • 4 tablespoons cream cheese, cut into small pieces (or 1/3 cup dairy sour cream or 1/2 cup cottage cheese)

  • 5 large eggs

  • 1 cup whole milk or half and half

  • 1/2 cup shredded meltable cheese such as Swiss, cheddar, Havarti or mozzarella

  • salt and freshly ground black pepper to taste

  • 2 tablespoons chopped fresh parsley (dill, basil)

Preheat the oven to 375 degrees. Lightly grease a casserole dish (such as approximately 8”x 6” or a 6-cup round) and set aside. Cook the potatoes in lightly salted boiling water for about 3 minutes or until barely tender. Drain and set aside. Heat the butter and olive oil in a sauté pan over medium heat. When the butter has melted and looks foamy, add the onion and cook for a minute. Add the potato and cook for 5-6 minutes or until the pieces are lightly crispy, stirring occasionally. Add the vegetables and cook for 2 minutes, stirring occasionally, until they have softened. Add the tomatoes, if used, and cook for another minute. Add the cream cheese and continue to cook and stir until the cheese has melted into the vegetables. Remove the pan from the heat and let the ingredients cool slightly. Beat the eggs and milk together and pour over the vegetable-cream cheese mixture. Add the shredded cheese and stir gently until the ingredients are evenly distributed. Sprinkle to taste with salt, pepper and parsley. Spoon the ingredients into the prepared casserole dish. Bake for about 45 minutes or until the eggs are set and the top is crispy.

Makes 4-6 servings

Grilled Carrots

I always think of Memorial Day Weekend as the start of the official grilling season where I live. Silly, maybe. Lots of people I know grill year round. But I don’t like being outside cooking chicken breasts or hamburgers when the weather is what the weather is in Connecticut during the winter.

So — the grill is open now, thanks to warmth and sunshine.

This recipe for grilled carrots is my official start to the official start of grilling season. We’ve eaten the carrots hot, with the cold sauce. We’ve eaten the leftovers at room temp, with the cold sauce. Winner, either way.

Also - you can cut the carrots into smaller pieces and use them with the sauce, for crudites.

Grilled Carrots with Yogurt Sauce

  • 1 dozen medium carrots

  • 1-1/2 tablespoons olive oil

  • 1 cup plain Greek style yogurt

  • 1-1/2 tablespoons lemon juice

  • 1 teaspoon grated fresh lemon peel

  • 1/4 teaspoon Aleppo pepper (or use crushed red pepper)

  • 3 tablespoons chopped fresh mint

Preheat an outdoor grill to medium heat. Peel the carrots and coat them with the olive oil. Grill the carrots, turning them occasionally, for 12-15 minutes, or until browned and tender. While the carrots are cooking, mix the yogurt with the lemon juice, lemon peel, Aleppo pepper and 2 tablespoons of the mint. Serve the carrots with the yogurt sauce. Sprinkle with fresh mint.

Makes 4-6 servings

Strawberry Pavlova

If you’re like everyone else who observes Passover, you’ve used a lot of eggs during the holiday!

Our usual family Passover menus use up more yolks than whites, so I’m always left with a load of egg whites. So, because I am one of those “waste not want not” people, I recently made a lot of meringues and meringue cookies and these Pavlovas.

Pavlovas, which are hard meringue shells filled with fruit, lavished with sauce and topped with whipped cream, are sugary sweet and you can do a lot with them. They’re also easy to make and are terrific for Passover because there’s no flour or any other ingredient we can’t eat during the holiday.

The meringue shell-cream-fruit dessert is named after a famous Russian ballet dancer named Anna Pavlova (1881-1931). Food historians say that a hotel chef in either Australia or New Zealand named the dessert after her visit there in 1926. The white meringue shell is said to mimic her tutu and in the original recipe, the shells were filled with kiwi fruit, in imitation of the decorations on one of her outfits. But any soft fruit will do.

Note: for more on beating egg whites properly, click here.

Pavolvas

Meringue Shells:

  • 4 large egg whites at room temperature

  • 1 tablespoon lemon juice

  • 1/4 teaspoon salt

  • 1 cup sugar

  • 3/4 teaspoon vanilla extract

  • whipped cream

  • sliced fruit such as strawberries, kiwi fruit, bananas, etc.

Preheat the oven to 275 degrees. Line a cookie sheet with parchment paper. Beat the egg whites in the bowl of an electric mixer with whisk attachment set at medium speed until the mixture is foamy. Add the lemon juice and salt and beat, gradually increasing the speed, until soft peaks form. Gradually add the sugar (2 tablespoons at a time) and the vanilla and continue to beat, gradually increasing the speed to high, until the mixture stands in stiff, glossy peaks. Spread 8-10 equal amounts of the meringue mixture onto the sheet. Flatten the mounds with the back of a large spoon, leaving the edges slightly higher. Bake for 45 minutes. Reduce the oven heat to 250 degrees. Bake for another 15 minutes. Remove the cookie sheet to a cake rack to cool. Gently release the meringues from the parchment. Fill the centers of the meringue shells with whipped cream. Top with sliced fresh fruit.

Makes 8-10

Eggplant Parmesan

IMG_3986.jpg

When I need a meatless meal, Eggplant Parmesan is one of my traditional go-tos. It’s familiar, relatively easy to prepare and you can cook it in advance and freeze it for about a month. Best of all, it tastes really good.

I especially love this dish in the summer when my garden is in bloom with thick, fresh purple eggplants!

The recipe below lists one cup of marinara sauce. I make my own and freeze that too. But in a pinch, store-bought works too when you want to make things easier on yourself.

Another thing that’s easy -- and less caloric too -- I roast the eggplant slices instead of breading and frying them.

Eggplant Parmesan

  • 1 medium to large eggplant

  • salt

  • 5 tablespoons olive oil, approximately

  • 1 cup marinara sauce

  • 15 ounces ricotta cheese

  • 1/4 cup plus 1/4 cup plus 2 tablespoons grated Parmesan cheese

  • 1 large egg

  • 2 teaspoons chopped fresh oregano (or 3/4 teaspoon dried)

  • 1 cup shredded mozzarella cheese

Preheat the oven to 400 degrees. Slice the eggplant about 1/8-inch thick, sprinkle with salt and let rest for 20-30 minutes. Wipe the eggplant slices dry and place them on a baking sheet. Brush each side of each slice of eggplant with a film of olive oil. Roast the slices for about 15 minutes, turning them once, until they are softened and lightly browned. Remove the slices from the oven. Place 1/2 cup of the marinara sauce in a baking dish. Place 1/3 of the eggplant slices in top (overlap the slices slightly). Mix the ricotta cheese with 1/4 cup of the Parmesan cheese, the egg and oregano. Place half of this cheese mixture on top of the eggplant slices. Sprinkle with 1/4 cup of the shredded mozzarella cheese and 2 tablespoons of the Parmesan cheese. Add another layer of eggplant slices. Cover with the remaining ricotta cheese mixture. Spread with the remaining (1/2 cup) marinara sauce. Cover with the remaining eggplant slices. Sprinkle with the remaining (3/4 cup) mozzarella cheese and the remaining (1/4 cup) Parmesan cheese. Bake for 20-25 minutes or until the cheese has melted and is beginning to turn lightly brown.

Makes 4 servings

The Benefits of Buttermilk: Summer Buttermilk Soup

8CFD4F27-DC5B-4C0E-84D9-1472A60AB802_1_201_a.jpeg

Buttermilk makes you beautiful.

So they say.

I once read that Mark Antony fell in love with Cleopatra because she had silky, radiant skin -- thanks to baths in buttermilk. And that Scarlett O’Hara apparently used buttermilk on her face to get rid of her freckles.

Me? Silky and radiant? Not lately (if ever).

Also I have too many freckles to even contemplate rubbing them out. Also, I think freckles are cute.

So no, for me buttermilk isn’t about its beauty functions.

It’s about food.

No surprise there, right?

You heard it here: buttermilk makes a lot of food better, more delicious, more perfect in texture.

Buttermilk makes one of the tastiest, most satisfying, most thirst-quenching drinks (lassis).

It adds a whole new dimension to ordinary cole slaw.

Want moist, tender muffins, scones and pancakes? Make them with buttermilk. Ditto Cake! Pie! Even pudding!

And especially, at this time of year: make satisfyingly creamy, low-fat, low-calorie summer soups like this one, based on cucumbers.

Cold Cucumber-Buttermilk Soup

  • 2 medium cucumbers

  • salt

  • 1 stalk celery, peeled and chopped

  • 2 scallions, chopped

  • 1 clove garlic

  • 1 teaspoon chopped fresh chili pepper, optional

  • 1 cup buttermilk

  • 1/2 cup plain yogurt

  • 3 tablespoons lemon juice

  • 2 tablespoons chopped parsley

  • 1 tablespoon chopped fresh dill

  • Aleppo pepper (or use freshly ground black pepper)

Peel the cucumbers, slice them in half lengthwise and scrape out the seeds. Sprinkle the cucumbers with salt and let them stand for 30 minutes. Wipe the cucumbers with paper towels. Chop the cucumbers into coarse chunks and place in a blender or food processor. Add the celery, scallions, garlic and chili pepper, if used, and process to mince them. Add the buttermilk, yogurt, lemon juice, parsley and dill (use a large bowl and whisk if your blender or processor isn’t large enough) and process until well blended. Season to taste with salt and either Aleppo or black pepper. Chill thoroughly before serving.

Makes 4-6 servings